View allAll Photos Tagged tutorial
This is a visual of one way to improve dark eyes. There are several other things you can do including using a hue/sat adjustment layer combined with it's mask to eliminate color in the whites of the eyes. It's not shown here. LARGE IN SEPARATE WINDOW
So I finally completed a tutorial on the tree technique used in some of latest MOCs and you can find it here:
Feel free to let me know what you think of it, and if there's anything that can be improved upon. Hope you will like it and find it useful :)
Planning on making a few more tutorials that some of you have requested, now that I have some time, so keep an eye out for them :)
Few people were interested about the 'acrylic' fake nails I made for my Zero, so I decided to make a tutorial so everyone can make their dolls some fancy nails.
You can make any kinds of fake nails with this method, and maybe use other material than straw, but I this is just how I do it.
Hope this is helpful!
A tutorial to show how to use the kemono eyes on other heads :D (you can't use the eyes on all the heads, but it will work for most of them)
The eyes textures shown are the Cyber Flux from Mynx Legend
CaptainDiamond36 asked for a tutorial on how to build the floor I used in several vignettes like Sudden Trouble or Boarded!, so here is a little bit of instruction.
The technique is rather easy. You just need a lot of grill tiles, a few 2x3 plates and several 1x2 and other 1xY tiles, along with a simple SNOT base. The size of the base is variable and the number of panels you use is totally based on how large the floor should be. I don't know exactly how many panels make a certain number of studs in length, so you just have to try it out, if you are building larger or smaller than this.
I hope this tutorial helps. Please, let me know, if you want to see more instructions like this for the techniques I use.
I forgot to add that before you flatten the image, you can also reduce the opacity on the layer....sorry! :)
If you liked my bridge from Tōzoku Hideout, then should find this tutorial useful.
Check it out on Brickbuilt!
Tutorials | Creations | Featured Tutorials | Build Logs | Commissions
Four more designs are covered in the latest tutorial on Brickbuilt!
Tutorials | Creations | Featured Tutorials | Build Logs | Commissions
6 more designs explained in our latest tutorial.
Tutorials | Creations | Featured Tutorials | Build Logs | Commissions
I have done a daily building tip video tutorial for a month straight now!
It has been super fun, and to top it all I decided to make the biggest tutorial so far, after several requests for kitchen related builds!
It all started with the sink, then the modular idea came about.
Video building instructions here:
Subscribe on YOUTUBE for daily LEGO building tips:
Follow me on INSTAGRAM:
There is a tutorial of my pine trees used in my recent built up on Brickbuilt if you are interested!
Do you know how to add stars to an empty night sky in Photoshop? Do you have a full sized Milky Way image to use in such cases? On my blog I've created a quick tutorial with step-by-step instructions on adding stars to skies and I've included a free, full-sized Milky Way photo for you to use
www.throughstrangelenses.com/2013/06/11/tutorial-adding-s...
step one: extrude strands of the desired thickness in your chosen colour and cut lengths of about 2.5 cm with a craft knife or a tissue blade.
step 2: take one of the cut lengths and push the ends together to form a loop. repeat.
group the loops together as shown.
step 3: take a length of extruded clay and lay it across the group of loops as shown.
step 4: using the back of the blade deeply indent the clay making sure the indents are aligned with the centre of the loop.
step 5: i flatten the tails of the loops with a cocktail stick. this ensures each line of loops will lie reasonably flat. if you are making long lines you will need to do
this bit at a time. be carfull you dont mark the 'stitches' with your fingers/nails as you roll the cocktail stick.
repeat steps 1 to 5
step 6: place one line of stitches overlapping the flattened tails of the loops.
you can use this effect on its own or experiment with knitted cables, plaits etc.
if you have any questions or anything seems unclear please dont hesitate to ask : )
I've written a tutorial that could help give you even more control over your images under conditions that can either ruin a photo or help to create a vibrant photo. This is a technique I use a lot..See the link below to learn how to be completely free from lens flare without using filters.
Link: www.throughstrangelenses.com/2013/06/29/tutorial-how-to-r...
Hi Bee's
No Fofurice Rules tem Nail Art de corujinha, super TENDÊNCIA!
Muito fofinha :3
No post eu também falo sobre a caneta mais cobiçada do mundo HAHAH
Pra conferir o post é só clicar: FOFURICE RULES ♥
Ou ir direto ao vídeo:TUTORIAL ♥
Qualquer dúvida só falar,
XOXO ♥
_______________________________________________________________________________
@deborawernke (\_(\
If you haven't seen yet, the amazing Anne has a digital painting tutorial out. I spent the day going through it and this is the result! :) I'm really happy with it, though I did make a rookie mistake and didn't noticed I hadn't taken the picture in HD until it was too late!
If you like it here's a beginning to either finish or experiment. If you'll notice the strip in the photo, it shows before the process.
1. Duplicate background layer twice (command/control + j twice will do it).
2. Click, choosing "Layer 1", and go Image > Adjustment > Desaturate (Or make it black and white anyway you want to).
3. Click and choose "Layer 1 copy" and put that in "softlight" blending mode using the Layer Pallet drop down menu.
4. Go to the Channels Pallet and command/control click the RGB channel, getting a highlights selection.
5. Go back to the Layer Pallet and "Layer 1 copy" should still be chosen ( You can tell it's chosen because it'll be highlighted with some color), and again do command/control + j. This creates "Layer 2" from your selection and it's in "softlight" blending mode.
6. Go back to Channels pallet and command/control click the RGB layer, getting the highlights selection again. Invert the selection by either going to Select > Inverse or use the keyboard shortctu of command/control + shift + i
7. Add a hue/saturation adjustment layer and set the saturation to +50 and Lightness of -10.
I've created an action at www.allangengler.com/my_actions if you're interested. BUT do it manually first so you can see the effects and maybe try creating your own action.
Tutorial for the well I used in my Nordheim Armory build is up now, check it out on brickbuilt: www.brickbuilt.org/?p=5260
Wahh I finally finished these few parts. Sorry for the long wait. i will continue to update the parts probably this weekend! ; - ; I hope you will like the tutorial > <
View it in original size!
Patrick B. shares his wooden wall technique in our latest Guest Tutorial on brickbuilt: tutorial link.
Requested by ShoelaceAglet on eurobricks.
Read the full tutorial on Brickbuilt.
Tutorials | Creations | Featured Tutorials | Build Logs | Commissions
Since many commenters seemed to enjoy the well I built for my Herbalist's Garden, here is a tutorial for it!
After a 20 month silence, dipping my toe nervously back into blogland... tutorial now posted here: listentothebirdssing.blogspot.co.uk/2014/04/bunnypouchtut...
Depois de abrir as janelas e tirar as abas da caixa eu reforcei as laterais que ficaram fininhas demais com o próprio papelão das abas. Assim o mini studio não corre o rsico de "desabar"
If you like this one I have written 3 other tutorials which you can find >> here <<
---------------------------------------------------------------------------------------------------------------
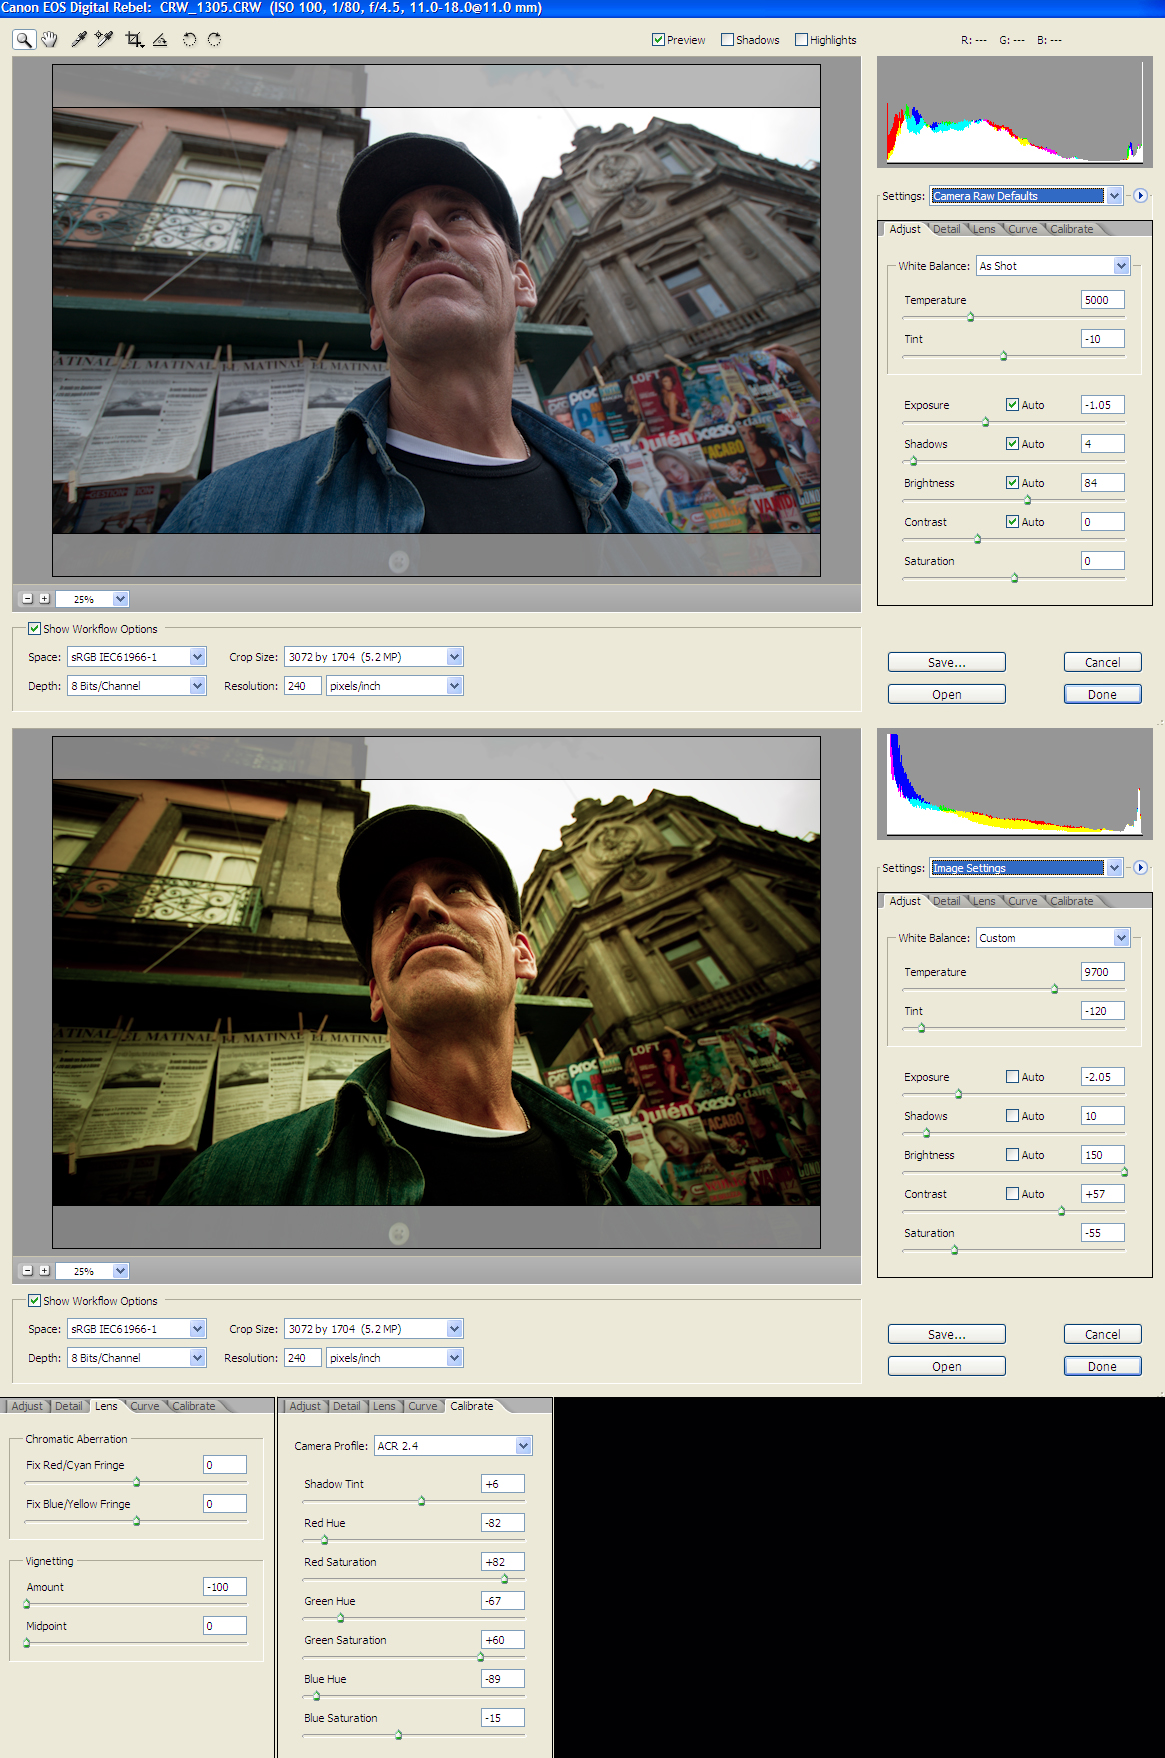
Some of you have been asking what I have been talking about when I've said that I've been using pixel blending to improve the exposure on some of my photos. Well here is the second of my attempts at writing a tutorial, this time on using "Pixel Blending".
I'm afraid this tutorial is only of use to those of you who shoot their images in RAW (and use Photoshop CS2), but if this applies to you or you're just interested please have a look through my tutorial in the comments section below. Any criticism or comments are welcome (I'm not an expert and always like hearing about new techniques)
Here is the other tutorial I have written if you want to look at that.
Made for Jeni for an ornament swap between a few of us friends. And a quick tutorial and templates for you! Blogged
Three more window designs are covered in this tutorial on Brickbuilt.
Tutorials | Creations | Featured Tutorials | Build Logs | Commissions
Here you can see the original photo and the color correction one, with all the RAW parameters. Hope you find this helpful.
Best View Original Size.
Here its the photo in full size
Photos from other people using this tutorial:
Clowning around by Nikonographer
mandolin LM green by adderall_223
If you use this tutorial on your photos it would be nice to add them here :), so let me know!
Need a new well design to spice up your medieval layouts? Check out this tutorial on Brickbuilt.
Tutorials | Creations | Featured Tutorials | Build Logs | Commissions
Our newest tutorial on Brickbuilt is another installment in our growing number of furniture tutorials.