View allAll Photos Tagged tutorial
Nothing like a steep learning curve that has you almost vertical. More than a handful of false starts but with very little determent. Got to animate it next. I love this! And I can only get better!
------------------------------
Some other albums of mine I hope you'll enjoy:
Bokeh
Twitter ID: erraticspace
Tumblr ID: space-rbo
Instagram (opens in same page!)
Instagram: My cat + friends
Instagram: Me - Non-cat stuff.
If you like this one I have written 3 other tutorials which you can find >> here <<
---------------------------------------------------------------------------------------------------------------
Some of you have been asking what I have been talking about when I've said that I've been using pixel blending to improve the exposure on some of my photos. Well here is the second of my attempts at writing a tutorial, this time on using "Pixel Blending".
I'm afraid this tutorial is only of use to those of you who shoot their images in RAW (and use Photoshop CS2), but if this applies to you or you're just interested please have a look through my tutorial in the comments section below. Any criticism or comments are welcome (I'm not an expert and always like hearing about new techniques)
Here is the other tutorial I have written if you want to look at that.
Three more window designs are covered in this tutorial on Brickbuilt.
Tutorials | Creations | Featured Tutorials | Build Logs | Commissions
It's been a few months since our last furniture tutorial, must be time for a new one!
Tutorials | Creations | Featured Tutorials | Build Logs | Commissions
I've made a tutorial which covers a variety of crate designs. I would appreciate it if you would check it out!
legohobbitbuilder.wordpress.com/2020/01/07/column-tutoria...
You can check also check out my work on:
Blog - legohobbitbuilder.wordpress.com/
Instagram - www.instagram.com/legohobbitfan/
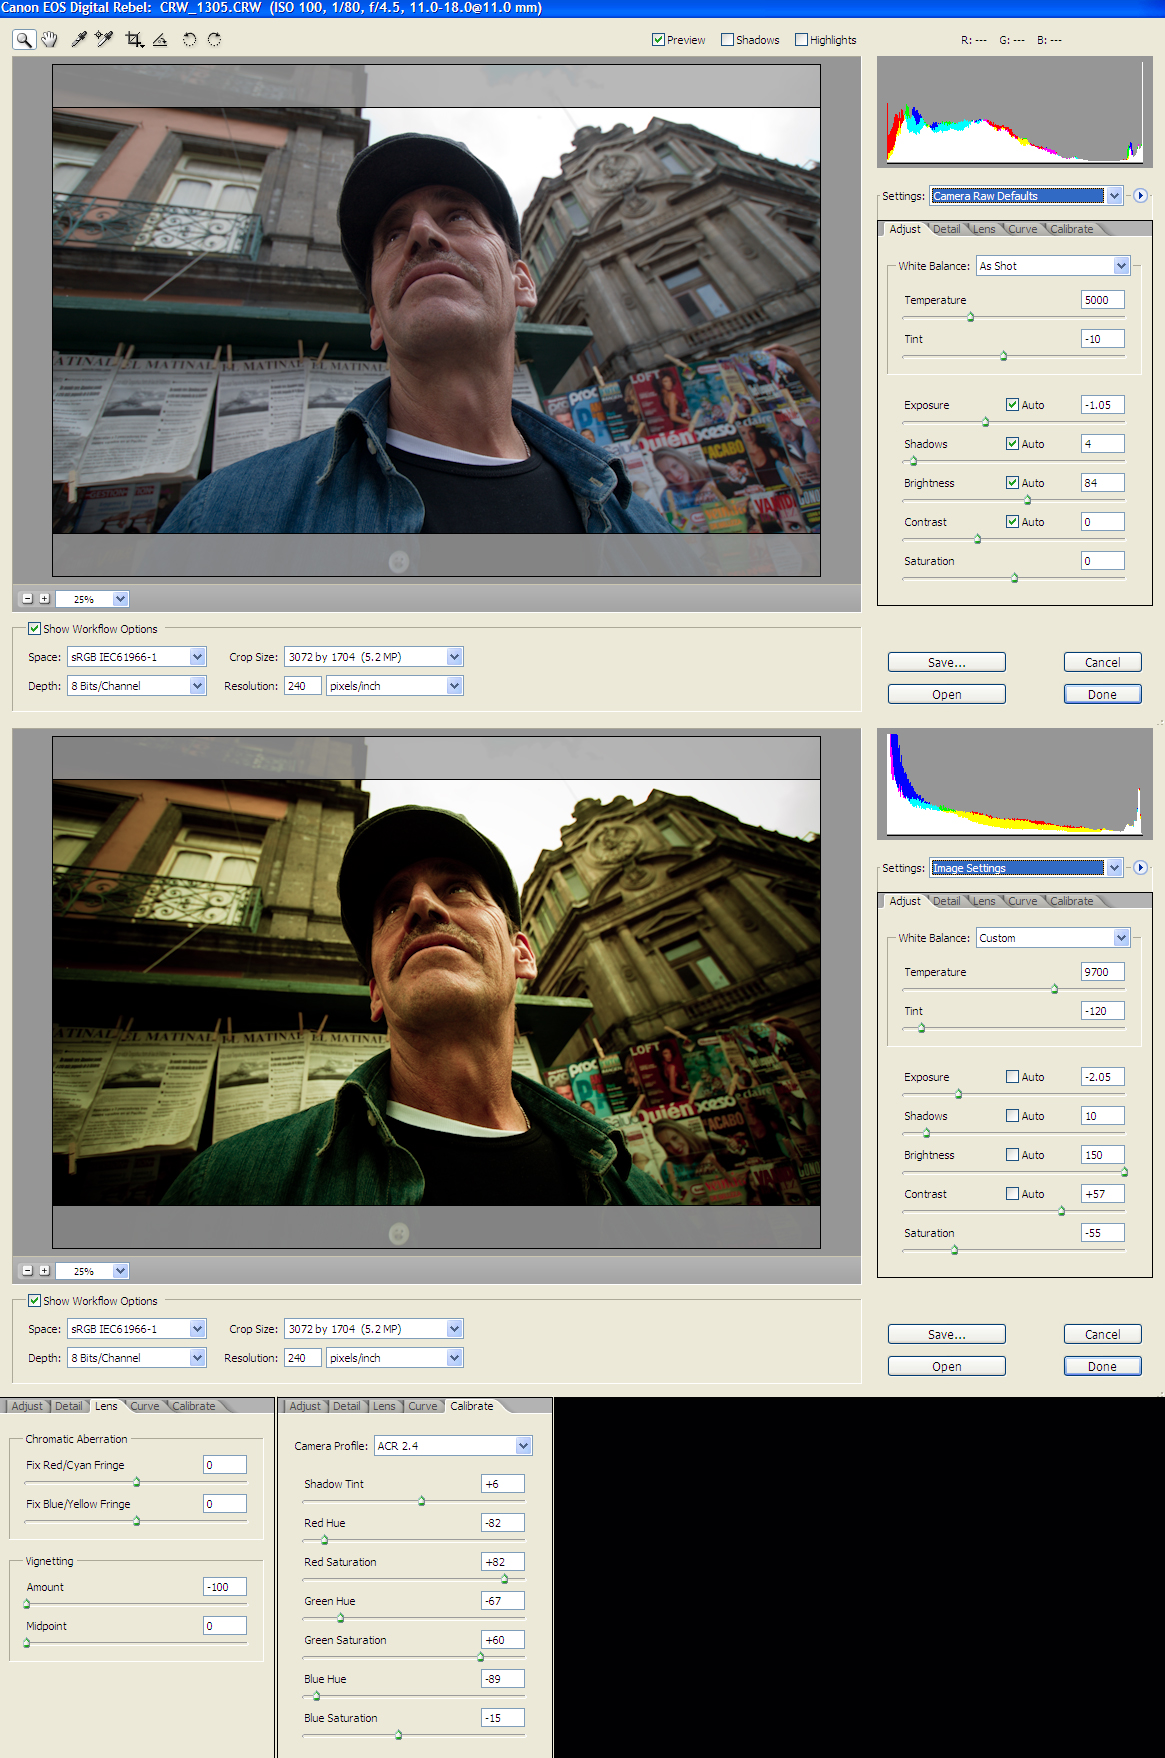
Here you can see the original photo and the color correction one, with all the RAW parameters. Hope you find this helpful.
Best View Original Size.
Here its the photo in full size
Photos from other people using this tutorial:
Clowning around by Nikonographer
mandolin LM green by adderall_223
If you use this tutorial on your photos it would be nice to add them here :), so let me know!
This is going to be my first visual tutorial about consciousness and awareness.
It is very easy because the pictures will speak for themselves.
Without words you will understand, what it all means.
Maybe you discover something very important for yourself... :-)))
If you like, ask yourself what you see and how you see.
Next picture tomorrow.
HKD
For the interested who did not see picture one and two...
This is going to be my first visual tutorial about consciousness and awareness.
It is very easy because the pictures will speak for themselves.
Without words you will understand, what it all means.
Maybe you discover something very important for yourself... :-)))
If you like, ask yourself what you see and how you see.
Next picture tomorrow.
HKD
More furniture designs are explained in our latest guide on Brickbuilt!
Tutorials | Creations | Featured Tutorials | Build Logs | Commissions
Se necesita 70 cm de alambre de 2mm de diametro.
Le debo este descubrimiento a Paula -Cruz, muchísimas gracias Paula , tu si que eres Super¡¡¡¡¡¡¡
Este tutorial también se lo dedico a calabacina www.flickr.com/photos/29534130@N04
Maria José, se merece esto y más, un beso.
I've seen so many photgraphs with really obvious problems that are difficult to fix, so I created a tutorial about one way to "blend" photographs semi-automated using Photoshop and the awesome masking abilities that many people are not familiar with.
One secret is that you can use this technique with 2 (or 3) versions of the same RAW file so that if you did not bracket the shot, you can still improve it using this technique.
Hope this helps.... maybe more will follow showing other techniques I employ on almost every image you see here....
-John
One of the fun things I'm doing over on Brick Fiend is Tutorial Tuesday. I'll be doing small little builds in four or five steps, that pretty much anybody can build!
Flickr will be getting them a week or so after the Facebook page will be, so go Like the page to get them when they come out!
Aquí tenéis un regalito, por si os viene bien para una pulsera como la de cuatro fotos más abajo
www.flickr.com/photos/alia_h/3664956304/in/set-7215760023...
(la idea la tomé de otra comprada):
1- Doblas el cordón, pero una parte debe quedar corta (algo más larga de la longitud real de la pulsera, y la otra al menos de 1´30 m., que es la que irá haciendo el entramado. Haces un nudo, donde luego enganchará el mosquetón. Entonces tienes dos cabos, el corto y el largo. Por cada uno de ellos enfilas el mismo número de bolas (ya calcularás tú, según sean las bolas y el tamaño de la pulsera).
2-3- Sujetas el cabo corto, y vas enrollando (por fuera) con el largo una bola de un lado y otra del otro, hacia arriba, haciendo zigzag, hasta llegar al principio.
4- Una vez en el principio, sigues dando vuelta con el cordón a las bolas, esta vez haciendo el zigzag al contrario.
Pero ojo, al principio del paso 2, debes dejar las bolas con un poco de separación entre ellas para que el cordón tenga un poco de espacio y luego no se quede muy rígida. Además, en el camino hacia arriba, la pulsera se va quedando retorcida, pero luego con la vuelta hacia abajo, las tensiones se van igualando y ya no se queda así.
Foto: Manuela Parreño
Pronto! Panô terminado, prontinho pra cobrir a minha caixa de disjuntores... assim que eu tiver coragem de colocar preguinhos na parede! =P
Tenho dois tutoriais de viés pra indicar, usei ambos no acabamento deste panô:
1) Básico, como aplicar e como fazer os cantinhos: www.pat.patches.nom.br/retalhos/dicas/acabamento.htm
2) Como finalizar o viés, para que não fique evidente onde começa e onde termina: eltallerdegeorgina.blogspot.com/2009/07/tutorial-bies-fin...
Este último é genial, recomendo.. a impressão é que não vai dar certo, mas funciona direitinho!
Beijos, Gi.
Work in progress. I have a super easy tutorial for putting a quilt like this together is just a handful of hours. See blog bettyninja.blogspot.com/2009/01/hot-pink-cross-quilt-bloc...
This is the basic form of the three largest trees in the Pool Party. Here's how I made it. See the comment below for instructions and links to larger images.
There are other methods of making trees with this technique. I'll talk about some of those later.
I had a request to show better how to make these trees. I do hope that this is easy to follow.
Edit: Here is a link to a photo with small leaves woven: www.flickr.com/photos/eilonwy77/7238222882/in/photostream
See complete set for other examples: www.flickr.com/photos/eilonwy77/sets/72157629804759804/
Soccer Grass Tutorial
Another grass tutorial from my Element Experimentation series. This grass is shorter and tidier than the wavy grass that I showed in my previous tutorial and looks more like what you'd typically find on a soccer field. You can find the tutorial here:
fullplatebuilds.com/2018/11/06/soccer-grass-tutorial/
Hope you find it useful :)
Hello Folks,
Repeatedly, I see our friends having problems understanding and making the best use of Raw Conversion. There is actually a lot that can be done, while converting a raw file. If you can make the best of the tools available, you actually don't need to do much in post processing at all.
Here you may read the rest of the story if interested.
This was done in Photoshop CS2. I may at some point do a similar interface tutorial for CS3 if the interest level happened to be high enough.
Created following this tutorial www.youtube.com/watch?v=VXtR8WSciBo
I tried to follow along at actual speed, but I had to pause a few times to catch up.
I also used Sepia instead of Burnt Sienna, because that's the closest colour in my watercolour tin.
We have started a brand new feature on Brickbuilt: guest tutorials! Every month a guest will be contributing a new tutorial, and to kick things off, Joeri Ridder shared his beautiful tree design: tutorial link.
Omg it's finished!
This is the last part, i hope you will like it ^^
View it in original size~
How to view it in original size:
Right click on the picture --> View all sizes: click on "Original" at the right side.
pues estos pendientes son los que he hecho para un vídeo demostrativo,
tutorial youtu.be/6AgWFBnr2tw
tambien podeis verlo en el apartado de esquemas de mi blog www.cristinarugar.blogspot.com
here is what my book looks like after all the pages are decorated
tutorial here:
theadventuresofbluegirlxo.blogspot.com/2010/01/birthday-w...
Taking a look at a sci-fi design this week!
I used this technique in my last SHIP, and hope you all find it interesting.
Read the guide now on Brickbuilt.
Tutorials | Creations | Featured Tutorials | Build Logs | Commissions
A short tutorial on a type of leafy bush that I use quite often when building landscapes. It's quite simple and cheap, but looks quite nice and have an organic curve to it :) It can also be built to different heights for variation, and the top can be either rounded or pointed, depending on what look you're going for.
You can find the tutorial here:
fullplatebuilds.com/2018/12/07/leafy-bush-tutorial/
Hope you find it useful :)
Made an article/tutorial on how to use office and art supplied for product photography. Also how t create this kinds of shot. Head on over to petapixel.com/2016/05/09/use-office-art-supplies-product-...
for the whole article.
Strobist info:
Studiostrobe thru softbox and scrim subject right @ 1/16
Studiostrobe thru softbox and scrim back left of subject @ 1/16
White Fill card front left and right side of subject
blog.knottygnome.com/2013/04/rolling-diamonds-tutorial.html
if you downloaded prior to 4PM EST 04/30/13, i added another tip at the end on cutting the rectangles as a strip set. Sorry for any inconvenience!
Short and sweet guide for this carpet design has just been posted on Brickbuilt.
Tutorials | Creations | Featured Tutorials | Build Logs | Commissions
Bueno... Pues lo prometido... Aquí llega!!
Espero que os guste y lo disfrutéis! Si no entendéis cualquier cosa, preguntad o si veis algún fallo en el texto, igual.
Saludos y gracias a las visitas y comentarios que me habéis dejado!!!!
Aquí os dejo el enlace:
Aquí os dejo este tutorial de como he hecho las flores del Conjunto Alia.
Se necesita bote de plástico , tijeras y soldador. Es mucho más cómodo de trabajar y más seguro.
Se cortan los círculos con forma de pétalos.
Hacer el agujero del centro.
Acercar los lados de los pétalos al soldador y poco a poco se van encogiendo.
Cuando están los lados acercar el pétalo por la parte de arriba al soldador, empezará a encogerse, después pasarlo a la punta del soldador y se encogerá del centro. Haciendo la forma del pétalo natural,
Así con los 4 pétalos.
Volver a hacer lo mismo con un círculo más pequeño.
Unirlos con fornituras al gusto del artista.
Qué tengáis una primavera muy floreada¡¡¡¡¡¡
Wrote a short tutorial on how palm trees can be built.
This is by no means my design, or anything new for that matter. But I had to make a tutorial for it for a tree building workshop I held recently, so I figured I might as well post it :)
The design is rather commonplace I think and I have no idea who first came up with it, but when I was going to build one I wasn't sure how people had put the top together. I went with green flotation devices as the attachment piece for the leaves, which I suspect is not how it's usually done, but it works :)
You can find the tutorial here:
fullplatebuilds.com/2018/11/21/palm-tree-tutorial/
Hope you find it useful :)
El tutorial de esta flor ya está en la red, no estoy segura, pero creo que su autora es Naama Zamir. He hecho las fotos para un mural para el puesto en el Mercado Artesanal y lo comparto por si alguien no lo conoce aún :)
Muchas gracias a Naama, por su generosidad.
~ EXPLORED # 116 ~ Best view large.
1. Roll out some sugarpaste and cut them using three sizes of daisy cutters.
2. Cut out two sizes of large, two medium and three small daisies.
3 With a ball tool,gently draw each petals from the centre out to the tip to lengthen and widen.
4 Gently curl out from the tip in towards the centre to cup the end.
5 Petals are ready to be arranged.
6. Arrange the petals according to the sizes from large to small in a pallete.
7. Cup the ends more, to create a tighter array that hides the centre of the flowers.
I hope the tutorial and the instruction would benefit you . all the best everyone..:)