View allAll Photos Tagged patternedpaper
I was inspired to create this card for Daria's (djc's) SOF11 White Negative Technique Challenge and Stamping A to Z's B is for... (background stamping), C is for... (ColorBox), and D is for... (distress) Challenges.
The focal piece is made from 140# cold-pressed Canson Montval watercolor paper. First, I stamped Impression Obsession E8175 Maple Leaf twice using ColorBox Frost White pigment ink. Then I heat embossed both leaves using Ranger clear embossing powder and Heat It craft tool (heat gun), as per the instructions for Daria's white negative challenge.
Next I applied Worn Lipstick and Spiced Marmalade Distress Inks directly to my non-stick craft sheet. I spritzed with water from a mini-mister until the ink beaded up. Then I dipped the watercolor paper face down into the ink, twisted it, and turned it right side up. I wiped off the embossed areas with a paper towel and then dried the ink with my heat tool. Once the embossed areas were cool again, I dipped the panel back into the ink and repeated the process until I got a distressed, watercolor background look that I liked.
Next I used Tsukineko sponge daubers to apply Spiced Marmalade, Worn Lipstick, and Tea Dye Distress Inks around the leaves themselves. This also helped me get ink into the areas in the leaves that are not embossed.
I stamped the music from Hero Arts CG279 Musical Clef repeatedly using Worn Lipstick Distress Ink to get a "background stamped" look. I used a border punch along the sides and finished with pink embroidery floss. I adhered the focal panel to a card base from yellow BoBunny Double Dot paper.
Thanks for looking! :-)
Day 14
Inspiration : Who
Journaling reads:
"i am...
...currently 30 years old - EEK! ... using an old photograph ... missing my gram every.single.day ... trying to figure out what i want to be when i grow up & how to get there ... more in LOVE than i EVER thought possible ... enjoying puppy parenthood ... splurging on art supplies from papertrey ink ... obsessed with instagram & taking photos of everyday things ... addicted to diet coke, probably too much so ... enjoying the process of making my house a HOME ... learning i have a LOT to learn ... embracing change. 5/14"
Thanks for looking!
Created for the Lawn Fawn & Operation Write Home Challenge.
More details blogged here: randomchaoslife.blogspot.com/2012/09/lawn-fawn-operation-...
Supply list available on my blog as well.
Thanks for looking!
International giveaway from Debra Glanz of The Paper Assembly.
Enter on the blog through December 7, 2014: www.allthingspaper.net/2014/12/the-paper-assembly-artist-...
I love this photo. The person in it with me brings so much color and fun to my life. I chose to use several bursts of color in this layout for different reasons. The green is loud...how we are together. The red patterned is busy...once again, how we are together. The yellow has such an organized pattern which totally represents how OCD we both are. These colors make me happy...just like this girl.
This is the digitally stitched version but you can see each of the individual pages in my gallery.
You can also see more details in this blogpost: randomchaoslife.blogspot.com/2011/02/day-seven.html
Journaling reads:
"We hold hands because you can't hug and walk at the same time.
Matt took this picture of Laura and me as we explored downtown Marietta.
Our friendship is much like the bridge we're on : long, strong and incredible.
I don't see her nearly enough. I love the way we ALWAYS pick up where we left off - whether in person, on the phone or online.
She is my ROCK, my very best friend, my sister. She knows me better than most people. My world is complete with her in it.
I admire, respect and love her. She challenges me and always knows which questions to ask.
She brings so much fun, COLOR, and laughter to my life. Things are better when we are together. :)
7 February 2011"
Supplies Used:
Cardstock: Bazzill
Patterned Papers: My Mind's Eye, Basic Grey
Stamps: Hero Arts [CL146, CL493]
Ink: Versamark, Ink It Up!
Punch: EK Sucess
Embossing Powder: American Crafts
Adhesive: Tombow
Pen: Staedtler
A tutorial by Kristen Desrosier of LCI Paper.
Blogged: www.allthingspaper.net/2015/11/diy-holiday-printables-sim...
The photo to the far left is "less than stellar" to use Lain's words! It's not 100% clear, you can see the puppy-nose marks on the glass, etc. However, I felt like it was a good compliment to the other two photos and as also mentioned in the video prompt, it helps tell my story.
Journaling reads:
"Hercules & Harley LOVE the sun! They can sit, lay & sleep in the rays for hours! Hercules is the first one to lean against the glass door-he can't get close enough! Harley will lay in any patch she can find-usually on a pillow or stair. One thing is for sure : they are completely ADORABLE!! 2013-2014"
(I took the photos in 2013 but scrapped them for LOAD)
Supplies used:
Patterned paper: Doodlebug, Bella Boulevard
Cardstock: Bazzill
Letter stickers: American Crafts
Pen: Staedtler
Circle punch: Fiskars
Adhesive: Scotch, Darice
Thanks for looking!
I love wrapping packages for family and friends. That wise old saying from Acts 20:35, "It is more blessed to give than to receive", is so powerful and so true.
Giving is an energy-filled activity. It involves thinking about and understanding the wants, needs and preferences of the person who will receive the present. Time and energy are committed to purchasing or creating the gift ... packaging it creatively and beautifully ... photographing it to upload to Flickr ... delivering it ... and letting it go.
I believe that letting it go is the most important part. When I was in college, I loved the song, "Hold on Loosely", by .38 Special. I've never forgotten the following words: "Hold on loosely, but don't let go. If you cling too tightly, you're gonna lose control." Those lyrics refer very effectively to relationships, but they apply just as easily to things.
Let go. Let 'em open it any way they want. If they appreciate your efforts ... and carefully deconstruct each element ... great ... don't rush them. If your creative expression completely misses their radar ... and they rip into the package like a kid at Christmas ... great ... be inspired by their zeal. Just enjoy the process, and enjoy the recipient's response ... whatever it is.
Once you hand it to them ... it's no longer yours ... it's theirs! That's what giving is all about. Besides, in our digital world, you're only one click of the shutter release away from sharing your creative talents with everyone on the planet ... "If you upload it, they will come."
Creating this gift was fun. The contents? A book for my nephew, Michael. The cover? A simple, elegant patterned paper from Paper Mojo adorned with three red oak leaves ... two spray-painted copper and one painted a rich gold ... gently suspended from a bow of braided cord from Wal-Mart. The leaves are gifts from the tree just outside my front door.
Expensive? No. Expensive looking? I'll let you be the judge. Though it really doesn't matter. I'm very pleased with the results.
Oh, and see that glimpse of green and cream stripes over to the left? I created that pattern in Photoshop, had it printed up at our local print shop at 100% and 85% to produce dark and medium green patterns, and used it to wrap two gifts. It cost me a dollar, yet the paper was unique and beautiful.
Cultivate your creative side. That nurturing will reward you and others many times over. Merry Creative Christmas!
~s
I've had so much fun creating my own snowmen!!! Love this clear set of stamps!! After stamping the snowballs, I glued them onto vintage text paper which I had glued to white CS. The snowman is mounted with foam tape. Each snowflake has a touch of Crystal Stickles in it's flower's center. The same was used on the eyes and top of his head. Mouth and holly berries were made or highlighted with Stickles xmas red. Hope he / she makes you smile and warm all over ; D
Hero Arts CL368, CL183 (snowflake centers)
PP: Cosmo Cricket , K&Co
Martha Stewart snowflake punch
Stickles Crystal, xmas red
Copics: Y21, G07, BG10, BG72, R29, RV14
Included in 5 Jewelry Artists Who Make Stylish Paper Necklaces and Earrings: www.allthingspaper.net/2017/06/5-jewelry-artists-who-make...
I started out inspired by Kristina's card from day 4 of the Clean & Simple cardmaking class. And even though I ended up with something completely different, I really like how this turned out!
TFL!
Day 4
Inspiration : Greed
[The background story]
I don't know that I'd consider myself greedy when it comes to art supplies, but I definitely want to have them all...so maybe that is greedy. I've tried really hard to focus on only purchasing those items that I know that I'll use, but I'm finding more and more, if it's made by Papertrey Ink, I'm going to use it one way or another.
Journaling reads:
"I can't even be mad at Sherry for getting me hooked on Papertrey Ink! Their stamps are flawless, their dies cut like butter, their color matching between papers, inks & buttons is incredible! I've quickly become obsessed and each month my wishlist grows. I'm addicted & I want it ALL!"
Supplies used:
Cardstock: Papertrey Ink [hawaiian shores]
Patterned paper: Papertrey Ink [soft stone, hawaiian shores], Studio Calico
Washi Tape: Love My Tapes
Buttons: Papertrey Ink
Die cuts: Sizzix [Limelight]
Circle punch: Marvy
Adhesive: Darice [pop dots], Glue Dots, Scotch, Xyron
Pen: Staedtler
Thanks for looking!
Just barely squeezed in a second card! Thanks again, Janet! More details are on my blog stampingandstitching.blogspot.ie/2012/06/90-minute-mayhem...
Supplies:
S5215 Clouds Background
CL599 Picnic
CL261 Woodland Creatures
CH173 Heart Accent Pearls
Card (white, blue, yellow and red), faded jeans distress ink, black ink, patterned paper, ribbon (thanks again, Linda!) and colouring pencils.
I love each of these tiny treasures...each one is soo different, but they are priceless - to me anyway!!
A layout about me almost being 28.
The journaling reads:
favorites: lowercase letters. diet coke. country music. flip flops. smiley faces. :) creating art. my cell phone. tomatoes. houndstooth. blogging. grey's.
daughter. sister. friend. employee. girlfriend. best friend. cousin. aunt. girl.
i am: spunky. creative. RANDOM. a lover of music. eclectic. caring. sunshine on a rainy day. optimistic. scared. outgoing. shy. risky.
likes: stamps. being different. the color orange. quotes. hooded sweatshirts. texting. bud light. ampersands. challenges. smiling.
fears: failure. not being financially stable. success. growing up. making the wrong decision. bugs.
learning: patience. change isn't always bad. life is a journey. it's okay not to know. who i am. to listen.
dislikes: lima beans. bad drivers. feet. negative attitudes. being tired. unloading the dishwasher.
goals: get back in shape. save money. be creative everyday. make things happen for me. get engaged.
I made this for a friend. Kinda simple, but I love the way it turned out!
The teal strip is raised with pop dots, even though it's hard to tell.
I also stamped the background stamp on one of Hero's orange envelopes and embossed it in clear before addressing it. I did however forget to take a picture before writing my friend's address!
Thanks for looking!
Supplies Used:
Cardstock: The Paper Company
Patterned Paper: My Mind's Eye
Stamps: Hero Arts [CL479, CL129]
Ink: Versafine
Pen: Sakura [Clear Stardust [over the large [happy birthday']]
Adhesive: Scotch, Scrapbook Adhesives
Included in 5 Jewelry Artists Who Make Stylish Paper Necklaces and Earrings: www.allthingspaper.net/2017/06/5-jewelry-artists-who-make...
Prompt 2 of the class was to record the best part of your day. I doodled mine and it has a bit of a double meaning..... love that quiet part of the day when the classroom is tidied up and quiet BUT lately, I find myself thinking about my 'future' home at such random moments! Sometimes it's a room or furniture or what flowers I want in my garden - it's my favourite part of the day!
I created this for Two Peas' Stamping A to Z Event. For the G is for... (Glossy Accents), H is for... (Hero Arts and heat embossing) and J is for... (jewels) challenges.
The focal piece for this card is Hero Arts H5396 Bird Garden, stamped using Versafine Onyx Black pigment ink onto 140# watercolor paper. After the pigment ink dried, I colored in the image using Prismacolor Premier colored pencils.
I used Spellbinders Nestabilities Classic Large Rectangles to die cut and dry emboss it, and Classic Large Scalloped Rectangles to die cut and dry emboss the matte. I wrapped the focal piece with Together Twine (baker's twine) from My Mind's Eye's Lime Twist collection, then adhered it to the matte. Then I added clear jewels from Hero Arts CH117 Assorted Crystal Gemstones.
The intaglio heart is punched from chipboard, and colored to match. I heat embossed multiple layers of ultra thick embossing enamel (UTEE) on top, using my Heat It craft tool (heat gun). I pressed Hero Arts H5261 Flourish Trio into VersaMark watermark ink to prevent it from sticking, and then pressed it into the still-warm UTEE, and left it there until the UTEE cooled. Once it was cool, I removed the stamp and had this great, handmade intaglio embellishment.
Background is paper from BasicGrey's Recess 6x6 paper pad. I adhered the focal image and matte, and then attached the intaglio heart with foam squares for dimension. Ranger Stickles glitter glue in Crystal (similar to Diamond) was used to accent the two blue birds. And, Glossy Accents was added to accent the purple butterfly.
Thanks for looking! :-)
This is a sample card for my WF12 Hidden Potential Challenge during Winterfest at Two Peas in a Bucket.
The background is made using acrylic paints on white cardstock to make a faux woodgrain. Once it was fully dry, I embossed it with my Scrollwork embossing folder, trimmed it to size, and mounted it to the chocolate card base.
The tree patterned paper is from Die Cuts With a View's (DCWV's) Green Stack (woodland theme). I die cut and dry embossed it with Spellbinders Nestabilities Labels Eighteen. Then I dry embossed it again using the Swiss Dots embossing folder.
I added burnt orange velvet rick rack by American Crafts and adhered the tree panel to the card base.
The bird is from Tim Holtz / Sizzix Caged Bird die - and it was a prize I won from Two Peas during the Stamping A to Z event (photo 4). (Thank you Two Peas, Tim Holtz, Ranger, and Sizzix!)
I used the die to cut the bird and wing from recycled cardboard from a cracker box. Then I dabbed it with a Ranger Paint Dabber in stream to coat it.
After the initial coat of paint was dry on the bird, I stamped music from Hero Arts CG279 Musical Clef cling set on the bird using Ranger Archival ink in sepia. I dried it with my heat tool. Then I spread a thin layer of Golden acrylic paint in iridescent pearl.
When that dried, I lightly sanded / distressed the piece with sandpaper. Then I dabbed a bit more of the original stream paint on top. I adhered the wing to the bird using Glossy Accents and set it aside to dry.
Once the bird was dry, I added a Dot Sparkler foil sticker that Daria sent me (photo 3). (Thanks Daria!) Then I used Walnut Stain Distress Ink on a sponge dauber to add detail to the top edge of the bird. Finally, I adhered the bird to the card base using foam squares for dimension.
Click here to see a close-up of the bird.
Thanks for looking! :-)
I was inspired to make this card for April's WSW12 Shabby Chic Challenge. Our instructions were to make a shabby chic style card that uses flowers as embellishments, uses ribbon or lace, has at least one button, has 2 to 3 patterned papers, and at least one stamped vintage image.
To make this card, I started by taking two Tim Holtz/Sizzix Floral chipboard die cuts - that were a gift from Jan (Far North) - and painted them with Distress Crackle paint. For the larger flower, I used Aged Mahoghany, and for the smaller, pointy flower I used Antique Bronze. Then I set them aside to dry.
Meanwhile, I inked Penny Black 40-110 Damask Pattern with Ranger Archival Ink in Sepia. I placed this large background stamp ink side up on my work surface, and placed a piece of kraft cardstock on top. I rubbed over the back of the kraft cardstock, to make sure the stamped image transferred. Then I lifted the kraft cardstock to get this pretty damask background and set it aside to let the pigment ink dry. (I am counting this as both my vintage stamp and as one of my patterned papers.)
Next, I took a piece of green patterned paper and stamped the "wishing you well" sentiment from Penny Black 30-103 Wishes using the same Sepia ink. Then I stamped a banner / pennant shape from Penny Black 30-104 Sweet Wishes around the sentiment. Once the pigment ink was dry, I trimmed the pennant shape with scissors. (The green patterned paper is the reverse side of Fancy Kewl Papers "Exquisite" by Michelle Coleman for Fancy Pants Designs.)
The lace was a gift from my friend Ann (lickeyan). The green button is from my stash and I strung twine through the button holes and tied it into a bow.
Once all the pieces and parts were ready, I adhered the lace to the damask piece. I intentionally placed the lace at an angle, which I repeated later when I adhered the pennant. Next I adhered the damask piece to a burnt orange card base. I adhered the pieces of the flower together using glue dots, and then I adhered it to the card base using Glossy Accents as a glue. Finally, I tucked in the sentiment on the pennant.
Thanks for looking! :-)
It has been so hard trying to get any crafting done lately, but was able to get the opportunity today.
This card was made using one of the wine labels Jacqueline sent awhile ago.
TFL
Unable to sleep at 3 in the morning - I decided to journal. I randomly chose the 'write a haiku' and spent ages counting the syllables (unable to really concentrate in between inhalers!) Finally happy I had it correct, I wrote it, committed it to my journal .... only to then reaslise the second line was missing two syllables :( I very nearly cried!
A little card I made for Bella Blvd's CHA trade show booth, using their yummy new collections 'Hello Beautiful' and a little 'Socialite'. :)
Photos by Stephanie, as blogged at Bella here: bellablvd.typepad.com/bella_blvd/2010/08/fridays-cards.html
I blogged it, too: michelleclement.typepad.com/blog/2010/08/hey-cupcake-bell...
Thanks for peeking! :)
Background is patterned paper by Kathy Griffiths for Provo Craft. I scored lines 1/4" in from each of the card's edges, but it is kind of hard to see in the photo.
Focal image is Dried Marigold and Tea Dye Distress Inks applied with blending tool and foam to a manila shipping tag over a non-stick craft sheet. Misted with water and dried using a heat tool to give it a watercolor look. Stamped grass from Hero Arts CL428 Earth Flowers over top with Tea Dye Distress Ink.
Stamped single flower from Hero Arts CG170 Wildflower Garden over top of that, using Dusty Concord Distress Ink. Trimmed to size and edged with Tea Dye. Cut a scalloped mat using a Spellbinders Nestabilities Classic Scalloped Rectangles die. Attached to card base with foam for dimension and added a bow.
"Note of Thanks" sentiment is from Hero Arts AR137 Script Sentiments (an Archiver's Exclusive set). It is stamped using VersaFine Vintage Sepia pigment ink on glossy cardstock colored with Ranger alcohol inks. It is also adhered with foam squares for dimension. Finished with 3 orange jewels from Hero Arts CH216 Sunshine Mixed Accents.
Thanks for looking! :-)
card and gift set using Lawn Fawn's Critters In The Forest, Love N' Breakfast,Teeny Tiny Backdrops, Sally's ABCs and Harold's ABCs
This is a close-up of the bird I made for my Bird in a Forest Card. You can see the stamped music and paint layers better in this close-up.
I made these cute little paper pumpkins out of patterned paper circles.
I put together a little 'tutorial' on how to make these cuties on my blog: sylviastamps.blogspot.com/2011/10/paper-pumpkins-wtutoria...
It's really super easy :)
finally finished my entry....I got a bit carried away - I think I ended up with like three more pages than I was supposed to - but it was my book...who cares?
I am one of those people who really enjoy Christmas. I enjoy it for many reasons, not least of all because I get to give gifts I have gathered throughout the year to my family and friends.
I shop for gifts all year around, and then hide them in places about the house where my partner won't find them (if they are for him) and in places out of the way for other recipients who might be visiting.
In the lead up to Christmas, my dining room becomes a wonderland of Christmas wrapping and trimmings which I joking call the Christmas Wrapping Bureau, as I usually end up wrapping all my partner's presents, and potentially my aged mother-in-law's gifts as well as my own. However another reason I like Christmas is that I love wrapping gifts, playing with ribbons and bright paper.
They are all done and are nestled under my tree, ready for Christmas Day!
This is the only LO I got done during the 2 weeks of Scrappin' Peeps' first Summer Camp. The challenge was to use weaving on a LO. I wove the background papers from strips of matching pp. It looks to me like a quilt I once made for DS.
DH & I cared for DGS for the first few weeks after his mom's return to work following his baby sister's birth, while his parents got finances together for 2 kids in daycare. I caught this shot as the guys were sharing some bonding time after playing hard outside. Thought I would surround them with things you'd find in a little boy's pocket - a marble, a key, a bottle cap, a frog, etc. Tag below says, 'These are the times that make us family' (sorry about the glaring photo!) and the journaling, on a tag under the photo, says, "Grandpa and ***** really like to hang out together. They don't have to be doing anything much to enjoy each other's company. G'pa is happy to just be *****'s chair! - March 2012 "
CS: Core'dinations; PP: Paper Pizazz, "Mixing Baby Papers"; handmade doily; journal card: Oriental Trading Co; "Moments" sticker, MAMBI,"Soft-Spoken" collection; airplane: cut from one of the tags in K&CO Baby Boy Tag Pad; frog: from packaging of an Englebright stamp set; arrow: CCK swap hostess gift; bottle cap: found item; butterfly: Recollections; marble sticker: Susan Branch; chipboard tag w/ wire: unknown mfr; clear sticker: Miss Elizabeth's "Family Fun"; red bird taken from an inchie made by Irmz; ribbon: from an Anna Griffin scrapbook kit; glue lines by Glue Dots; Penway All-purpose Glue
Done! This is what the tag book will look like, without the tags. If you want, you can use a square punch, or a knife/ scissors, to cut the top off the two middle panels, so the tags peek out. I forgot to take a picture of this stage, but you can see this tag book, for example.
Inspired by Two Peas in a Bucket's Stamping A to Z Event. For the N is for... Notions (rick rack), Q is for... Quirky, R is for Resist and Ranger, and S is for Sizzix and Spellbinders (Part 1) challenges.
The Christmas tree is from Hero Arts CL357 Holiday Dolls and is stamped on Sizzix Little Sizzlits patterned paper using Ranger Archival Ink in jet black. Xmas Red, Turquoise, and Silver Stickles glitter glue (by Ranger) accents were added to the tree. It is attached using foam for dimension.
The pink piece is from recycled plastic packaging. Various shades of Ranger alcohol inks were applied using a blending tool and felt over my non-stick craft sheet. I used blending solution and a paper towel to clean up the excess. Then, I used Ranger Archival Ink in jet black to stamp Hero Arts S5146 Bold Flourish on top and immediately wiped off the ink using paper towel as a resist (from Week 5 of Jennifer McGuire's Thinking Inking series). I turned it over so the non-inked side is face up and mounted it to a white paper backing. Then I die cut and dry embossed it using Spellbinders Nestabilities (Nesties) Labels Twelve.
The card base is made from navy cardstock. I stamped Hero Arts CG119 Flourish Background using Tsukineko VersaMark watermark ink (Hero Arts VC250). Then I heat embossed it with Ranger silver embossing powder and my Ranger Heat It craft tool (heat gun). The silver rick rack (notions) is from American Crafts.
Thanks for looking! :-)
"Thank you" sentiment from Hero Arts CL142 Thank You Messages. Used a Tsukineko sponge dauber (Hero Arts MI002) to edge the focal panel with Pumice Stone Distress Ink. Three crystal gemstomes from Hero Arts CH117.
Thanks for looking! :-)
The flower is made with layers of MMY patterned paper and foam tape On the largest layer, I filled in the circles with Copics, then highlighted the circles with Crystal Effects, What a yummy flower stamp to play with!!
HA CL375, CL181
Black versafine ink
Copic YR16, BG23
Quickutz embossing folder
Closeup of one of my lavender digital scrapbooking papers, Pattern Circles. You can read more about my Lavender scrapbooking and crafts trend report at: downloadcraftshop.com/scrapbooking-and-crafts-trend-repor...
TFL :D
I was looking through a few blogs the other day and one of them was Jacqueline's Craft Nest. I love the way Jaqueline creates such beautiful country looking cards. Anyway I decided to CASE one of her pretty bird cards she made recently. Seen here 1.bp.blogspot.com/-k9qUemBytOc/VdmVrRPTfOI/AAAAAAAAgGM/A6...
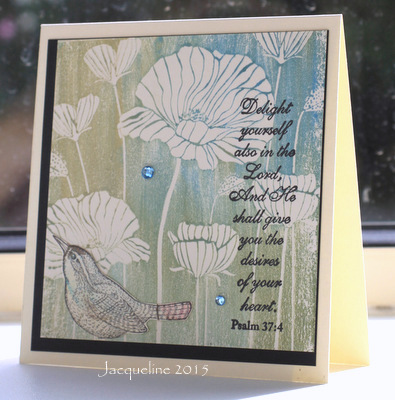
TFL
I love these new sticker bins. I noticed that the lables were left blank...seeing as I change my mind alot.
I am one of those people who really enjoy Christmas. I enjoy it for many reasons, not least of all because I get to give gifts I have gathered throughout the year to my family and friends.
I shop for gifts all year around, and then hide them in places about the house where my partner won't find them (if they are for him) and in places out of the way for other recipients who might be visiting.
In the lead up to Christmas, my dining room becomes a wonderland of Christmas wrapping and trimmings which I joking call the Christmas Wrapping Bureau, as I usually end up wrapping all my partner's presents, and potentially my aged mother-in-law's gifts as well as my own. However another reason I like Christmas is that I love wrapping gifts, playing with ribbons and bright paper.
They are all done and are nestled under my tree, ready for Christmas Day!
I seem to loose my clings now and again. I have even been to the Post Office to retrieve something I posted to see if the cling that I had wasn't clinging to the underside of the item! Now I had an idea with the peacock cling and couldn't find it anywhere - by luck I did find it because I had an idea. I have lots of colored embossing powder, like this pink that I used for this card - which I never use. Now I think I can make lots of quick cards and use up the embossing powder before it gets too old to use!
I have also never used this basic grey paper, now it has a home too.