View allAll Photos Tagged Tutorial
If you like this one I have written 3 other tutorials which you can find >> here <<
---------------------------------------------------------------------------------------------------------------
Some of you have been asking what I have been talking about when I've said that I've been using pixel blending to improve the exposure on some of my photos. Well here is the second of my attempts at writing a tutorial, this time on using "Pixel Blending".
I'm afraid this tutorial is only of use to those of you who shoot their images in RAW (and use Photoshop CS2), but if this applies to you or you're just interested please have a look through my tutorial in the comments section below. Any criticism or comments are welcome (I'm not an expert and always like hearing about new techniques)
Here is the other tutorial I have written if you want to look at that.
Made for Jeni for an ornament swap between a few of us friends. And a quick tutorial and templates for you! Blogged
Three more window designs are covered in this tutorial on Brickbuilt.
Tutorials | Creations | Featured Tutorials | Build Logs | Commissions
Olá minha gente!
Hoje eu trago pra vocês o tutorial dessas rosas lindas, quem quer aprender a fazer?
Vem ver! trioesmaltado.blogspot.com.br/2014/01/tutorial-rosas-azui...
It's been a few months since our last furniture tutorial, must be time for a new one!
Tutorials | Creations | Featured Tutorials | Build Logs | Commissions
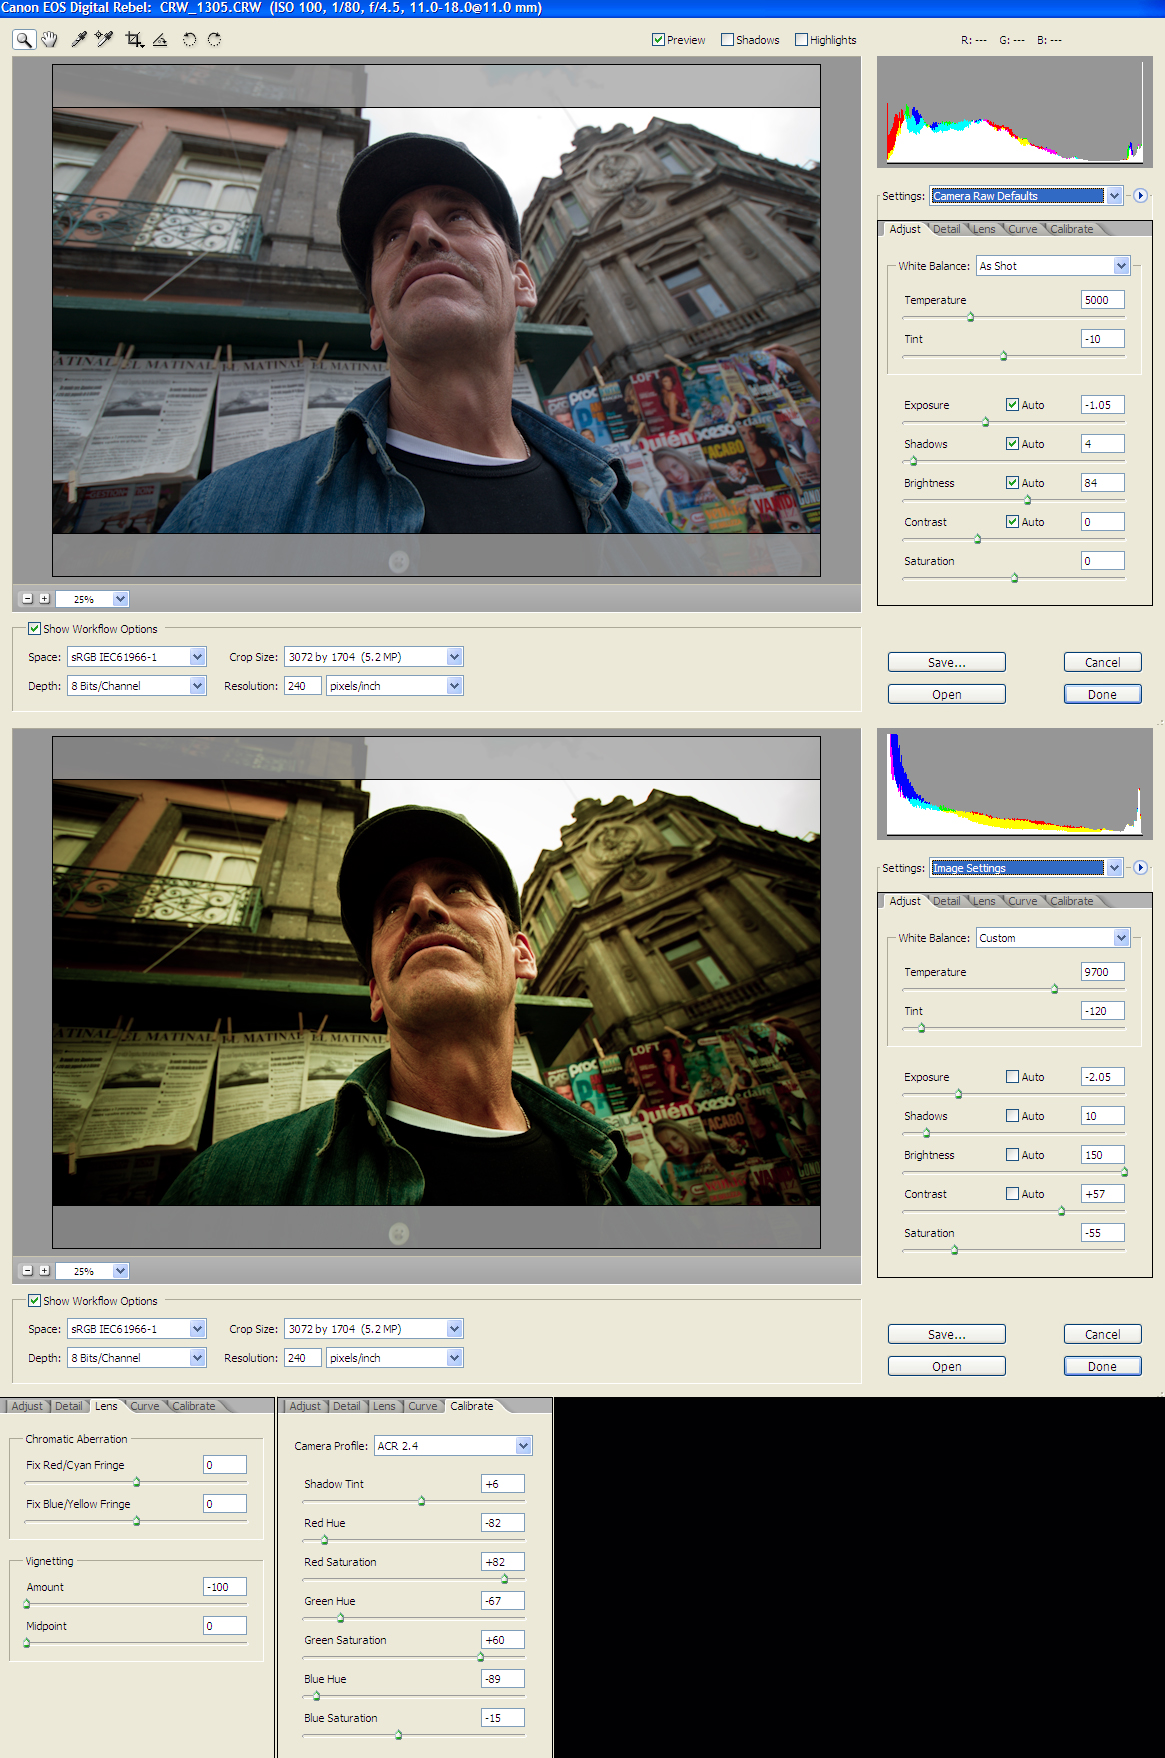
Here you can see the original photo and the color correction one, with all the RAW parameters. Hope you find this helpful.
Best View Original Size.
Here its the photo in full size
Photos from other people using this tutorial:
Clowning around by Nikonographer
mandolin LM green by adderall_223
If you use this tutorial on your photos it would be nice to add them here :), so let me know!
Se necesita 70 cm de alambre de 2mm de diametro.
Le debo este descubrimiento a Paula -Cruz, muchísimas gracias Paula , tu si que eres Super¡¡¡¡¡¡¡
Este tutorial también se lo dedico a calabacina www.flickr.com/photos/29534130@N04
Maria José, se merece esto y más, un beso.
I've seen so many photgraphs with really obvious problems that are difficult to fix, so I created a tutorial about one way to "blend" photographs semi-automated using Photoshop and the awesome masking abilities that many people are not familiar with.
One secret is that you can use this technique with 2 (or 3) versions of the same RAW file so that if you did not bracket the shot, you can still improve it using this technique.
Hope this helps.... maybe more will follow showing other techniques I employ on almost every image you see here....
-John
One of the fun things I'm doing over on Brick Fiend is Tutorial Tuesday. I'll be doing small little builds in four or five steps, that pretty much anybody can build!
Flickr will be getting them a week or so after the Facebook page will be, so go Like the page to get them when they come out!
So you've recently purchased a Rapunzel doll. You don't want to keep her in the box, but you also don't want her hair to be a hot mess after a few days of pictures and playtime. Well fret no more! Here is a solution to all your hair raising problems! A braid that is beautiful, and movie accurate! =D
Step One
Separate her hair into sections depending on how many braids you want in her hair. I have mine divided into 5 braids; 2 small, 2 medium, and one large braid. I have done 4 braids so far, leaving the one section in the front for that little curve that she has in the movie.
Step Two
Comb or brush out the last section of un-braided hair till its nice and straight. Simply hold the hair and gently fold in and clip it. I have two angles of that sectioned hair, so hopefully it is easy to understand.
Step Three
While the Section is clipped up, you should braid it. Instead of dividing it in 3's like the other braids, I have done a simpler braid with just two. It doesn't really change the over-all look, it was just easier to do.
Step Four
The final and easiest step! Now that all the hair is braided and banded, You just have to make one huge braid out of the smaller braids to complete the look.
Some random notes
- To make the process a little bit easier, spray the hair with some water. That way, the hair won't tangle as easy. and the braiding process will be much faster.
- For a really complete look. go out and buy some small flowers to put in her hair! I've seen some people online who have done that (and they look fabulous!), but i just cant find fake flowers that small anywhere. I don't think I'm looking hard enough. lol
Anyways, I hope you guys enjoy this tutorial! If you have any questions, don't be afraid to ask. I'll try to answer them the best I can. =D
If you need instructions for each step, look for this tutorial in my youtube channel: www.youtube.com/watch?v=t_5qrri6U58
When your bird has a great shape (like most birds do) and you have a bright background, consider making a silhouette by exposing for the background and letting the bird go completely black. To do this, use spot metering and meter on the background.
Read the tutorial on the blog:
Created following this tutorial www.youtube.com/watch?v=VXtR8WSciBo
I tried to follow along at actual speed, but I had to pause a few times to catch up.
I also used Sepia instead of Burnt Sienna, because that's the closest colour in my watercolour tin.
We have started a brand new feature on Brickbuilt: guest tutorials! Every month a guest will be contributing a new tutorial, and to kick things off, Joeri Ridder shared his beautiful tree design: tutorial link.
Omg it's finished!
This is the last part, i hope you will like it ^^
View it in original size~
How to view it in original size:
Right click on the picture --> View all sizes: click on "Original" at the right side.
Como hacer una flor japonesa? Aquí teneis una imagen que la extrage de esta página web: www.mookychick.co.uk/diy_ethic/kanzashi_tutorial.php
Para cualquier consulta enviad un flickr mail o consultad mi perfil
pues estos pendientes son los que he hecho para un vídeo demostrativo,
tutorial youtu.be/6AgWFBnr2tw
tambien podeis verlo en el apartado de esquemas de mi blog www.cristinarugar.blogspot.com
An adult yellow-bellied Marmot (Marmota flaviventris) watches over a pup born this year in a boulder field near treeline. The pup was one of 4 that kept appearing from their refuge to look at the bipedal animals that frequently walked by, despite the best efforts of mom (or dad?) to keep them hidden in the rocks. The adult was emitting almost a constant whistle alarm call (and thus the cheesy common name "whistle pig"). Litters of 4 are typical of yellow-bellied Marmots, but mortality in the first year is around 50%, probably associated with predation from coyotes, foxes, and birds of prey.
here is what my book looks like after all the pages are decorated
tutorial here:
theadventuresofbluegirlxo.blogspot.com/2010/01/birthday-w...
Taking a look at a sci-fi design this week!
I used this technique in my last SHIP, and hope you all find it interesting.
Read the guide now on Brickbuilt.
Tutorials | Creations | Featured Tutorials | Build Logs | Commissions
A short tutorial on a type of leafy bush that I use quite often when building landscapes. It's quite simple and cheap, but looks quite nice and have an organic curve to it :) It can also be built to different heights for variation, and the top can be either rounded or pointed, depending on what look you're going for.
You can find the tutorial here:
fullplatebuilds.com/2018/12/07/leafy-bush-tutorial/
Hope you find it useful :)
Someone asked for a tutorial on how to make an AK hanging from a strap seen here. Well, here it is :) Give credits if you use this.
Step 1.
Wrap a rubberband around waist. It doesn't have to go around leg, but I like the look of it.
Step 2.
Put your weapon of choice under the rubberband.
Step 3.
Add second rubberband around the barrel. I used different colors so it is easier to see what's going on there.
Step 4.
Do what I did in the pic.
Step 5.
Raise hand between handle and stock, so the gun is in nice position and it looks like he is holding the gun.
Step 6.
Add all the sweet accesories and equipment. Done!
Made an article/tutorial on how to use office and art supplied for product photography. Also how t create this kinds of shot. Head on over to petapixel.com/2016/05/09/use-office-art-supplies-product-...
for the whole article.
Strobist info:
Studiostrobe thru softbox and scrim subject right @ 1/16
Studiostrobe thru softbox and scrim back left of subject @ 1/16
White Fill card front left and right side of subject
blog.knottygnome.com/2013/04/rolling-diamonds-tutorial.html
if you downloaded prior to 4PM EST 04/30/13, i added another tip at the end on cutting the rectangles as a strip set. Sorry for any inconvenience!
So, ich hoffe, daß ich auf Grund der Bilder deutlich machen konnte, wie ich die Muster
gestaltet habe.
Wichtig ist, solche Werkzeuge zu nehmen die eine flache Kante haben, damit man sie gut in den Clay drücken kann.
Ansonten ist Eurer Fantansie und Kreativität keine Grenzen gesetzt.
Ich hoffe Ihr habt genau so viel Spaß wie ich!!
So, I hope, that I was able to make clear on the basis of pictures, how I have created the
pattern.
Important is, to take such tools which have a flat edge, so you can press it well into the clay.
Otherwise your fantansie and creativity is limitless.
I hope you have as much fun as I do!
Short and sweet guide for this carpet design has just been posted on Brickbuilt.
Tutorials | Creations | Featured Tutorials | Build Logs | Commissions
Bueno... Pues lo prometido... Aquí llega!!
Espero que os guste y lo disfrutéis! Si no entendéis cualquier cosa, preguntad o si veis algún fallo en el texto, igual.
Saludos y gracias a las visitas y comentarios que me habéis dejado!!!!
Aquí os dejo el enlace:
Aquí os dejo este tutorial de como he hecho las flores del Conjunto Alia.
Se necesita bote de plástico , tijeras y soldador. Es mucho más cómodo de trabajar y más seguro.
Se cortan los círculos con forma de pétalos.
Hacer el agujero del centro.
Acercar los lados de los pétalos al soldador y poco a poco se van encogiendo.
Cuando están los lados acercar el pétalo por la parte de arriba al soldador, empezará a encogerse, después pasarlo a la punta del soldador y se encogerá del centro. Haciendo la forma del pétalo natural,
Así con los 4 pétalos.
Volver a hacer lo mismo con un círculo más pequeño.
Unirlos con fornituras al gusto del artista.
Qué tengáis una primavera muy floreada¡¡¡¡¡¡
El tutorial de esta flor ya está en la red, no estoy segura, pero creo que su autora es Naama Zamir. He hecho las fotos para un mural para el puesto en el Mercado Artesanal y lo comparto por si alguien no lo conoce aún :)
Muchas gracias a Naama, por su generosidad.
~ EXPLORED # 116 ~ Best view large.
1. Roll out some sugarpaste and cut them using three sizes of daisy cutters.
2. Cut out two sizes of large, two medium and three small daisies.
3 With a ball tool,gently draw each petals from the centre out to the tip to lengthen and widen.
4 Gently curl out from the tip in towards the centre to cup the end.
5 Petals are ready to be arranged.
6. Arrange the petals according to the sizes from large to small in a pallete.
7. Cup the ends more, to create a tighter array that hides the centre of the flowers.
I hope the tutorial and the instruction would benefit you . all the best everyone..:)