View allAll Photos Tagged LensCap
“And the seasons they go ’round and ’round
And the painted ponies go up and down
We’re captive on the carousel of time
We can’t return we can only look behind
From where we came
And go round and round and round
In the circle game.” ~ Joni Mitchell
Have to share a story about this shot, the carousel is inside a mall and of course I had two problems A. nobody was using it and B I knew I needed to do a long exposure and I had no tripod! The solution to A was asking the operator nicely if she could pretty please run the carousel without people, and B was solved using a table, my tablet, a to go container, my cell phone and then the lenscap :) I engaged the self timer then backed away and hoped the thing didn't get bumped. The slowest shot I got was 1.6 seconds at f/22
Macro Monday: #Closed
Size of the Frame: 2 cm / 0,78 inches
First official image leaked of the brand new Rainbow Engine™ in celebration of its start of production. Its prototype is currently fuelling the Starrider Bulli T2 "Woodstock" special edition model (see first comment, please) that is cruising the galaxy on an emission-(and mud)-free mission of Peace and Love. What you see here is the core of the Rainbow Engine™, an intricate, yet super simple (do I sense a contradiction here?), and incredibly elegant mechanism entirely driven by light particles, and operated by the magic phrase...
...Screeeech!!!! Which is the very unpleasant sound I hear every time I turn my little Lumix LX100 on and the flaps of the automatic lens cap (which are pushed open by the extending lens) scrrrratch along the UV filter attached to the precious Leica lens. Actually, the automatic lens cap is a very convenient thing (much nicer than the regular lens cap which you'll either lose, eventually, or will have it dangling around on a titchy ribbon). Actually. But if you want to use the original Panasonic automatic lens cap, which you want to, because, hey, you've paid for it, right?... it's original accessory, right?... you can't use a UV (or other) filter at the same time to protect the lens, because it has not been designed high enough for filters. So I had to buy a third-party automatic lens cap which is high enough for filters, but just not so for regular(ly high) filters, but a regular UV filter is what I'd bought together with the camera. Sigh. After one and a half years of torturing myself (and my camera) with that gruesome opening sound and process it's about time to finally buy an ultra slim filter, I guess... Oh, and what was it I wanted to say in the first place? It's a detail of the automatic lens cap that you see here. Which you'll probably have guessed by now.
Technicalities: I'm happy to say that this is one of the shots that actually turned out the way I had imagined them before I started shooting. And it's also the very first time I managed to use the glass prism in (almost) the exact way I had imagined it before the photo shoot as well. To capture the automatic lens cap was my first idea for the theme, but I thought that it would look a little boring just by itself. What is photography all about? Light. So I thought I'd add a little light to this. Preferably light with a special "shape", or colourful light. Because my idea was that light itself would do the magic trick of opening the lens cap, as if the camera itself was addicted to light - which in a way it is: light as an "Open Sesame!" phrase. I played around with the prism's triangular shape, and got a few nice captures of a triangular light shape that pointed right at the centre part of the opening of those three mechanical flaps of the lens cap, and the light shape almost looked like a sharp tool which could pry open the firmly closed flaps. Nice. But in the end I settled for the rainbow colours, because that's what I was aiming for in the first place. To create the rainbow I had to hold the prism really close to the lens cap which is the reason why the cap itself, which is actually silver-coloured, looks black on the photos. Black = space = space-themed capture ;-)
Processed in Luminar 3, preset "Detailed Warmth", with extra filters Detail Enhancement (only "small" at 100), Foliage, and HSL; and in Nik's Analog Efex, Preset 7, Film Preset No 2 / 1 (second from above), and vignette; back to PS where I added the four-colour frame and my name.
A Happy Macro Monday, Everyone, and have a pleasant week ahead, dear Flickr friends and macro nerds!
Deutscher Text folgt...
I am such a copy cat. But my friend Sue (VA2PA)
www.flickr.com/photos/myprettypics/
started taking shot of the same object for one year. Yeah - I wont be able to do one year.. so I am going to go for 1 month. I chose to use my Nikon lens cap as the same object.. dur.. like you can't tell. We will see how this goes.
At a quite ridiculous starting price I could hardly refuse making an offer! Nobody else did. So what do I do with that number of identical bottles?
(Suggestions on a postcard please!)
The lens for the photograph was taken from a broken Prinz Saturn camera made in the 1970s and roughly glued to a washer cemented to a hollowed out camera lens cap. Not sure where I got the idea, but it was fun to make and the results can best be described as 'interesting'!
I guess it's not every day a Bee Wolf lands on your lens cap while you're trying to take a photo of it!
A circle is the reflection of eternity. It has no beginning and it has no end - and if you put several circles over each other, then you get a spiral. ~Maynard James Keenan
I worked from home today, didn't go anywhere more interesting than the grocery store, it's almost the witching hour and I had no picture of the day.
How many days left in 2016?
I often loses photographic equipment, so I had to buy a new lens cap. I received een orange one. Excellent for this challenge I thought. I made this photo on my lightbox.
Thanks for taking time to comment and fave my work. I really appreciate.
Nikon FM2n | Nikkor 55mm 2.8 Micro AIS | Kodak Tri-X 400 | Kodak HC110b | www.JohnnyMartyr.com
B&W 35mm Photojournalism by Johnny Martyr
Thanks for checking out my work!
Maxi-Mini. Super Takumar lenses for Pentax. 35mm fisheye for the 6x7 or 50mm for the 110. IN EXPLORE 01.05.2022
This is the cap of my macro lens and learnt that messing around with the camera's light metering can bring out some interesting effects.
I promised Charlotte. I promised her that when we got to San Francisco I would put away the camera, tripod, filters & various other accessories, which cluttered our hotel rooms. That promise was broken when this happened :(
My Photography Kit List
Kit I use for YouTube
My Lightweight & Comfortable Camping/Hiking Gear
The Most Comfortable Camping Pillow
A Few Good Photography Books I Read
7Artisans 18mm F6.3 UFO II
The 7Artisans 18mm F6.3 II Lens is a tiny wide-angle lens that looks like a body cap when mounting on your camera, which makes it perfect for casual walkaround shooting and the wide-angle focal length suits street and documentary shooting applications.
The 7Artisans 18mm F6.3 II is designed for APS-C-format mirrorless cameras and provides a 27mm equivalent focal length.
Manual Lens: Fixed f/6.3 aperture and fixed focus, with a minimum focus distance of 30cm, with a simple and intuitive design.
Fully-metal Construction: The Lens is fully metal built with a compact size and weighs only 58g.
www.pergear.com/products/7artisans-18mm-f6-3-ii
fujistas.com/7artisans-18mm-f6-3-ufo-objetivo-tapa-para-f...
7Artisans 18mm F6.3 UFO II
La lente 7Artisans 18mm F6.3 II es una pequeña lente gran angular que parece una tapa del cuerpo cuando se monta en la cámara, lo que la hace perfecta para tomas informales y la distancia focal gran angular se adapta a aplicaciones de filmación callejera y documental.
El 7Artisans 18mm F6.3 II está diseñado para cámaras sin espejo de formato APS-C y proporciona una distancia focal equivalente a 27 mm.
Lente Manual: Apertura fija f/6.3 y enfoque fijo, con una distancia mínima de enfoque de 30cm, con un diseño sencillo e intuitivo.
Construcción totalmente metálica: La lente está construida totalmente en metal con un tamaño compacto y pesa sólo 58 g.
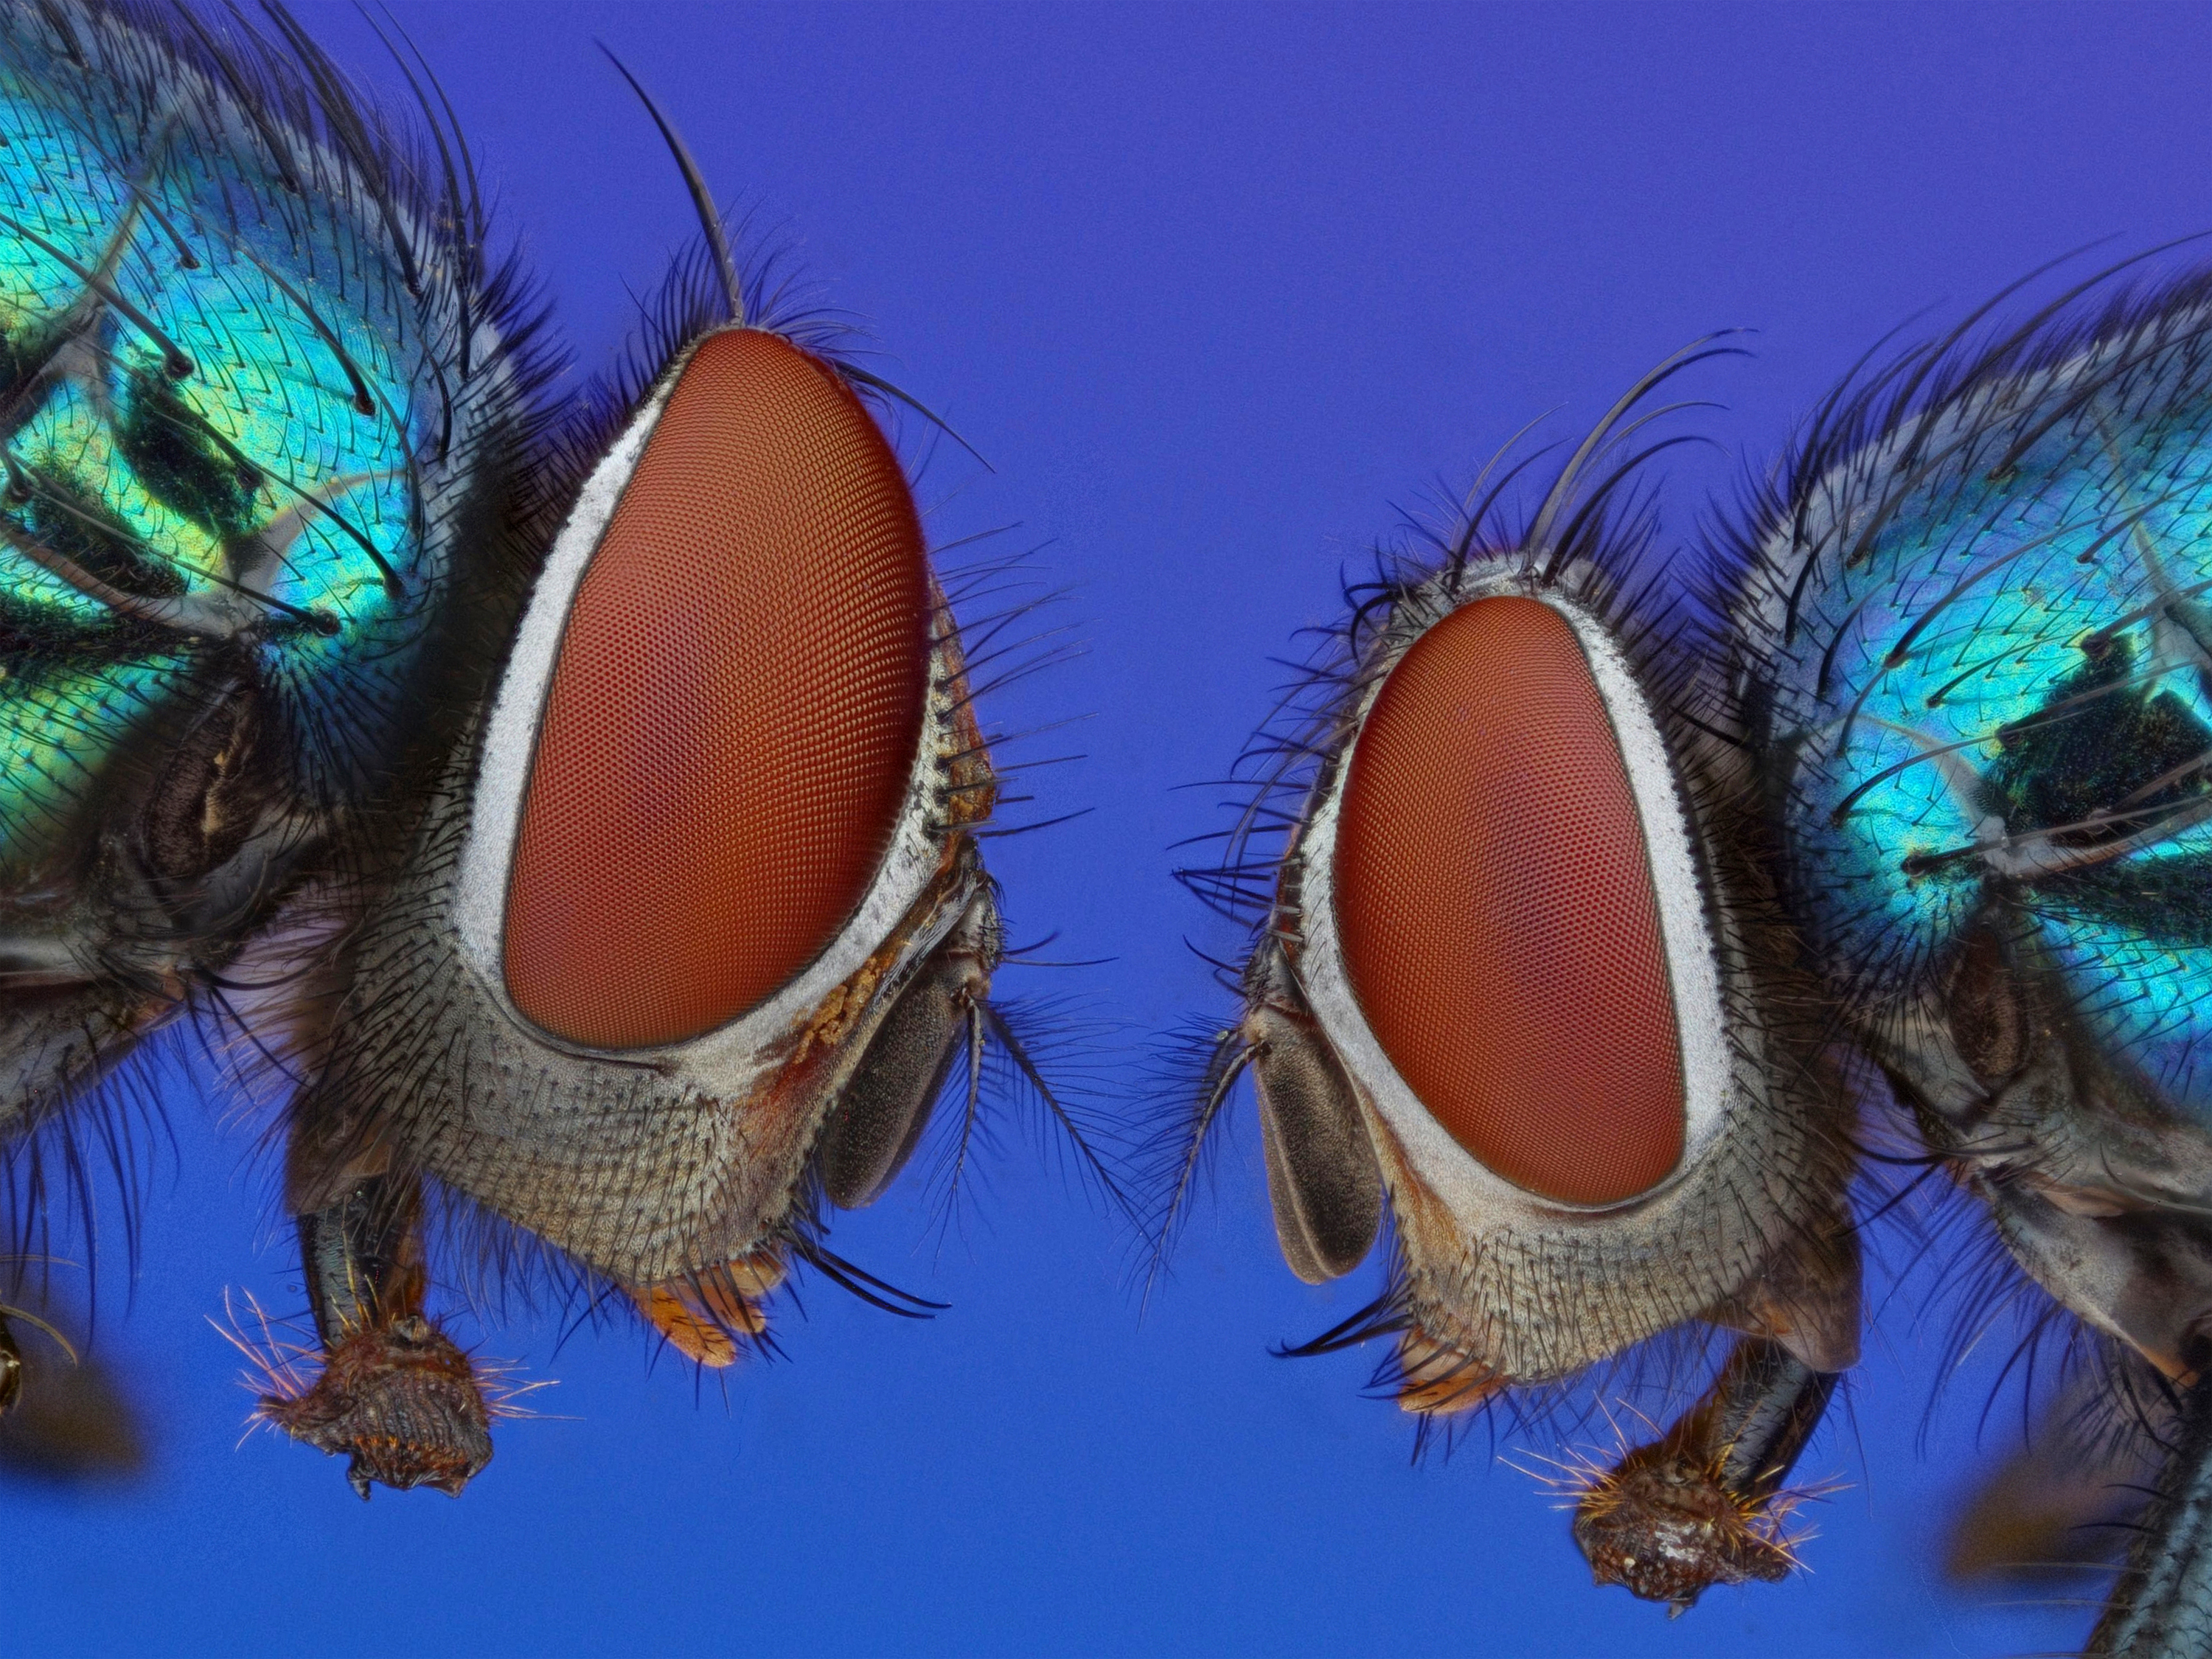
Someone kindly suggested on my last shot that another fly looking across might be interesting... so I gave it a shot. It certainly works for me =). Thank you Gary! And, credit where credit is due: I really liked this shot by Jemenu so wanted to have a play too! So this is, I think, a pair of greenbottles (not bluebottles, I promise you they look green compared to the bluebottle I compared them to at the time!), they're rather mundane creatures but not without a certain aesthetic appeal when you look at them like this. A blue background: a different blue to last time which is gradiented towards purple. I wanted a bit more vibrancy and I think this gave it to me!
Posing this wasn't easy. I used the Watkins & Doncaster Insect Examination Stage with some cork cut out in a 2 cm by 1/2 cm by 1/2 cm strip mounted at the tip. Then I cut a groove into the cork for each mounted insect according to the angle which I needed for the shot. Each of these insects were mounted on a thick black ent pin. Then I fiddled, swore and cursed for 30 mins to get them parallel and in the positions I wanted, cutting off the end of the pins that went beyond the cork so that it could all fit into the chip cone diffuser. These chip cones are handy because they're shaped so that they diverge so allow relatively big things inside the diffuser (mine just sits on the end of the lens with a custom reverse lenscap made from a black party popper) but they're also the right shape so that there's stilll enough omnidirectional light of a similar intensity (because of similar distances, not quite a perfect hemisphere but better than other things I tried). With close flashes I get away with 1/32 and 1/64.
Technical: Gradient in CS4 piped into SmallHD using HDMI matrix used as ambient lighting for the background; strobing has rear curtain sync. 1s exposures; 121 photos into 34 sub stacks, retouched from Dmap composite, finished off with CS4 & Topaz Detail. Step size of 30µm, polystyrene chip cone diffuser. Cropped then resized 10% to lessen noise. Componon 35 f/4 reversed on flat bellows so about 1:1 ish; 2 Pentax 540& 1 Pentax 360 off camera flashes triggered wirelessly by Metz 58 II cam-connected controller; all manual trailing synch to eliminate flash ghosting, strobes manual at @1/32; perpendicular to flys at @2,6.30 &10 o'clock.
Looks nice on black! www.flickr.com/photos/jingleslenobel/7191333770/lightbox/
Link to full size image: farm9.staticflickr.com/8158/7191333770_da753c467e_o.jpg
UPDATE 2014 - I have put together an extreme macro photography learning site to explain the techniques and equipment used for all my macro photos here in Flickr which is now ready. To point to a few of the links that people who want to learn this stuff might like to have a browse of:
Focus Stacking, Focus Stack Preparation, Shooting A Stack, Stack Processing, Stack Post Processing, Schneider Kreuznach Componon 28 mm f/4, Schneider Kreuznach Componon 35 mm f/4, Schneider Kreuznach Componon 80 mm f/4, Nikon El-Nikkor 50 mm f/2.8N, Reject Enlarger Lenses, JML Optical 21 mm f/3.5, 20 mm Microfilm f/2.8, Anybrand MP-E 65 Macro Lens, Manual, TTL, Rear Curtain Sync, Extreme Macro Backgrounds, Single Colour Background, The Gradient Background, Adjustable Flash Shoe Mounts, Extension Tubes, Eyepiece, Field Monitor, Flash Bracket, Focusing Helicoid, Holding Tools, Lens Adapters, M42 Iris, Macro Tripod, Making A Macro Beanbag.
I didn't realise it at the time, but this is an image that can only come together under certain conditions. The frost is very rare and only happens a few days of the year and the light will only hit the tree for about 2 minutes before the frost begins to melt. Even if the forst doen't melt, it won't be long before the background is completely washed out with light. I doubt this image will happen again this year.
You can watch my YouTube Video and see the entire 'behind the scenes' shoot.
My Photography Kit List
Kit I use for YouTube
My Lightweight & Comfortable Camping/Hiking Gear
The Most Comfortable Camping Pillow
A Few Good Photography Books I Read
Shek Kip Mei (?), Kowloon, Aug 2007
My own hastily purchased ten dollar umbrella balanced on my head, handle held between shoulder and cheek (and beginning to leak), I somehow managed to fumble my lenscap off and grab a shot as the cloudburst hit full stride. 2007's record breaking heatwave was officially over and I now had wet socks.
Netherlands, Zuid Holland, Rotterdam,NS, Central Station Roof with support beams & Y shaped pilars and photovoltaic elements and CTA's (uncut)
R'dam Central station was- a perfect spot to test out the Olympus Lenscap Fisheye. This is one of the first outdoor shots I made with this little fish-eye lens and number 507 of the Rotterdam architecture album.
I finally got some (thrifted, vintage) smock aprons -- this one is much too big but is my favourite as it has plenty of pockets for keys and lenscaps and lipsticks and extra spoons and tissues...AND...it has daisies on it. I like daisies.
After an incredibly long, hot hike I was rewarded with a glimpse beneath the lava field in to this wonderful, glowing Skylight. Unfortunately I didn't find the surface lava I had hoped for, but I am more than happy with this image.
You can watch my YouTube Video and see the entire 'behind the scenes' shoot. Warts and all.
My Photography Kit List
Kit I use for YouTube
My Lightweight & Comfortable Camping/Hiking Gear
The Most Comfortable Camping Pillow
A Few Good Photography Books I Read
For "Macro Mondays" group theme "One Word"
I can't believe that this lens cap is the original supplied with the lens but its a reasonable replica if it isn't! It came to protect a Leica lens made in 1949. The lens is 75 years old and the cap just might be! Lettering in relief.
Leitz Summar 5cm f2 lens dated 1938.
Mount Shasta, CA- Lenticular clouds are the first to catch the light of a new day this first day of June.
this week's MM theme: lost/found
I can't count the number of times I have lost a lens cap, only to have it eventually show up in a pocket somewhere.
Friend and kick-ass photographer Kevin Mcneal at Ruby Beach, WA.
I first met Kevin through a photography contest site when I was just starting out with photography. I liked his work so much that I wrote him and asked if I could wash his car or mow his lawn in exchange for photography tips. He laughed, and told me I didn't have to do that. He's been kind enough to give me great tips along the way, and on this trip, he was teaching me about my new 5D. I found that the waves at Ruby Beach can sneak up on you. I rode the 3 hours home in wet pants.
Please do yourself a favor and check his awesome landscapes. His Newest Editions and Oregon Coast portfolios are my favorite. If you happen to be on a ferry and see the WA State Visitors Guide, that cover shot is by Kevin.
flickr.com/people/55847625@N00/
www.kevinmcnealphotography.net
I love that strobism can be so quick and easy sometimes. For this shot, I had a 3373/SB-26/white umbrella, all of which I had carried down on the side of my lowepro, and just hand held the lightstand from upper left for the shot. It only took about a minute or so to get in a decent portrait before getting down to business....landscape:)
5D
17-40L
iso100
1/90
f/11
SB-26 through umbrella on full power very close in
Sonya snapped this picture of me as I tried to put the lenscap back on my camera.
Strobist:
430ex held in my left hand towards me/cap @ 1/8th
ST-E2
Canon 30d
Sigma 8mm Fisheye
My head's kind of wonky this morning so I can't come up with a title.
Taken in the driver's seat (left in the U.S.) with the camera in my other hand. So why is "Nikon" readable?
Just being silly and having more mirror fun. Happy Nifty Fifty Friday!
This was a beautiful morning for photography, if only my planning was up to scratch. Watch my YouTube Video and see the entire 'behind the scenes' shoot.
My Photography Kit List
Kit I use for YouTube
My Lightweight & Comfortable Camping/Hiking Gear
The Most Comfortable Camping Pillow
A Few Good Photography Books I Read