View allAll Photos Tagged Arduino,
Arduino that generates a Midi CC that is a sin wave with controllable duty cycle, amplitude and offset.
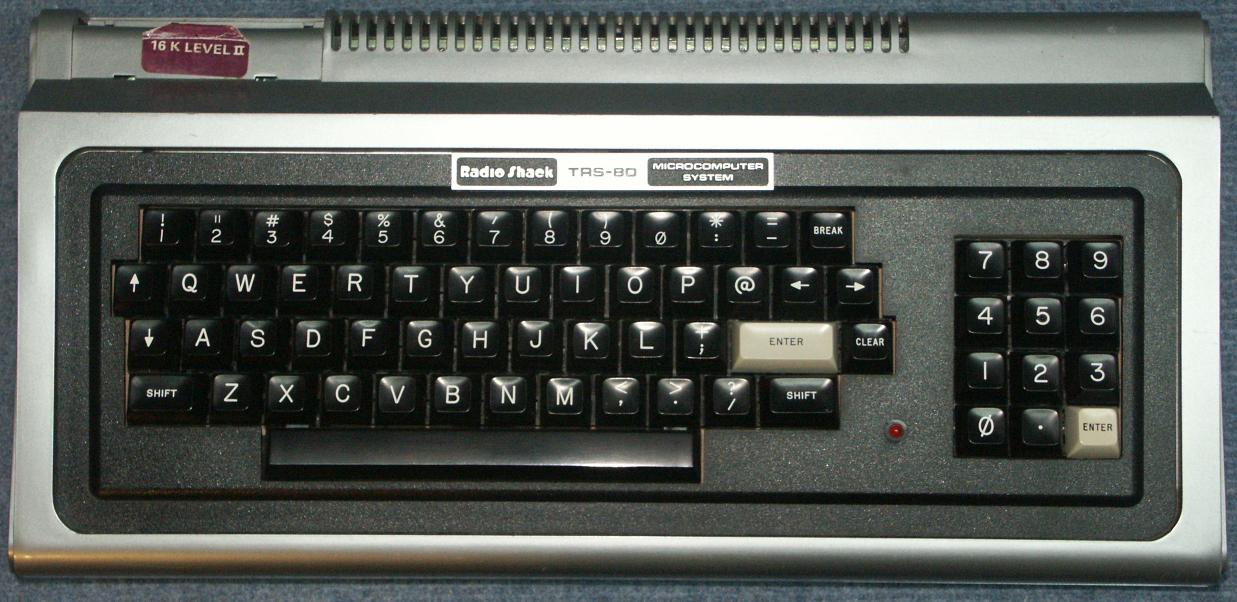
Connecting an Apple II keyboard to a computer with USB is surprisingly easy with a Teensy board. The Apple II uses an ASCII keyboard, which means that rather than returning scan codes, it returns a 7-bit ASCII value. This also means you can't read the state of modifier keys like shift or control independently. The Apple II keyboard in particular doesn't even support lower-case letters (though I've made a bit of a hack for this). They even re-use a couple alpha keys for other characters, so shift-P makes @ and shift-N makes ^. Other late 70s/early 80s home computers like the TRS-80 had a really simple layout like the Apple II's (though the TRS-80 had all four arrow keys but no Control key). I may have to try out adapting some other weird old home computers as USB keyboards -- the C-64 seems like it would be a good shape/size for that. (from afiler.com)
Arduino (Teensyduino) code is available at github.com/afiler/keyduino.
A simple circuit to switch multiple strands of EL wire on/off independently using an Arduino microcontroller. I used ST Microelectronics Z0103MA triacs.
Closely based on Cyphunk's circuit
Arduino radio shield from Argent Data Systems. This shield implements an AX.25 modem for the Arduino. I plan to use this one for a few projects, mostly playing around with AX.25 and APRS in particular.
Comes as a kit with no instructions, you need to go to the Argent Data wiki.
Imagine Dragons - Believer - Arduino Cover! We have used Arduino to control the push pull solenoids.
Full Video ▶ youtu.be/CnglySlS_HU
Code, Circuit and details ▶ teenenggr.com/2019/12/25/imagine-dragons-believer-arduino/
Believer drum cover is played using midi file, Arduino SD card shield is used to read midi files from SD card.
I like this simple 5V power regulator (GoodLuckBuy “Arduino 5V/1A Power Module LM340 Voltage Chip” SKU: 75987). It has screw terminals for the 5 volt output and a 2.1mm Arduino style input jack. The power switch and a green power LED also make this thing easy to use. The Fluke 87 V measured 5.072V output which is good.
However the battery pack (Deal Extreme “6 x AA Batteries Holder with DC2.1 Power Jack for Arduino“ SKU: 126413) at the back is terrible. After inserting the batteries I have to push the long edges and roll the batteries around to ensure I get a circuit and power out of it. The far right and far left batteries are held too tight and can be inserted without making contact with one end. If I bump it or breath on it the wrong way the circuit is broken and power is lost. The whole thing is unreliable, barely usable and very crappy. I recommend avoiding this product.
Crude tone generator - not really a theremin though.
www.psychicorigami.com/2010/06/13/arduino-tone-generatort...
This is an laser cut enclosure for mobile arduino prototyping. I will start selling this soon. A bit more testing is needed.
Check:
My take on the arduino based PC ambient lighting project posted here: siliconrepublic.blogspot.com/2011/02/arduino-based-pc-amb...
I used the same embedded arduino code and wiring setup to get it working, but main difference is that I used Python code instead of Processing for the desktop client, and I used an arduino proto shield to make a compact package that I could hide on my desk. I'm still tweaking the code so that it can work with fullscreen applications like games and average all 3 monitors instead of the center, but as it is now it works really well.
WIP python code: dl.dropbox.com/u/9993009/AmbiLight.py
In this open lab you have the chance build a motor controlled drumstick. Participants will learn how to assemble the parts and program an arduino microcontroller.
credit: CC0
Arduino Heartbeat sensor, sends OSC messages over ethernet at every beat.
I've been working on this on-and-off over a few months:
cmpercussion.blogspot.com/2009/07/heartbeat-sensor.html
And now I'm using it in a performance in Canberra!
Our third Arduino 101 class at Tam Makers went really well. I taught this evening course with co-instructor Donald Day on Thursdays, from June 16 to 30, 2016, at the woodshop in Tam High School in Mill Valley.
We worked with an enthusiastic group of seven students, including adults with diverse backgrounds, as well as a couple high school students. Our partner Geo Monley worked both as a mentor and as a student during the hands-on sessions.
We started the class at 6pm, by giving students an overview of how circuits work. We then learned how to use a multimeter, how to solder electronics, and how to control rainbow-colored NeoPixel lights.
Students seemed to really enjoy this class and told us they learned a lot from it. Several expressed an interest in taking intermediate and advanced classes in the future. This is one of our first maker courses at Tam Makers, and we’re really happy that it is going so well; we look forward to teaching more classes in the fall.
View more photos of this Arduino course:
www.flickr.com/photos/fabola/albums/72157659914570948
Learn more about this Arduino 101 class:
www.tammakers.org/arduino-101/
Read our Arduino 101 Guide:
bit.ly/arduino-101-guide-june-2016
Check out our course slides:
bit.ly/arduino-101-slides-june-2016
Learn more about Tam Makers:
A Sparkfun accelerometer rigged up to an Arduino which samples it and sends the data to the host computer. Fairly straightforward.
Success. With a new active antenna (powered by the Arduino via the Jupiter 12) I am now getting a valid GPS fix. Now I need to think of something to do with it.
Geiger counter circuit coupled with Arduino. Counts are read out by Linux server and graphed using Cacti.
Graph can be found at:
Arduino + Pmr + RTTY = Remote Temperature Sensor
emmanuelgranatello.blogspot.it/2012/08/remote-temperature...
Contenedor donde colocaremos el juego, dejando libre la tapa para poder ver el arduino
Info sobre arduino: www.arduino.cc/ y www.arduino.cc/es/
Uses SRF05 to send ultrasonic pulses and calculate the distance. Lights up the LED the closer an object is :) demonstrated in this case by Judes hand
More info is at: luckylarry.co.uk/2009/07/arduino-sonic-range-finder-with-...
I made this housing for an Arduino Pro that will control my waveguide relay in my 47 GHz radio. This housing is made from 6061 billet aluminum. The cover is held on with a dozen 0-80 screws. Shown here is the filtered DC feedthrough.
Stripboard layout to build a basic Arduino compatible circuit. (Shown from the top top side of the board). More info and build instructions here.
This is something I had been meaning to complete for quite a while. I needed something that was portable, clean and easy to store random things in to prototype stuff on the fly.
The Proto Desk allows me to sit on the couch with my laptop and arduino and mess around.
This is a very simple digital sound sensor (Arduino Sound Sensor Module for Sensor Shield, SKU 74446) from Goodluckbuy. It’s either triggered because there’s a sound loud enough or not. The sound level threshold can be set by adjusting the pot on the PCB and the red surface mounted LED can visually show you when the device is being triggered. Much like the light sensor an op-amp is used (LM393).
The only down side is I would have liked the choice of either a digital or an analogue value much like the light sensor and it’s switch.