View allAll Photos Tagged template
Are you looking for creative business cards templates?
Then you came to the right place, follow this link to explore more: www.codester.com/Pixime
Are you looking for creative business cards templates?
Then you came to the right place, follow this link to explore more: www.codester.com/Pixime
Printable PDF Flower Applique Templates have six different sizes of flowers and circles. Use the templates to make appliques for your bags, clothes, handmade gifts, home decor and soft furnishings or use them in your scrapbooking and card making projects.
All templates can be bought directly from The Stencil Garden or via ETSY. Please see our Profile for more information.
Flower Template Sizes (Approx)::
11cm x 11cm
10cm x 10cm
8.5cm x 8.5cm
6.5cm x 6.5cm
5.5cm x 5.5cm
3cm x 3cm
I have been doing a ton of tweaking on the website and blog to create a new cohesive look. I've decided to go for a soft platinum feel for most of my baby images. This will be the consistent blog template for posting images.
Van den Bergh 14 & 15 along with SH2-202 in HaLRGB. This is a 2-panel mosaic from data I finished capturing a few months ago but hadn't had the time to sit down and process until now. I am properly proud of this image, more so than any of the others I have made since going remote. The stark contrast of the blue reflection nebula and the hydrogen alpha emission from the Sharpless cloud juxtaposed next to each other make this an extremely dynamic region.
I have not seen that many images of these objects in particular on Astrobin and thus wanted to shoot it in the hopes of inspiring others to make even better images of it in the future.
- Location: Remote Observatory (Bortle 1, SQM 21.99) near Fort Davis, TX
- Total Exposure Time: 77.9 Hours
Equipment:
- Scope: Esprit 100ED w/ 1x Flattener
- Imaging Camera: QHY 268M
- Filters: Chroma HaLRGB (36mm)
- Mount: Astro Physics Mach1GTO
- Guidescope: SVBony 50mm Guidescope
- Guide camera: ASI 120mm mini
- Focuser: Moonlite Nitecrawler WR35
- Accessories: Pegasus Ultimate Powerbox v2, QHY Polemaster, Optec Alnitak Flip Flat
------------------------------------------------------------
Software:
- N.I.N.A for image acquisition, platesolving, and framing
- PHD2 for guiding
- PixInsight for processing
-------------------------------------------------------------
Acquisition:
- Ha: 314 x 5m (5nm)
- L: 500 x 3m
- R: 185 x 3m
- G: 174 x 3m
- B: 176 x 3m
- All images at Gain 56, Offset 25 (Readout mode 1) and -5C sensor temperature
- 20 flats per filter
- Master Dark, Flat & Bias from Library
- Nights: 9/26-9/28, 9/30-10/2, 10/12, 10/13, 10/20-10/23, 10/26-10/30, 11/2, 11/3, 11/5, 11/7/22
-------------------------------------------------------------
Processing:
For each pair of masters per filter:
- DynamicCrop
- MureDenoise
- DynamicBackgroundExtraction
- ImageSolver script with distortion correction enabled to platesolve each panel
- MosaicByCoordinates script to create mosaic master templates
- PhotometricMosaic script to stitch panels into masters for each filter
RGB Processing (apply to each master):
- DynamicCrop to remove mosaic edges
- DynamicBackgroundExtraction
- StarAlign G/B/Ha to Red
- Combine RGB linear masters into color linear image with ChannelCombination
- DynamicBackgroundExtraction
- SpectrophotometricColorCalibration
- StarXterminator to remove stars for processing and save star_mask
- NoiseXterminator x2 for noise reduction
- BackgroundNeutralization with preview for color correction
- NoiseXterminator at 0.25 for further NR
- HistogramTransformation for initial stretch and then further green channel tweak
Create Continuum-Subtracted Image for non-linear Ha Addition:
- StarAlign Ha master to Red
- PixelMath to assign Red and Ha to HRR as RGB respectively
- BackgroundNeutralization using background preview and ColorCalibration to isolate Ha signal
- StarXterminator to remove stars from linear image
Luminance Processing:
- DynamicCrop
- DynamicBackgroundExtraction
- StarAlign to Red
- StarXterminator to remove and extract stars - save stars_only image
- GeneralizedHyperbolicStretch for intial stretch
- HistogramTransformation x3 for further stretch
- CurvesTransformation for contrast
- UnsharpMask with luminance mask applied to sharpen reflection tendrils
- ACDNR with luminance mask applied for slight noise reduction
Combine Luminance and RGB:
- LRGBCombination with chrominance NR enabled
- Extract luminance mask and CurvesTransformation to super stretch
- Apply luminance mask and invert mask
- MultiscaleMedianTransform with inverted lum mask for chrominance noise reduction
Add Ha to LRGB:
- NoiseXterminator on linear Ha image for noise reduction
- HistogramTransformation x3 to stretch
- CurvesTransformation for extreme contrast curve to suppress background and isolate Ha signal
- PixelMath to add Ha to LRGB
- ColorSaturation to saturate blue reflection nebulosity
Further Processing:
- CurvesTransformation for slight contrast adjustment
- HistogramTransformation x3 on RGB stars to stretch to non-linear
- Invert -> SCNR green -> invert to remove magenta from stars
- SCNR green on stars
- CurvesTransformation to saturate and bring up blue point for stars
- HistogramTransformation x2 on Luminance stars to match size of RGB stars
- LRGBCombination to combine Luminance and RGB stars with saturation at 0.35
- ColorSaturation to saturate blue stars
- PixelMath with re-linearization technique to combine stars with starless nebulosity
- NoiseXterminator for final noise reduction
- SCNR green to remove slight green tint
- MorphologicalTransformation with luminance star_mask applied for slight noise reduction
- CurvesTransformation for final green reduction/'c' curve adjustment, and contrast boost
- DynamicCrop to crop edges
- Save and export
Colour study in macro.
Image kingsleydavis.co.uk/#
Please do not use or reproduce this image on Websites/Blog or any other media without my explicit permission.
Instagram: @flipthescriptbook
© All Rights Reserved Kingsley Davis
My newest template! Background colors can be easily changed to match your images and style. I just love green, hehe.
IBM GX20-8020-1 Flowcharting Template U/M 010
ca. 1969
According to wikipedia: A flowchart is a type of diagram that represents an algorithm, workflow or process, showing the steps as boxes of various kinds, and their order by connecting them with arrows. This diagrammatic representation illustrates a solution model to a given problem. Flowcharts are used in analyzing, designing, documenting or managing a process or program in various fields.
americanhistory.si.edu/collections/search/object/nmah_690232
DSC01191
Happy NoVVember!
Been awhile since I've started and completed an actual build. The last time was actually the Bio-Cup 2022 back in June... woof. I failed at SHIPtember (got a frame built the first day and didn't touch it again all month), didn't even attempt MECHtober, and I started a Vic Viper for NoVVember, but then didn't touch it all month, but then I figured I could at least make a mini one, right?
Here it is, based on the free online instructional course on what makes a Vic Viper, my Template Vic Viper in LEGO. I wonder if anyone else has ever had the gall to do that. (Eh, like most things, I'm late to the party, of course someone has!)
Individual images can be found on Imgur
Thanks for stopping by!
Are you looking for creative business cards templates?
Then you came to the right place, follow this link to explore more: www.codester.com/Pixime
Colour study in macro.
Image kingsleydavis.co.uk/#
Please do not use or reproduce this image on Websites/Blog or any other media without my explicit permission.
Instagram: @flipthescriptbook
© All Rights Reserved Kingsley Davis
KAFFEEBERG - BLOGGER SEARCH - MAGICAL SPIRIT - TEMPLATE
- You can change the template as you wish for your personal use only ( Colors, Sizes, Fonts etc.)
- You can open and edit the Template just in Canva for now, but when you are ready you can save it as jpg, png or pdf, so you can edit it more in Photoshop or other graphic programs.
More Infos: marketplace.secondlife.com/p/KAFFEEBERG-BLOGGER-SEARCH-MA...
I re-did my complete minifig template. I combined the hip pieces with the torso pieces to make it easier to cut out and apply.
The only draw back is that the hip section has to be with the torso when the decals are appled.
Here are the files:
AI www.mediafire.com/?e6mm36dgkk3o2tl
PSD www.mediafire.com/i/?za0ejbhf4g6aei7
SVG www.mediafire.com/?m0wx8zeglzea21d
PDN www.mediafire.com/?6a3u6ho6960tkt2
PNG www.mediafire.com/i/?yp4k1p60w90deag
JPG www.mediafire.com/i/?a4cos447cva364n
** Please give me credit for my work **
Quick idea for the Order Of Magnitude homepage sketched out on my custom wireframe template.
You can download the pdf template and read more about it on my blog
This is my template free for everyone,
here it is in vector format:
www.mediafire.com/?dheeg3hppe5l538
4.6059 cm W x 2.5569 cm H
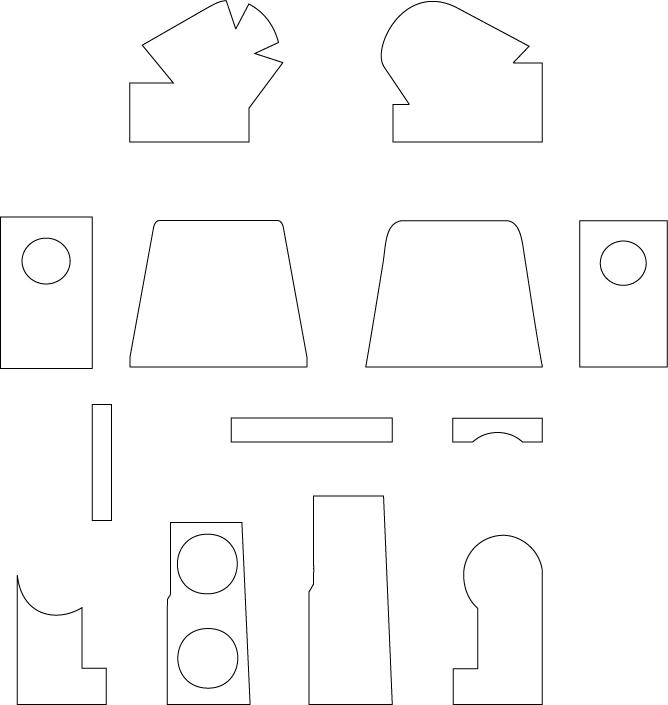
If you watched my decal tutorial video, I mentioned I'd upload a minifig template to help people get started. These templates are adapted versions of ones that Roaglaan once posted.
The leg decals completely cover the leg as one smooth decal as opposed to four separate decals. The torso and belt are made together, but can easily be separated by knife or digitally. The arms can cover a minifigure's forearm and the front surface of their should/upper arm; you'll notice a small slit near the elbow, that needs to be cut to get the arm to conform around a minifigre's elbow properly (all my clones have this).
I hope this helps people to make more accurate decals and for those who buy my decals to know how to properly cut them out. If you use this, please give credit where it's due, and happy decaling ~
The next tutorial will be up next week.
-Andrew
This almost certainly wont print out at the correct size, so flickrmail me (including your normal email address)if you want the template.
If you still cant print it at the correct size you can draw your own as above.
I just printed this to test, and as long as i opened the 'all sizes' option and then printed it was perfectly sized.... the world of computers is so fickle!
Feel free to use it. If you would like to, you could always give me some credit for it if you post it in a blog or something..
In every one of our Cutting Edge Die Sets, each die comes with its matching cut-out. The die is the framed 'negative space' shape, and the cut-out is the actual shape that used to be part of the die before it was cut out.
The dies were designed for silhouette dieforming – pushing flat sheets of polymer clay through an opening to make 3D forms with a specific silhouette – as explained in our book, Relief Beyond Belief. Since we released that book almost two years ago, the dies have become the more famous half of these two-part tools. But cut-outs on their own were in my studio long before I made dies or developed dieforming for polymer clay. They've always been an indispensable tool when cutting shapes out of flat veneers, blends, textures, mokume, whatever...
It's possible to cut out shapes using the opening within a single template or in a template sheet (like those green plastic geometric templates sold in art supply stores that many of us own). The opening is like a window and you can easily and exactly frame the area you want. But when you cut within a window, you're cutting on the inside edge of the template, which is awkward, and you have to be careful not to slip. If you do, the only way for your blade to go is in, and then you mar the good clay you've carefully prepared and chosen to feature within your shape. That's why I use cut-outs, to cut outside the edge of a shape instead of within it: the cut-out protects the swatch as I cut; I can see the cut line easier; I don't have to get into small spaces and tight corners; and if I do slip, I'm only cutting the part of the veneer that I wasn't going to use anyway. It's a trick I picked up in art school years ago (back when cutting and pasting actually involved X-ACTO knives and glue). It's carried over into my work in polymer clay and fits so perfectly for this application.
For well-placed patterns and perfect shapes every time, I use both the die and its matching cut-out. First, I use the die window to find and define the area of pattern I want to use. Once it's in place on my veneer, I drop in the cut-out and swap out the die, masking the area I know I want, and revealing the rest to be trimmed away with my X-ACTO knife and #11 blade. Once trimmed, I remove the cut-out, and reveal my cut-out shape, exactly as I expected.
When we designed our Die Sets, we did so with dieforming in mind. But we also knew the matching cut-outs were an important 'other half' to these tools. For dieforming, I use dies. But if I want to cut out a shape, I use a cut-out.
Borrowing step-outs from our book, and following the numbered sequence in the diptic here, here are the basic steps for cutting shapes with cut-outs...
1. frame your veneer within the window of your die and set it in place
2. grab the matching cut-out
3. place the cut-out into the die window
4. gently hold the cut-out in place and lift the die off the veneer
5. your cut-out is now in postion and your veneer is ready to trim into a shape
BTW, the only time you wouldn't want to use a cut-out is if you wanted to create a 'negative space' shape within a larger veneer. In other words, if you want to cut out a window, you use the window to cut it out (after you've used the cut-out to place your window where you want it..). But hey, that's a lesson for another day.
If you're interested, you can see the complete collection of Geometric, Organic, Polygon, and Long Trio Die Sets (each with dies and their matching cut-outs) in The Cutting Edge Store.
Baby stats template that I did for a family friend!
The template can be downloaded from my blog: bit.ly/1paoCih
Neon Party Flyer Template
Neon Party Flyer Template PSD was designed to advertise a glow party or a neon party inside a club / pub / bar.
The design is well sorted in folders, and all the elements can be removed or rearranged as you please. You don’t need a good knowledge of Photoshop to...
Prenup Template
Copyright Notice:
This photo has a copyright, any redistribution nor transmit or store it in any other website or other form of electronic retrieval is prohibited without express written permission from the owner. campsg photography
i was trying so hard to be myself i was turning into
[add your photo id / passport photo / driving license / work id card etc and i will add it to this set
thank you for participating]
I am re-posting this module which was created [discovered] in 1990. The main reason for re-posting this is that I found a more logical way to get that odd angle. The method is quite accurate but I do not think that it is Mathematically correct. The method is best illustrated by the photo diagram. Briefly, it shows the angles [in black] required for 4, 6, 8 modules assembly like stars, and coasters. Those angles radiate from the bottom left corner to the middle crease line. These angles can be easily generated by simple folds. Therefore, in order to get the angle required for a 5 piece assembly, logically, that angle should be in between 4 and 6. Can I logically assume that the bisector [circled and in red] the correct angle? Likewise, for a 7-piece assembly I take the bisector of 6 and 8 to be the correct angle. The interesting part here is that, that angle radiates from the corners to almost the middle of the opposite edge. I have assembled some 7 piece coasters quite accurately with this and will post them in due course. More details of this module was posted in 1993 - www.flickr.com/photos/61236172@N08/11003407114/in/datepos...