View allAll Photos Tagged Tutorial,
Depois de abrir as janelas e tirar as abas da caixa eu reforcei as laterais que ficaram fininhas demais com o próprio papelão das abas. Assim o mini studio não corre o rsico de "desabar"
Made for Jeni for an ornament swap between a few of us friends. And a quick tutorial and templates for you! Blogged
Found this little tutorial back on my laptop. I was asked to make a little tutorial last summer on how I make my models pose in my pictures. It was meant to be printed in a dollmagazine... Sadly in the end it didn´t get printed because of .... ..... whatever.... So I thought I´d share it with you guys.... Oh, and sorry for my very bad english,.. I never asked someone to correct it... lol
Three more window designs are covered in this tutorial on Brickbuilt.
Tutorials | Creations | Featured Tutorials | Build Logs | Commissions
Olá minha gente!
Hoje eu trago pra vocês o tutorial dessas rosas lindas, quem quer aprender a fazer?
Vem ver! trioesmaltado.blogspot.com.br/2014/01/tutorial-rosas-azui...
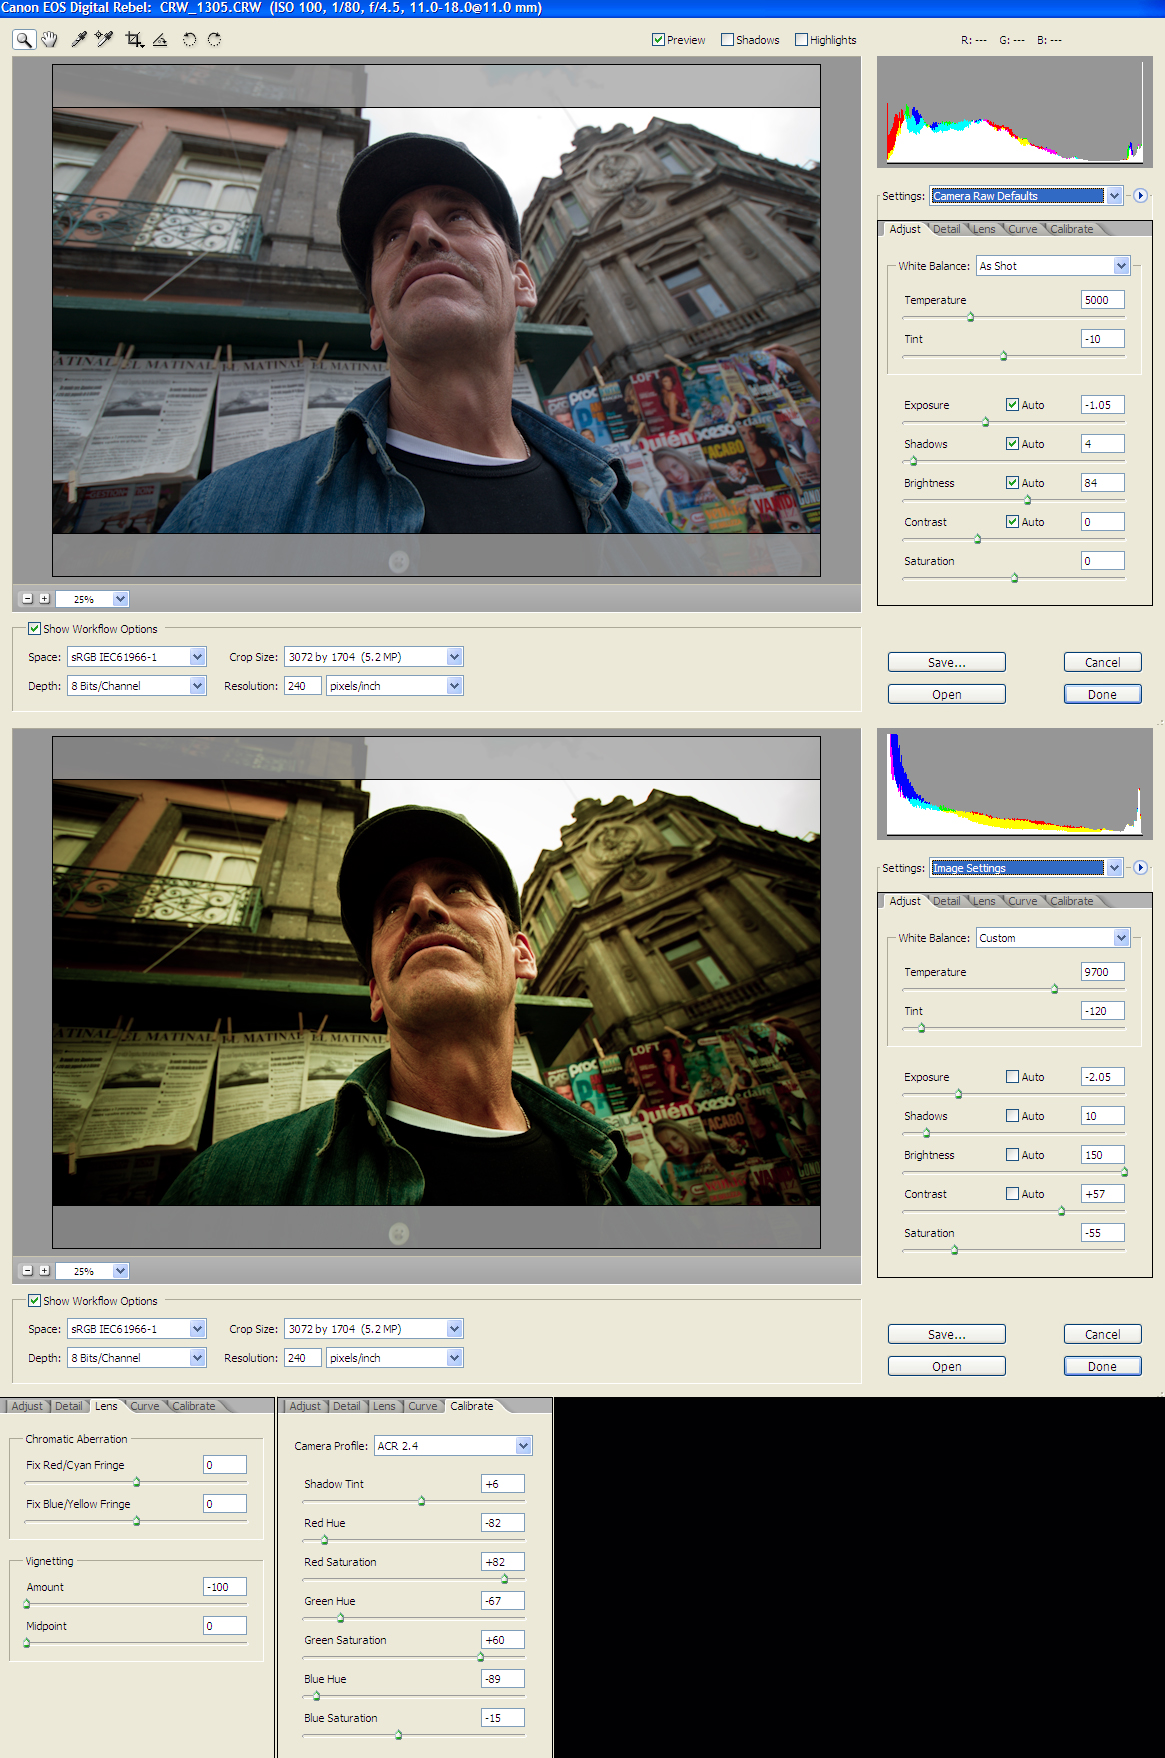
Here you can see the original photo and the color correction one, with all the RAW parameters. Hope you find this helpful.
Best View Original Size.
Here its the photo in full size
Photos from other people using this tutorial:
Clowning around by Nikonographer
mandolin LM green by adderall_223
If you use this tutorial on your photos it would be nice to add them here :), so let me know!
I've seen so many photgraphs with really obvious problems that are difficult to fix, so I created a tutorial about one way to "blend" photographs semi-automated using Photoshop and the awesome masking abilities that many people are not familiar with.
One secret is that you can use this technique with 2 (or 3) versions of the same RAW file so that if you did not bracket the shot, you can still improve it using this technique.
Hope this helps.... maybe more will follow showing other techniques I employ on almost every image you see here....
-John
Our newest tutorial on Brickbuilt is another installment in our growing number of furniture tutorials.
More furniture designs are explained in our latest guide on Brickbuilt!
Tutorials | Creations | Featured Tutorials | Build Logs | Commissions
Need a new well design to spice up your medieval layouts? Check out this tutorial on Brickbuilt.
Tutorials | Creations | Featured Tutorials | Build Logs | Commissions
Se necesita 70 cm de alambre de 2mm de diametro.
Le debo este descubrimiento a Paula -Cruz, muchísimas gracias Paula , tu si que eres Super¡¡¡¡¡¡¡
Este tutorial también se lo dedico a calabacina www.flickr.com/photos/29534130@N04
Maria José, se merece esto y más, un beso.
further practise. removed the tacking from the under collar, back neck facing, front facing and sleeves. then cut out another undercollar, attached it to the back neck facing and machined both to the blazer neckline, continuing on to the front facing
critique
for the photo i should have opened the collar down to where the first button is to be positioned. never mind, next time
the collar, lapel and front are machined but still have to be edge stitched. that's for another day, as are the making of the button holes and covering the buttons in the same fabric.
happier with the collar and lapel though the angles are still not quite symmetrical.
hoping i don't mess up when i edge stitch.
reset and machined the sleeves to lose the puckering on the shoulder.
the hemming of the front, back and sleeves has not been done. i'll only do that on the actual blazer
tomorrow i'll prepare the green linen for the actual blazer
i'm following the classic blazer pattern downloaded from this reference book flic.kr/p/2q55djV
'the dressmaking book' by alison smith mbe publisher dk
alongside the reference book i use you tube tutorials that i search for when more explanation is needed
How to Sew Darts | Beginner & Advanced www.youtube.com/watch?v=m9x-i-txyfo
5 Tips on how sew non-pointy darts! www.youtube.com/watch?v=D8M_TLn_do4
How to Sew an Invisible Zipper
www.youtube.com/watch?v=yaza9t-CAiQ
How to Sew an Invisible Zipper - Updated
www.youtube.com/watch?v=cG8CSr11kjA
How To Sew Invisible Zipper On Shirt / Dress | Sewing Technique Tutorial
www.youtube.com/watch?v=ZHNrRoCSxaE
Invisible Zipper
www.youtube.com/shorts/npDSSAMzNNc
Super clever invisible zip trick
www.youtube.com/watch?v=2UyfKL5G-Bw
how to understitch www.youtube.com/watch?v=aFz4tsplENI
what is understitching?
www.youtube.com/watch?v=gnRDeKqKgto
ten top stitching tips www.youtube.com/watch?v=XDRXfYgkU4k
Top and Dress
Detailed Sewing Tutorial For A Beginner : Simple Linen Top, Bias Binding Neckline【Free Pattern】
www.youtube.com/watch?v=5cFiT8UcU54
Download the Pattern
www.madebysachi.com/2021/09/27/super-simple-top/
LINEN DRESS DIY【Free Pattern +Easy Draft】Step by Step Guide for Beginner /back opening /Skirt Pleats
www.youtube.com/watch?v=iDFRlF_yEtA&t=0s
Download the Pattern
www.madebysachi.com/2021/09/27/super-simple-top/
BASIC SEAM POCKET
www.madebysachi.com/2022/07/09/basic-seam-pocket/
How to Sew Pleats | Box Pleat, Knife Pleat, Inverted Box Pleat
www.youtube.com/watch?v=kRlHcPh38MY
Forming Box Pleats
www.youtube.com/watch?v=cNXJ_BIsb1E
Inverted Pleat
www.youtube.com/watch?v=EfdE3DlJdFQ
setting the sleeve www.youtube.com/watch?v=Nqo-SIy8MXY&t=178s
coat pattern instructions www.sewmag.co.uk/free-sewing-patterns/serena-wool-coat#lo...
How to properly sew a shawl collar jacket/sewing techniques for beginners www.youtube.com/watch?v=DjeqgIfSt9c
Easy Way To Sewing shawl collar | Coat Collar Tutorial Cutting and Stitching | Sewing Tutorial www.youtube.com/watch?v=dsUZjA9JErI
my sewing machine JL220 flic.kr/p/2odruLA from john lewis www.johnlewis.com/john-lewis-jl220-sewing-machine-pepperm...
sewing machine maintenance flic.kr/p/2q9GVTh
How to Use your SEWING MACHINE (for Beginners)
www.youtube.com/watch?v=jmaZBTMzkoY
A Beginners' Guide To Using Your Sewing Machine
www.youtube.com/watch?v=imryOl_LNaw
Beginners Sewing Course - Day 1 - The Basics
www.youtube.com/watch?v=IGITrkYdjJs
Seam Finishes
10 SEAM FINISHES Without a Serger || Basic to Couture
www.youtube.com/watch?v=GYt7JxC_bIc&t=596s
7 Seam Types and How to Make it- Sewing Lesson for Beginner
www.youtube.com/watch?v=Ax6JDDP_6O8
French Seam Pockets
How to Add Pockets to a Side Seam using French Seams
www.youtube.com/watch?v=aatWJL_aAYY
Lining
How to add lining to ANY dress pattern | Sewing Tutorial
www.youtube.com/watch?v=ENKI3fSBQBo
How To Sew a Slip Stitch by Hand
www.youtube.com/watch?v=pjky55Cp1_I
Buttonholes
3 Sewing Tips to Make Buttonholes Neatly and Quickly
www.youtube.com/watch?v=6oOz28Ybk8I
How to Machine-Sew and Custom-sized Buttonhole
www.youtube.com/watch?v=A6P-TKK3tjg&t=135s
Place and Sew Hooks and Eyes Correctly
www.youtube.com/watch?v=_d06GhQx_Wg
How to Fix a Low Neckline
www.youtube.com/watch?v=3U-W6W5fh-4
Interfacing
How to fuse iron-on interfacing to fabric
www.youtube.com/watch?v=7idVbAkUBTU
reference books
i'm a complete beginner at dressmaking. posting photos of progress to encourage myself to continue www.flickr.com/photos/connect2012/albums/72177720305370633/ i'm not making any recommendations ...
One of the fun things I'm doing over on Brick Fiend is Tutorial Tuesday. I'll be doing small little builds in four or five steps, that pretty much anybody can build!
Flickr will be getting them a week or so after the Facebook page will be, so go Like the page to get them when they come out!
My HDR tutorial is now ready please have a look Tutorial
Pronto! Panô terminado, prontinho pra cobrir a minha caixa de disjuntores... assim que eu tiver coragem de colocar preguinhos na parede! =P
Tenho dois tutoriais de viés pra indicar, usei ambos no acabamento deste panô:
1) Básico, como aplicar e como fazer os cantinhos: www.pat.patches.nom.br/retalhos/dicas/acabamento.htm
2) Como finalizar o viés, para que não fique evidente onde começa e onde termina: eltallerdegeorgina.blogspot.com/2009/07/tutorial-bies-fin...
Este último é genial, recomendo.. a impressão é que não vai dar certo, mas funciona direitinho!
Beijos, Gi.
Hello Folks,
Repeatedly, I see our friends having problems understanding and making the best use of Raw Conversion. There is actually a lot that can be done, while converting a raw file. If you can make the best of the tools available, you actually don't need to do much in post processing at all.
Here you may read the rest of the story if interested.
This was done in Photoshop CS2. I may at some point do a similar interface tutorial for CS3 if the interest level happened to be high enough.
Canon 5DIII | 70-200 2.8 @ 70mm f/7.1 | 1/320 | ISO 200
22 Shots, Handheld
Panoramic and Landscape Editing Tutorial
---
©k2focus.com | photography
Soccer Grass Tutorial
Another grass tutorial from my Element Experimentation series. This grass is shorter and tidier than the wavy grass that I showed in my previous tutorial and looks more like what you'd typically find on a soccer field. You can find the tutorial here:
fullplatebuilds.com/2018/11/06/soccer-grass-tutorial/
Hope you find it useful :)
Created following this tutorial www.youtube.com/watch?v=VXtR8WSciBo
I tried to follow along at actual speed, but I had to pause a few times to catch up.
I also used Sepia instead of Burnt Sienna, because that's the closest colour in my watercolour tin.
We have started a brand new feature on Brickbuilt: guest tutorials! Every month a guest will be contributing a new tutorial, and to kick things off, Joeri Ridder shared his beautiful tree design: tutorial link.
Como hacer una flor japonesa? Aquí teneis una imagen que la extrage de esta página web: www.mookychick.co.uk/diy_ethic/kanzashi_tutorial.php
Para cualquier consulta enviad un flickr mail o consultad mi perfil
When your bird has a great shape (like most birds do) and you have a bright background, consider making a silhouette by exposing for the background and letting the bird go completely black. To do this, use spot metering and meter on the background.
Read the tutorial on the blog:
I thought I would make a tiny tutorial for anyone interested in making the 1/24th DIY kits that are available on ebay. This shows how to make a cake stand for the tea room.
The top photo shows the instructions. They are mostly in Chinese, which is a challenge, but the photos are good.
The bottom left shows how I gathered the items I needed using the directions and a key that shows all the components.
The bottom right shows the finished cake stand. Everything comes with these kits. It's just a matter of sorting the pieces, and assembling. Great if you like this sort of thing, not great if you don't, lol.
An adult yellow-bellied Marmot (Marmota flaviventris) watches over a pup born this year in a boulder field near treeline. The pup was one of 4 that kept appearing from their refuge to look at the bipedal animals that frequently walked by, despite the best efforts of mom (or dad?) to keep them hidden in the rocks. The adult was emitting almost a constant whistle alarm call (and thus the cheesy common name "whistle pig"). Litters of 4 are typical of yellow-bellied Marmots, but mortality in the first year is around 50%, probably associated with predation from coyotes, foxes, and birds of prey.
Taking a look at a sci-fi design this week!
I used this technique in my last SHIP, and hope you all find it interesting.
Read the guide now on Brickbuilt.
Tutorials | Creations | Featured Tutorials | Build Logs | Commissions
Made an article/tutorial on how to use office and art supplied for product photography. Also how t create this kinds of shot. Head on over to petapixel.com/2016/05/09/use-office-art-supplies-product-...
for the whole article.
Strobist info:
Studiostrobe thru softbox and scrim subject right @ 1/16
Studiostrobe thru softbox and scrim back left of subject @ 1/16
White Fill card front left and right side of subject
pues estos pendientes son los que he hecho para un vídeo demostrativo,
tutorial youtu.be/6AgWFBnr2tw
tambien podeis verlo en el apartado de esquemas de mi blog www.cristinarugar.blogspot.com
Here is a basic tutorial from fiz-iks.com on how we do our light stencils. It sure has changed since my first tutorial.
Light stencils are an easy way to add in graphic elements to long exposure shots. Basically, this is fired in the frame while the shutter is open during a long exposure. The graphic remains while the person and box is completely invisible.
Watch the vid and make a box as directed. Using any illustration program print out your design onto fine grade paper which is slightly heavier than regular copy/printing paper. I print 2 and paste them together but make sure they are perfectly aligned by holding them up against a bright light source. I laminate mine so they can be reused as they often rip when removed or changed but this is not a necessary step.
I usually set the flash to 1/8 which works well with the settings I use on my camera for light @painting. You may need to adjust this and I suggest doing a test shot before your light work to check the exposure of the stencil. Happy shooting!
Please pass this on via twitter or other social medias! More tutorials coming soon, follow on twitter to be notified.
Created for It's an Addiction discussion HERE.
Image credits with my thanks to;
Short and sweet guide for this carpet design has just been posted on Brickbuilt.
Tutorials | Creations | Featured Tutorials | Build Logs | Commissions
My attempt at a tutorial. I love when other people do tutes and put all the steps into one photo.
Since I don't have a lot of computer savvy, or fancy programs, this is the best I could do for now:
1. Choose a template shape that you like, or make your own from paper. The bottom layer is a solid flat - about #2 on an Atlas - cut to shape.
2. The middle layer is the same thickness, same shape, but with a mirror hole cut out. Leave a tiny bit of squiggle room to let the clay shrink around the mirror a little during cure.
3. The top layer is the decorated layer. Same thickness. Sky's the limit. Anything goes. Cut to the same shape. Cut the hole a little smaller so the mirror doesn't fall out when you're done.
4. Pile all three layers on top of each other, matching up the design with each layer. Sometimes I smear a drop or two of liquid polymer to act as a binding agent between layers. Add an edging to cover the laminations. Cure all at once!
Aquí os dejo este tutorial de como he hecho las flores del Conjunto Alia.
Se necesita bote de plástico , tijeras y soldador. Es mucho más cómodo de trabajar y más seguro.
Se cortan los círculos con forma de pétalos.
Hacer el agujero del centro.
Acercar los lados de los pétalos al soldador y poco a poco se van encogiendo.
Cuando están los lados acercar el pétalo por la parte de arriba al soldador, empezará a encogerse, después pasarlo a la punta del soldador y se encogerá del centro. Haciendo la forma del pétalo natural,
Así con los 4 pétalos.
Volver a hacer lo mismo con un círculo más pequeño.
Unirlos con fornituras al gusto del artista.
Qué tengáis una primavera muy floreada¡¡¡¡¡¡