View allAll Photos Tagged Solve
Last spring and early summer the robins built a nest on top of this A/C unit. We had to do something to stop them since we needed to use the unit and I didn't want to harm the babies so Craig, our Handyman put a screen above the unit and now there isn't enough room for any bird to get in there. We have these screens on the other A/C units so this was the last one. I'm happy!
No more pinholes but this developer is really black in the shadows. Agitation is every 15 sec. Might try once every minute next time to reduce the contrast.
2/5
BOX DATE: 2012
MANUFACTURER: Mattel
DOLLS IN LINE: Lagoona; Operetta; Robecca; Howleen; Gil; Robecca; Rochelle
RELEASES: 2012 separately sold; 2012 Gift Set
MISSING ITEMS: Headband, bracelet, bag, leotard
PERSONAL FUN FACT: I'm really glad I was able to solve the mystery of this skirt. I knew it was Monster High when it arrived in the mail, in small lot of Monster High/Ever After High clothes I purchased. I just couldn't quite place which character it belonged to. I didn't even think about this outfit belonging to Robecca. Luckily, when I was on eBay looking at Monster High stuff, I spotted this skirt in a random clothing lot, paired with its leotard. Seeing it in the context of an entire outfit made me suddenly remember what it must be! After all, I did spend an awful lot of time coveting the Dance Class Gift Set in stores back in the day. I knew this either was a very small cape, or some kind of wrap! I'm so glad to have identified it...hopefully it will come in handy someday!
Three of the four members of the Algonauts (the winning team) at this year's Digi-Key competition. (The green thing on the table to the right is Tyler's elbow.)
The M15 globular cluster is found in the constellation of Pegasus close to the star Enif. It is one of the oldest known globulars, estimated at 12 billion years and lies at a distance of around 33,600 light years.
SW 190mm MN
NEQ6 PRO
Canon 550D modified
Astronomik cls clip filter
ISO 800
Guided
I will accept my Nobel Prize with grace and humility for solving this age old problem. Thank you all :-)
Date: 19:28-21:40JST Dec.22, 2017
Location: Asagiri Arena, Shizuoka Pref., Japan
Cloud Coverage: < 5%
Wind: 0.5kt ~ 1 kt
Temperature: -4.5C ~ -6.2C
Humidity: 88% ~ 94%
Air pressure: 928hPa
Lens: SIGMA 135mm F1.8 DG HSM Art
Mount: SWAT-200 (single axis autoguiding)
Autoguider: QHY5L-II, LM75JC, PHD2
Camera: Canon EOS 6D (SEO-SP4)
ISO speed: 1600
Exposure: 29x210sec.(f/2.2) + 15x45sec.(f/2.8)
Processing: PixInsight
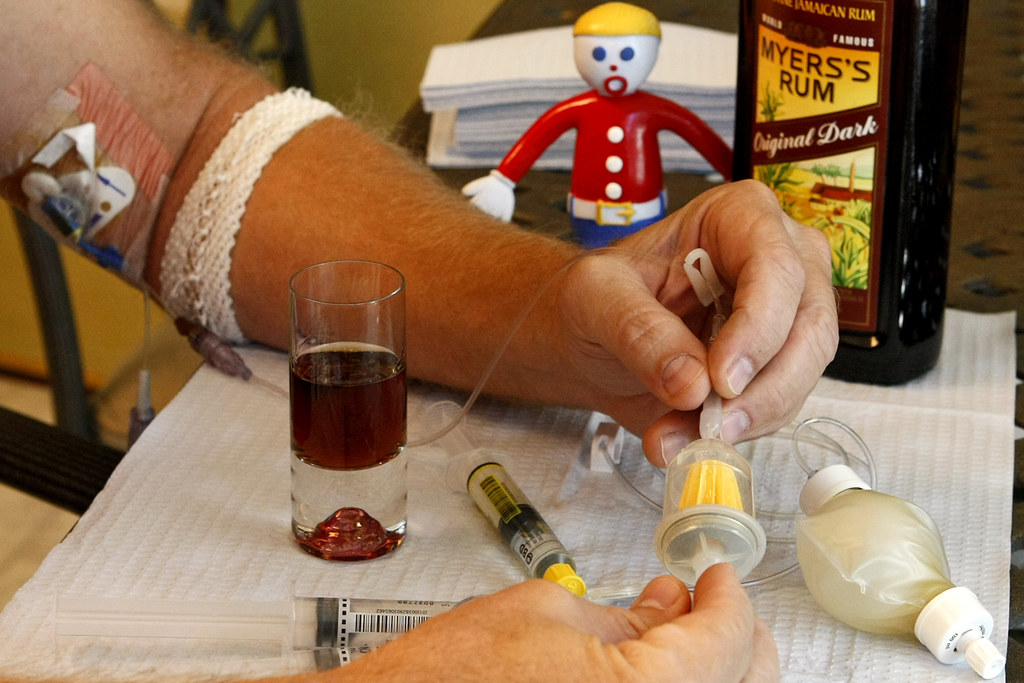
As discussed somewhere in this very long comment thread, the drinking of cocktails has been and will continue to be off-limits to me for a little while.
To work around this problem, and because the doctor and nurses specifically said I shouldn't "drink" alcohol during this period, I figured it shouldn't be too problematic if I simply infused cocktails directly into my bloodstream.
As seen in this photo, using a shot glass full of Meyer's Dark Rum (You can use any alcohol you like. I use rum 'cause it's the "in" thing to ingest here in the islands.), I simply dip a replaceable in-line fuel filter, that I would normally use on MiniPup, into a shot glass filled with rum.
I let the fuel filter soak up as much of the alcohol as possible, then insert the filter between the doctor prescribed drug (Zosyn) and the portal of my previously installed catheter (PIC Line).
I just finished my 8:30am infusion and am feeling much better than I was earlier this morning, after my 2:30am infusion.
My past engineering experience really came in handy here.
Here's a larger version.
Canon EOS 40D, Canon EF 85mm ƒ/1.2L II USM prime @ ƒ/1.2, ISO 1600, .8 sec exposure, camera sitting on a folded coat in lieu of tripod as I didn't have one with me.
I find that the faster you shoot these, the more subtle colors you get. Long exposures tend to make the quick flicks of rarer colors blend into one another; I was fortunate to have the ƒ/1.2 lens along.
It’s not all candy canes and snowflakes… ❄️
This holiday season, secrets are unraveling, and the Naughty List has deadly consequences.
Will you solve the mystery? 🔍🎄
MadPea’s immersive crime story is arriving soon.
In previous years the park and ride has hosted stored buses in the car park, which is physically segregated from the bus lane. I'd often wondered how they got on past the height barriers. This was how, past two padlocked barrier posts.
www.youtube.com/watch?v=N6aevCz-MRY
thinking of ways to keep my time from running out.
thinking of ways to keep my pride from running out.
so many reasons i can give for running out.
keep my head down but i still know
you can't send it alone.
and it's all i've got.
and it's not enough.
and it's time to reason out my mind.
and it's all i've got.
and it's not enough.
and it's time to reason out my mind.
you can't send it alone.
you can't send it alone.
you can't send it alone.
you can't send it alone.
there's a problem, i can't solve it.
(+ DUE NEI COMMENTI)