View allAll Photos Tagged compare
November 18, 2016
Lambent:
[lam-buh nt]
adjective
1. running or moving lightly over a surface
2. dealing lightly and gracefully with a subject; brilliantly playful
3. softly bright or radiant
-----
A very busy day left little time for photography, so after getting home from work and before heading out to celebrate Dad's birthday I was lucky enough to snap a few photos of a chickadee in my backyard.
Good thing this guy decided to show up because nothing else really stood out as a photo moment throughout the day.
All in all though, it was a good day. Topped off with a great meal celebrating Dad!
Happy Birthday Dad!
Hope everyone has had a good day.
Click "L" for a larger view.
Comparing Ektar to CineStill 50D I think that I can get almost the same picture if shot at the same ISO
Late Gothic church containing an altarpiece of absolute value and a series of interesting frescoes. These include an important depiction of the Battle of Lepanto, which can be compared with a representation of the same event in the beautiful Collegiate Church of Casei Gerola, the neighbouring village.
Nothing compares to nature when it comes to beauty! As I was shooting the reflections of this tree, two small fish broke the surface creating patterns between the two rings they made.
The Angler's lure didn't come out at all and what do you know? No one's made a library of angler glowers on women's heads? What the hell? :P
I kind of knew I was setting myself up for failure with the angle that I took the shot so I think I'll do another, closer up of the lure to see if I can force the robot to understand.
That said, I'm really enjoyed the metallic scales that came out in the comfyui rendering and I had to do very little to render a mermaid.
Fannie: there you are... Mom is looking for you, she needs those greens...mnomnomnumnom *gulp*
Annie: ...sheeesh...I'm almost done. Whatcha eatin?
Fannie: ...ah, your Easter candy... oh...and before ya get mad...
Annie: ..FFFfff...
Fannie: ... Dalton says the new girl is a klepto and she's got yer bear... BYE!
Compare this to the previous shot, and you'll see that windows were blown out in all 360º of the tower including the elevator shaft for The Sundial.
Look at the size of the Aeromexico jet compared to all of the Boeing 777/767 from United. (I assume there might be a 767 in there because United flies those to/from O'Hare still.)
....and here all this time we'd been thinking they were Yaks?? (dummies!) Have since found out that these cows are from the Badachro region of Scotland. Aren't they something? Very exotic compared to any of the cattle normally raised 'round here.
A comparison with the older versión I made 5 years ago.
The new striping makes the newer versión more "noisy" to look at, but has more details, and more correct curves, compared to the prototype.
Ringed Plover on the mud of the freshmarsh @ Titchwell this morning. miserable conditions compared to yesterday
I went out today, for the first time in a long time, with just me and my camera. It was windy and extremely cold compared to the last week and a half so I didn't stay out long. I spent some time tinkering with settings and my new remote.. and I am really happy with the outcome of said tinkering (not necessarily the photo itself but the shadows and whatnot).
Life is 'ever shifting'. This is but a moments capture of who I am today.
I just saw the views on this and I might have used the words holy, sauce and an expletive in the same sentence..thank you for 7,880 views!
Autumn is once again upon us
The chill is in the air...
Summer cannot compare.
Surely a new season has began.
That is Nature's great plan.
Leaves change from green to red... orange to brown.
They fly and lay upon the ground.
The breeze blows... and soon will bring Autumn to a close.
~nrgv©2015
In order to check that the two boards and all the associated wiring would stand up to being parted, moved around and rejoined, I relocated the layout. During the disassembly, some careful tidying of the mass of sub-baseboard wiring was undertaken.
The layout was reassembled and thankfully, all was well. The new location enabled a longer view to be taken, and it's shown here compared with a similar shot when the baseboards had just been built.
...and best viewed large or on black.
Good morning and Happy Feathery Friday. For a change of pace today I thought I'd post a series featuring the most frequent visitors, or yard buddies as I call them, during the late fall - winter season starting with the above male Northern Cardinal (Cardinalis cardinalis). There are a few notably absent from this series such as the Blue Jay, which is probably just as well since this series is long enough as is and I'll probably post the missing birds at a later date. And these photos were taken late October - early November when the weather was relatively mild compared to the cold & snow of the past week or so.
So you'll know, I'll not be posting anything here on flickr for a few days to tend to some personal things and to work on a new butterfly book. I plan to be back posting again on Tuesday, but between now and then I'll be popping in and out on flickr for quick visits and to attend to my groups.
Thank you for visiting...and I hope you have a truly nice Friday and weekend
Lacey
ISO800, aperture f/6.7, exposure .006 seconds (1/180) focal length 500mm
Elandra is considerably bigger than Merina, I didn't expect such difference. Glad about it though =P
Compared to some of my recent uploads, this shot has received quite minimal processing(!) mainly to colour balance and localised contrast adjustments. Still, it's the best I've got for Sliders Sunday...
HSS everybody :-)
The Nikon FE2 is a significant upgrade to its predecessor, the Nikon FE. The FE2 came out in 1983, about five years after the release of the FE in 1978. Like the FM2N, the design of the FE2 was highly refined over two generations and various other upgrades. The FE2 is a great travel camera for film. It is relatively small and light, compared with both large fully-automated film SLR cameras and large full-frame FX or even crop sensor DX digital SLR cameras. However, the quality of the images it can produce are the same or better than those of a full-frame digital camera, especially when the film is scanned with a commercial-grade scanner. You can fit the camera with two or three small prime lenses and an electronic flash in a regular size fanny pack. The FE2 has most of the advantages of the FE and then some. The main improvements in the FE2 over the FE, which will be discussed in more detail below, are (1) TTL flash metering capability, (2) maximum shutter speed increased from 1/1000 sec. to 1/4000 sec., (3) 1/3 stop exposure compensation instead of only 1/2 stop, (3) brighter viewfinder than the FE, with improved focusing screens, and (4) flash synch speed and mechanical shutter speed both increased to 1/250 sec. from 1/90 sec. for mechanical shutter speed and 1/125 sec. maximum flash synch speed on the FE.
I became a constant user of the original FE soon after it came out in 1978 as a backup body to my pro-level Nikon F2 Photomic AS. Then, for a long time, I variously used an F3HP, F4 and F90X together with an FM2N for a second body. Of course, after that, digital SLRs started to take off and film became obsolete for most applications. However, for travel, especially in the modern age of restrictions on flight check-in and carry-on baggage, I like to keep my travel camera system as small as possible but still keep maximum image quality. The fully mechanical FM2N itself is almost the perfect travel camera. However, may people like to use flash with film lots of in addition to shooting landscapes and street images, may shooters like to take pictures of my friends and family, sometimes inside a building or at night. So the ability of the FE2 to support TTL flash is a big advantage over the FE or FM2N.
The FE2 was in production from 1983 to 1987, concurrent actually with the experimental and more high-tech FA. Finally, in 1988, both the FE2 and FA were replaced with the new style F801 (N8008), which had the metering system of the FA plus autofocus and built-in auto-wind. There was actually one additional major upgrade to the FM2N/FE3, and that is the FM3A, which was released much later (2001-2006; 1991). The FM3A is the most advanced of the FM/FE Series, with a hybrid mechanical/electronic shutter, an FE2 style metering indicator, and all of the other features of the FE2.
The FE2 was available in silver chrome and black paint. I have the black paint version, and the finish still looks great today, with only a bit of very minor wear and tear. When I compare the black finishes on the FE and FE2, the finish on the FE's black metal plates and dials is significantly more matte than the relatively shiny finish on the FE2. Comparing side by side, the matte finish on the older FE is definitely cooler. I have not looked closely at a chrome FE and FE2, but I have read that the chrome FE's finish is also slightly nicer than the chrome finish on the FE2. Anyway, the black FE2 also looks great. Although my FE2 has been to the shop a few times for regular maintenance, it has thankfully never had any breakdown. Some might argue that the all mechanical FM series is more repairable than an electronic camera like the FE2 over a multi-decade lifespan, and that may be true. But the FE2 is relatively simple compared with later advanced electronic cameras, so I am hopeful that my favorite camera technician will be able to keep my FE2 running for a long time to come.
All FM/FE-style bodies work great today with a wide variety of old and modern Nikon F mount lenses. Some people prefer the FE over the FE2 due to its ability to shoot more images per roll, slightly more convenient battery check, and most importantly, ability to mount pre-Ai lenses with the camera’s retractable meter coupling lever.
Unlike the single large 6 volt battery in the older Nikon EL-2, the FE and FE2 alike take either a 3V lithium battery, two 1.55V silver oxide batteries, or two 1.5V alkalines. This was standard for Nikon bodies of that era. I usually prefer to just go with a single 3V lithium to enjoy the long shelf life, but of course the other two types work fine too. Even though the small batteries control both the light meter and electronic shutter (but obviously not film advance or any autofocus), they still seem to last forever. I really liked the battery check lever on the back left of the FE, which is missing on the FE2. On the FE, you just need to push the lever down with your left thumb, and if the batteries are good, the red diode will light; no need to look through the viewfinder to check the batteries. On the FE2; you have to check battery power by movement of the viewfinder needle instead.
The FM/FE series is built with a copper-aluminum-silicon (copper-silumin) alloy body. I find the size and weight of the FE2 to be perfect, especially with wide-angle through medium telephoto Nikkor manual focus prime lenses. The body size is not too big or too small. Its size is large enough to hold securely, but still smaller than full size professional bodies like the F2AS or F3HP. It is not as small as the (mechanical) Contax S2, Pentax MX, or even the Olympus OM-3, which are considered small compact bodies and sometimes feel a bit too small to get a good grip. The FE2 weighs in at only 550g, without lens, even less than the FE's 590g. Of course, the weight of the batteries is insignificant, compared with the multiple AA batteries or other larger batteries in future electronic bodies. You can actually hang the FE2 with a small lens around your neck or shoulder and almost not notice the weight. The FE2 fits great into a dedicated case, or a spongy snug-fit case, or a small camera bag with a few lenses.
The FE2 body, like all cameras in the FM/FE series, feels a bit light and even insubstantial when held without a lens attached (The FE2 weighs virtually the same as the FM2N, which is only 10g lighter at 540g). However, once a lens is attached in the wide-angle to medium telephoto size range, especially any Nikkor manual focus primes, the lens/camera combination has the perfect balance, size and weight. It has a highly luxurious and precision feel and sound when held in your hands and used, although the sound is perhaps not as pleasing as that of the FM2N. I most often use Ai-S primes from 20/2.8 to 200/4 and the system is wonderful to operate with all of those lenses. However, once you start getting into bigger and heavier lenses such as, for example, the 80-200/2.8, the camera feels a big too light and out of balance. Also, on fatter lenses, you may need to use a rubber tripod spacer ring to keep the lens rings from touching the tripod head.
Operation of the FE2 is really smooth. The shutter speed ring is large and has an easy to turn knurled grip, although it is not quite as tall as that on the FM2N. The shutter speed dial on the FE2 offers noticeably more resistance than the dial on the FE due to the more robust click stops on the FE2. But still, it is easy to grab the shutter speed dial with your thumb and forefinger when the film advance lever is pulled out to turn on the camera. For safety purposes, you need to push the central button on the shutter speed dial to turn it off of "Auto". The film advance lever motion is amazingly smooth, although the lever is single-stroke only, unlike the levers on the F, F2 and F3. But the stroke is not very big, so a quick easy stroke quickly winds to the next frame. ASA/ISO setting is set by a ring that surrounds the rewind lever. The exposure compensation setting is located on the same ring as the ASA/ISO setting, and has a range from -2 to +2 EV in one-third stop increments, an improvement over the half-stop increments on the FE. Shutter speed and ISO markings are clear and easy to read. The ISO range of the FE2 (and also the FE) is 12 - 4000, wide enough to handle virtually all situations, though slightly narrower than the FM2N, which reaches up to 6400. The small multiple-exposure lever is located under the film advance lever, out of the way but easy to turn when you need it. The shutter release button is located at just the right location near the front of the body. It takes a standard mechanical cable release. The shutter release button on the FE2 (and FM2N) is a more modern, wider design compared with the relatively narrower release on the FE. The shutter release button on the older FE seems to have a slightly shorter travel than the FE2 and FM2N, and therefore feels slightly more instantaneous. Anyway, the shutter release on the FE2 works well with just the right amount of resistance to allow you to half press for an exposure reading, with just a short continued push to achieve an immediate shutter release. The electronic shutter on the FE2 has about the same loudness as the mechanical shutter on the FM2N, but the character of the sound is different. My FE2 has a honeycomb titanium shutter. Apparently, on later serial numbers, the FE2's shutter was changed to an even more improved aluminum design. The film counter is just in front of release crank and is easy to read.
One of the biggest advantages of the Nikon film SLR lens mount (the "F mount") is that it is the only SLR camera mount that has stayed virtually the same from the time of the first Nikon F and Nikkormat FS/FT through to the most current small and full frame Nikon digital SLRs. Except for the requirement that relatively newer Nikon film SLRs require Ai or Ai-converted lenses, all manual focus Nikon F mount lenses can be used on autofocus bodies, and most full-frame auto-focus Nikon F mount lenses can be used on all old manual focus bodies. I don't know of any other manufacturer that can make such a claim. Thus, it is convenient to use the FE2 together with a modern Nikon autofocus film or digital SLR because you can often use the same lenses on both bodies.
The FE and FM were the last bodies in that line to directly accept unmodified pre-Ai lenses because they included a retractable meter coupling lever. Of course, with pre-Ai lenses, you still need to use stop-down exposure metering. There are many excellent pre-Ai lenses available on the used market, and to use any such lenses that have not been converted to Ai, the FE and FM cameras would be a better choice than the FE2 or FM2n. Alternatively, you can probably still get an independent camera technician to convert any pre-Ai lens to Ai using scavenged parts, although Nikon itself presumably long ago stopped providing such service.
Loading Nikkor lenses onto any FM/FE Series body is quick and positive. Just line up the black dot on the lens with the dot on the camera body and twist the lens counter-clockwise. Of course, there is no need to line up the claw on Ai Nikkor aperture rings with an exposure meter pin on the body; this old system became obsolete after the Nikkormat FT2/EL-W generation. To remove a lens, just press the lens release button on the left front of the body and twist clockwise.
To load or unload film, twist the back opening lever counter-clockwise and pull the rewind crank upwards to open the camera back. Film loading is traditional style and almost foolproof. Like many Nikon and other cameras of this generation, you need to stick the film leader into a slot on the take-up spool and insure that the sprocket in the spool engages a film perforation. In my experience, this system is slower but more reliable than that on newer Nikon bodies where you simply lay the film leader flat next to an index line. Unlike the FE, the FE2 prevents you from accidentally loading the film with the shutter speed dial set to "A" and ending up with very long shutter activations if you try to wind to the first frame with the lens cap on. I can't count how many times I ran into this problem on my old FE. The FE2 defaults to M250 until the first official frame is reached. The slight downside is that you are unable to squeeze a few extra exposures off the beginning of the role (unless you use 1/250 sec. and Sunny 16 or an external exposure meter!).
The focusing screens of the FM/FE Series were improved and brightened with the release of the FM2/FE2. The original screens on the FE are about 1 stop dimmer than the later second generation. (Note: first and generation screens are interchangeable with exposure compensation). A slight disadvantage of the FM/FE series viewfinders is that, unlike the 100% frame coverage of a pro-level Nikon F series camera, the FE2's frame coverage is only 93%. This is not unusual in a pro-sumer level camera, but you need to be aware that objects that are outside the field of view in the viewfinder will be captured on your film. The viewfinder contains all of the information that you need for convenient camera setting. There is an aperture direct readout (ADR) at the center top of the viewfinder, same as on all FM/FE series cameras. The exposure meter uses a match needle system on the left side of the viewfinder. I actually prefer the three red light emitting diode system of the FM series, which is easier to see in all light conditions. However, the match needle system on the FE2, like the FE, is perfectly fine and is just as easy to see in most normal lighting conditions. The viewfinder of the FE2 is exactly the same as the FE, except that the shutter speed display range has been expanded beyond 1/1000 sec. to 1/4000 sec. Also, the FE2 adds a red LED on the right side of the viewfinder that lights up then exposure compensation is set to other than "0". This fixes a problem on the FE, where you could easily set exposure compensation then forget to turn it off, since there is no indication in the viewfinder that it is still on.
I often use both Manual exposure measurement and Aperture Priority exposure measurement on this camera, depending on the situation. In Manual metering, you simply adjust the shutter speed and aperture until the green and black needles line up. The black needle indicates the recommended shutter speed for the given aperture, and the green needle indicates the set shutter speed. In Auto metering (Aperture priority) you set the shutter speed dial to Auto which causes the green needle to lock on "A" in the viewfinder. The camera automatically selects the appropriate shutter speed, and the black needle indicates that speed in the viewfinder. While the match needle system is nice and clear in bright light, it is almost impossible to see the display to adjust exposure in dark environments. On the other hand, an advantage of the match needle system is that you receive direct visual confirmation of a wider range of exposure divergence, compared with the LED system.
The FE2, like the FE, FM2 and FM2n exposure meters uses a pair of silicon photodiodes (SPDs) for exposure measurement. This was the latest generation of exposure meter technology, after Cadmium Sulfide (CdS) technology in the Nikkormat FT (1965) through the FT3 (1977) and gallium-arsenide-phosphide photodiodes in the FM (1977). Silicon photodiodes provide quick response and stability, and apparently lower manufacturing cost for Nikon, compared with the prior generation. Exposure measurement range of the FE2 is the same as all FM/FE series cameras, i.e., EV 1 to EV 18 at ASA/ISO 100 and with a 50mm f/1.4 lens. This supports an aperture/shutter speed range of 1 sec. at f/1.4 through 1/1000 sec. at f/16. That range is pretty good for most situations, and a step up from the Nikkormat FT - FT3's range of EV 3 - EV 17. The FE2 is exactly on par with the Nikon F3HP. However, it is not as sensitive as the EV -2 to EV +17 range on the F2 Photomic AS, or the EV 0 to EV 21 range of the later Nikon F4.
Exposure lock is one thing that is slightly inconvenient on the FE/FE2. I sometimes find it easier, even on these cameras with aperture priority mode, to just use manual exposure mode and set the exposure directly. I find it quicker and more comfortable than pointing the camera to where you can measure the proper exposure, pushing the exposure lock button an holding the button in while recomposing and shooting. However, exposure lock on the FE2 is certainly usable. On the older FE, while locking exposure locks the shutter speed at the time the lock button is pressed, the black shutter speed needle in the viewfinder continues to move. This situation was fixed in the FE2, where the black shutter speed needle locks in place when the exposure lock is pressed. By the way, I am more apt to use Aperture priority exposure measurement and exposure lock with electronic Contax SLRs, which allow you to turn on the exposure lock by turning a switch after you achieve the proper exposure setting, and it stays on at a fixed EV until you turn it off. In other words, in the Contax world, after locking the exposure, changes in aperture affect the shutter speed and vice versa in order to keep correct exposure. The Nikon exposure lock only locks the shutter speed, so any changes to the aperture after the shutter speed is locked will change the exposure.
The center of the viewfinder display, with the standard K-Type focusing screen, contains a small central horizontal split image, surrounded by a microprism donut, which is further surrounded by a large matte donut and a 12mm diameter circle. But utilizing both the split-image and microprism collar, you can manually focus on almost any subject very quickly. Turn the camera at a slight angle when focusing if necessary to find a straight line. I can't resist pointing out that with well-maintained manual focus Nikkor primes, such as Ai-S lenses, focusing ring operation is buttery smooth, with just the right amount of viscous resistance. With the no-slip knurled focusing rings on the Ai-S lenses, focusing is quick and accurate. The FE2 provides three different interchangeable focusing screen types for various applications. I never needed to use any except the standard K2-Type screen. The B2 type screen removes the split image and microprism focusing aids, while the E2 type is the same as the B2, except with horizontal and vertical etched lines. As indicated previously, FM/FE series focusing screens were improved (from the "K" series to the "K2" series) to provide a brighter viewfinder image starting with the FM2/FE2 generation. Focusing screens on the FM3A were further improved so that their split-image rangefinders don’t go dark with lenses that have maximum aperture of f/5.6 or less.
The outer circle in the viewfinder encloses the central area that carries a 60% exposure meter weight, with the area outside the circle comprising the remaining 40%. The most important thing to know about an exposure measurement system is how it weights various areas of the viewfinder image so that you can determine how to use it in each situation. The 60/40 system works fine for most situations. It is vast improvement over the classic full-frame averaging system, which was used on a Pentax Spotmatic models, the earliest Nikkormat FT, and other cameras. For these averaging systems, if you wanted a proper exposure, you could not include a bright light or big sky in any area of the frame. Still, with the 60/40 system, you need to determine where to point the camera when manually setting the exposure. Find an areas that is representative of the subject, but which is not overly influenced by a bright light, a bright sky, a dark background, etc. Also make sure to select an area that approximates 18% gray, such as a dense area of green trees in a landscape image. If you cannot find an area that is equivalent to 18% gray that fills the 12mm circle, for example, inside the Haleakala volcano crater on Maui, HI, or a bright snowscape, then you need to compensate the exposure by appropriately changing the aperture or shutter speed in Manual mode, or by changing the exposure compensation dial in Auto mode.
Two contemporaneous Nikon bodies with the FE/FE2, the F3HP and the FA, had different exposure metering patterns. The F3HP, with its 80/20 heavy centerweight, makes it easier to find an area that is 18% gray, without surrounding high-contrast areas influencing the exposure reading too much. The FA is the first Nikon body to include, in addition to 60/40 centerweight, a multi-segment metering pattern (called AMP or "Automatic Multi-Pattern" in the FA; in later Nikon bodies, this metering pattern is referred to as "Matrix Metering"). The 5-segment pattern on the FA and its first generation software were the first Nikon attempt to correct the weaknesses of the traditional center-weight averaging system. While early multi-pattern systems on cameras such as the FA, F4, F800 and F90/F90x did a pretty good and steadily improving job in most normal situations, in difficult situations, they still didn't work as well as the center weight system with appropriate exposure compensation, as is utilized on the FE2. Of course, you have to know what you are doing in such situations! Newer film cameras, such as the F5 and F6, as well as advanced digital Nikons, with their advanced color matrix systems, finally do a good job even in difficult lighting situations. Modern Nikon bodies generally use a 75/25 weight in their center-weight metering modes.
The FE2 incorporates a vertical-travel, metal focal plane shutter with honeycomb titanium or aluminum curtains. Shutter speed range on the FE2 is an expanded 8 sec. through 1/4000 sec, which is acceptable even today. This is a big improvement over the shutter on the original FE, which maxed out at 1/1000 sec. On the slow end, the longest 8 sec. shutter speed (same as the FE) is a convenience to those of us who were previously used to using a shutter release cable for any exposure longer than a second. One advantage of the FE2's electronic shutter over the FM2n's mechanical shutter is that when in Auto (Aperture Priority) mode, the FE2 can select any intermediate shutter speed. In manual mode, you can only select the standard shutter speeds that are indicated on the shutter speed dial. The FE2 has one mechanical shutter speed, 1/250 sec., which is a separate selection on the shutter speed dial. The single mechanical shutter speed on the earlier FE is 1/90 sec. Users might argue whether it is better to have a backup speed of 1/90 sec. for available light, or 1/250 sec. for bright daylight. In any event, given the FE2's great reliability and long battery life, I have never had a need to use the 1/250 sec. mechanical shutter speed.
There are just a few more features that I want to mention. On the right front side of the body are located a depth-of-field preview lever and a self timer lever. Like many other cameras, you can check actual depth of field at the set aperture by pressing the depth-of-field lever. The image darkens if the lens is not set for maximum aperture, but you can get a good idea of the expected DOF with your lens/aperture combination. Actually, this lever is not really required with manual focus Nikkor lenses, because such lenses include an easy to read DOF index on the lens barrel. Many AF Nikkor lenses also have DOF index marks. The FE2 bodies have a mechanical self-timer with a delay of up to approximately 10 seconds. While these cameras do not have a mirror lock-up switch per se, you can simulate MLU by using the self-timer lever. When the shutter release button is pressed after the self-timer is set, the mirror swings up at the start of the timer count.
Finally, a hot-shoe contact is installed on top of the prism housing for flash photography. As already mentioned, the FE2 supports automatic TTL flash control with a four-contact hot shoe. The older FE only had a two-contact hot shoe for manual and non-TTL auto flash exposure. The FE2's maximum flash synch speed is 1/250 sec. This capability is still basically current today, significantly better than 1/125 sec. on the FE, and an improvement over all prior Nikon bodies except the FM2. On both the FE and FE2, one of the flash contacts communicates the flash charging status to the camera and lights a red diode "ready light" in the viewfinder when the flash is ready to shoot. Of course, the FE2 works with any Nikon flash unit. I use my SB-24 and SB-26 and they work great. If you will be doing a lot of flash photography, the FE2, along with the FA and FM3A, with TTL flash support, are better choices than the FE and prior Nikon bodies.
In addition to the vast selection of Nikkor and third-party lenses that are available for the Nikon F mount, the FE2 also accepts various other useful Nikon accessories. One of the most useful is the MD-12 motor drive (and also the earlier MD-11). This motor drive unit works on all FM/FE series bodies (and even the Nikon FA) and allows rapid fire or remote shooting up to 3.2 frames per second. However, the MD-12 is quite heavy, especially when loaded with the eight required AA batteries. These days, it would obviously be better to use a more modern camera is you want portable and higher-speed motor drive. Other useful optional accessories (which work with all FM and FE series bodies) are the MF-16 data back, the DB-2 Anti-Cold Battery Pack, the DR-3 and DG-2 viewfinder eyepieces, and various eyepiece correction lenses.
Copyright © 2013 - 2016 Timothy A. Rogers. All rights reserved.
(DSC_6194fin2)
小環頸鴴 Little Ringed Plover vs. 高蹺鴴 Black-Winged Stilt ... How do you face unfairness like this? I simply choose to ignore...
Crack front-line units of the Imperial First Order, the Elite troopers combine cold precision with deadly resolve
Will was kind enough to send me a few of the awesome new FOE-11s, but as much as I liked them as-is, I thought I might try my hand at creating a 'tactical' version ie the props that have an M4-type stock attached. I had to shave off the Sterling-based stock to get the MODCOM M4 stock to fit, but all in all, I really like more aggressive it gives the weapon, not to mention making it just a bit more unique compared to the E-11.
One of the flowers I had been told to explore under a UV light was “stonecrop”, which is a genus of flowers containing more than 400 different varieties. Some do nothing, others light up like fireworks! Fitting for a 4th of July post, enjoy these glowing flowers and read on to learn how to create images like this!
I suppose the first thing you should do is compare this image to the “visible light” version: donkom.ca/bts/PDKP2975.jpg - the flowers are mostly one hue and shade of yellow with yellow-green stems. When they fluoresce under UV light, the buds become rosey, extra hues appear in the centers of some flowers and there is a heck of a lot more depth of colour to the image!

This was shot using three custom-modified UV flashes at point-blank range on a table in my studio. Here’s a BTS shot showing the lighting setup: donkom.ca/bts/PDKP2968.jpg . The flashes actually enter the frame of the final image, but they don’t intersect with the subject so they can be edited out. Even at this close distance, the amount that these Sedum rupestre ‘Angelina’ stonecrop flowers fluoresce is very dim. I found the use of my Platypod allowed for a much more solid base for front-heavy flashes opposed to normal tabletop tripods.
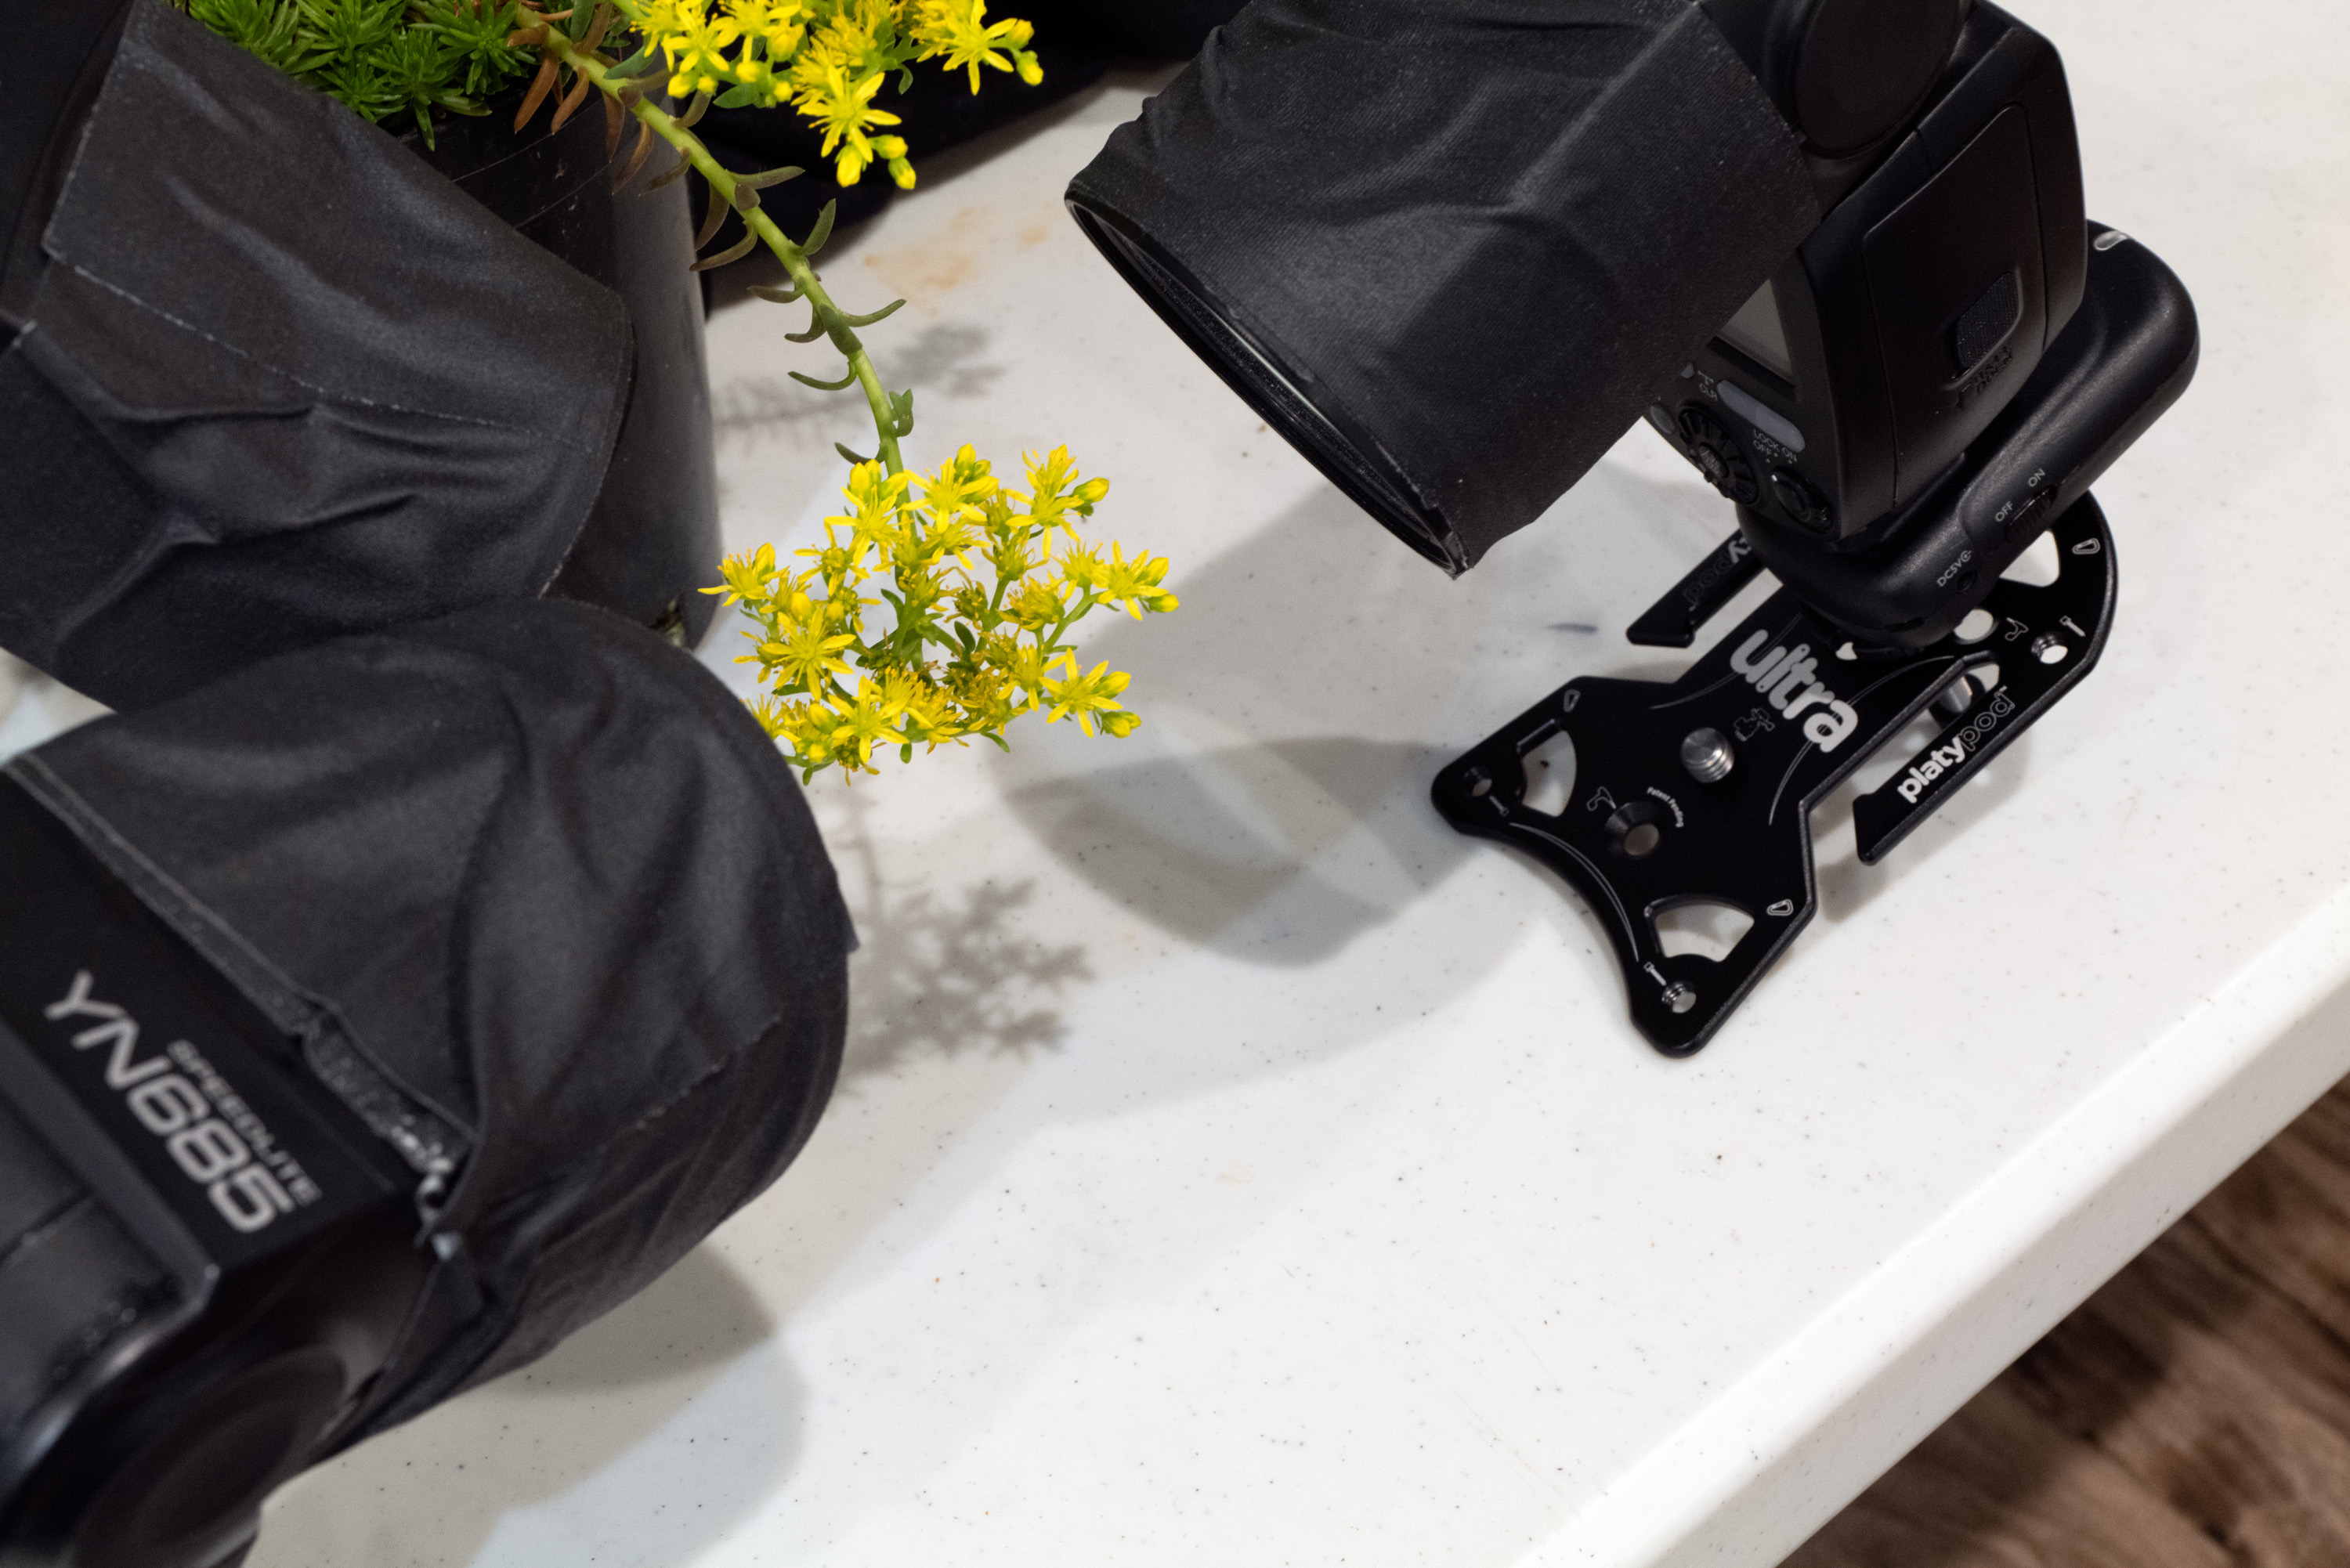
To maintain the best image quality, the image was shot at ISO 500, F/14 and 30sec exposure, while I held my flash transmitter in my hand and manually popped the flashes at 1/1 output whenever they beeped stating they had recycled. This process was repeated at three slightly different focus points with my Lumix S1R on a tripod, and focus stacked. Complex interactions and overlaps of elements in the frame meant that shooting with a wider aperture, lower ISO and more frames would just lead to headaches in post-processing. Keeping it simple, only three frames needed to get everything sharp here.
So wait a minute, why do things fluoresce? What exactly is happening when normally-invisible ultraviolet light strikes these flowers? To be clear, my flashes only emit UV light, yet the camera detects and records visible light. The simplest way that I can describe this is that the UV light excites the atoms in the flower, causing the electrons to jump up to a higher orbit/ring. This doesn’t last for very long – instantly to our own perceptions – and the electron decays back to its normal lower orbit. This also releases energy in the form of light within the visible spectrum: fluorescence. Fluorescence actually happens all the time from shorter-wave light within the visible spectrum to longer-wavelength light, it’s all around us hiding in plain sight.
Want to know camera techniques, subject insight, equipment lists and more to create images like this of your very own? There is less than 10 days left in the Kickstarter campaign for my new book, Macro Photography: The Universe at Our Feet - www.kickstarter.com/projects/donkom/macro-photography/ - pledge for a copy now at a price much less that retail!
Oxyrhopus vandicus - Cordillera Escalera Conservation Area, Peru
Some of you may remember a photo I posted 3 months back of an Oxyrhopus vandicus. Well I came across what I believe is the same individual again, 3 months later! I compared photos and the unique banding and imperfections in the pattern make me think it must be the same snake. It was found approximately 100 ft from where I found it the first time. Snake movement in the jungle is not something I know much about. In temperate areas they are often tied to a den or overwintering area that they return to every year, however I am unsure of their site fidelity in the tropics. I found it on opposite banks of a small jungle stream so it could just be drawn back to an resource with plentiful food like frogs as opposed to a territory. One way or another it was excellent seeing it again, its a rare occasion that I see the same snake multiple times in the jungle.
A photo from the 1st encounter: www.flickr.com/photos/26500525@N08/27350415546/in/album-7...
not much if anything compares to being the person you want to be in the peace and quiet of the countryside or as in this case Marks hall Estate,
Today was a much needed day out and as it made clear staying at home was not an idea I took the bull by the horns and went to the Aldham steam rally. Its more a vehicle show now but with free entry it proved to be a nice day out,
I have a couple of stories to tell over the next few photos
Comparing yourself to others, it’s like comparing bicycles, cars & motorcycles. It’s like comparing left & right.
Talk about out of this world! This is Webb’s first direct image of a planet outside of our solar system, and it hints at Webb’s future possibilities for studying distant worlds. Not what you expected? Let’s walk through the details.
Shown here is a gas giant named HIP 65426 b, which is about six to 12 times the mass of Jupiter. It is young as planets go — about 15 to 20 million years old, compared to our 4.5-billion-year-old Earth.
The four views of this planet, taken by Webb’s NIRCam and MIRI instruments, are each at a different wavelength of infrared light. The white star is the location of the host star. Its light is blocked by Webb’s coronagraphs. (Coronagraphs are sets of tiny masks that block out starlight, making it possible to see planets around them.) The bar shapes in the NIRCam views are artifacts of the telescope optics, not physical objects.
But why don’t these look like images of our solar system captured by missions like Juno or Cassini? The answer is that space is big and exoplanets are small — and far away from us! Don’t forget, we didn’t get our first detailed look at Pluto until 2015 when New Horizons visited.
Fun fact: if we sent a telescope to the nearest exoplanet traveling at the same rate as Voyager (17.3 km/sec), it would take 73,000 years to reach it. That is how big space is! And that is why exoplanet imagery from near Earth shows just dots of light.
Though Webb can potentially discover new planets, this one was found in 2017 using the SPHERE instrument on the European Southern Observatory’s Very Large Telescope in Chile. Above Earth’s atmosphere, Webb can see details of this planet that ground-based telescopes cannot.
“Obtaining this image felt like digging for space treasure,” said Aarynn Carter, a postdoctoral researcher at the University of California, Santa Cruz, who led the analysis of the images. “At first all I could see was light from the star, but with careful image processing I was able to remove that light and uncover the planet.”
Read more: go.nasa.gov/3wNDa4Y
Credits: NASA/ESA/CSA, A Carter (UCSC), the ERS 1386 team, and A. Pagan (STScI).
Image description:
The star HIP 65426 & 4 views of its planet “b.” The background of the image is black with many white & blue stars; it is not from Webb and is labeled the “Digitized Sky Survey.” Star HIP 65426 is labeled at top center. It has 4 diffraction spikes (telescope artifacts) from the top, bottom, left, & right. Diagonal lines down from the star to the bottom of the image highlight 4 inset boxes. From left to right, first is Webb’s NIRCam view of the exoplanet. It's a purple dot with purple bars at 11 & 5 o’clock. The bars are telescope artifacts, not physically present. The planet & artifacts have been colored purple. The filter used, F300M (3 micrometers), is on the image. Next is a similar NIRCam view using filter F444W (4.44 micrometers). This view is colored blue & has the artifact bars. Next is a MIRI view, colored orange. No bars are present. The filter is F1140C (11.40 micrometers). Finally, a MIRI view using filter F1550C (15.50 micrometers). It is a red large dot. A white star icon on all 4 images represents the parent star.
Compare with the image below to see what digital got from the same scene.
Shot on a Mamiya 645 using Kodak Ektachrome.
ISO 100
Aperture 3.5
Shutter Speed 1/60
Shot on a tripod
Comparing the new Angel skin to the older picasso. I honestly don't like all this highlighting, its so much. Lighter tones are fine though.
What lies behind us, and what lies before us are tiny matters compared to what lies within us.
~ by Ralph Waldo Emerson ~
Compared to the amount of snow and ice that was in other towns and cities, Kincardine's roads and sidewalks were the best kept around! Road clearing equipment was out in all kind's of weather this past winter, at all times of day…Thank you guys! Bring on the street sweepers!
Wanted to post a comparison shot of Integrity's newest man Takeo (assassin from Japan accd to the storyline) with Lukas. From a distance, they look so similar that I had given up on acquiring Takeo.
But up close you can see the difference. Takeo is indeed starkly Asian compared to Lukas. I do still think that Takeo could have looked younger and I would love him more that way, but ... whatever. I will toy around with his face, and try to make him younger looking somehow ...
The White-breasted Nuthatch is quite common here in the New Jersey area compared the the Red-Breasted. 2015.
"Mascot of Maine"
Compared to most of the other locomotives I've published most recently, this one is a bit of an outlier. It's not the hotshot superpower found on the Nickel Plate, it's not wartime power like the Mohawk, and it's not part of the Age of Steam collection.
My love for 470 comes from elsewhere. Having been a New England resident for several years and having vacationed in most of those states, I've developed a soft spot for the region, especially the piney woods of Maine. I've also always enjoyed the idea of coastal railroading: a mix of maritime and railroad visuals produce interesting scenes. There's a concept for a layout module I've had for some time that would perfectly represent those thoughts.. Maybe someday I'll build it.
I'm also drawn to the Maine Central and 470 specifically due to the preservation and claim to fame of the locomotive; 470 operated the last steam-powered passenger train on June 13, 1954 and is the largest preserved steam locomotive in New England and Maritime Canada. After sitting on display for over six decades, the non-profit New England Steam Corporation acquired the locomotive in 2015 and has since relocated it to a purpose-built structure where volunteers actively work to restore the locomotive to operating condition.
Being a naturally good looking locomotive, not to mention the incredibly striking Maine Central "speed lettering" it carried, and being preserved and undergoing restoration wins 470 a spot in my heart.
I began my model in early to mid 2021. I know, quite a while ago. Chronologically this locomotive was designed around the time I was building and completing Grey Ridge 26. Work progressed through September 2021, at which point I tested an assembled and functioning model (minus rods and artwork) on some track on my apartment floor. Tests were satisfactory; no major issues found.
And then I let the project go for quite a while. In this incomplete state, 470 sat on my shelf until last year.
One of the bigger challenges I faced was designing a satisfactory rod and valve gear package for this engine. The cylinder design necessitated some new thinking and part design which is perhaps the main reason why I only completed the model in January 2024. Some of the valve gear components required as many as four iterations until they performed as desired. I guess the take-home point is that I got there. Better late than never, right?
I'm using a Power Functions L motor geared at a 1:1 ratio to XL.25 size drivers. Control comes from a Power Functions V2 IR receiver and power is a 7.4v battery from Tenergy - a staple of my newer locomotive designs.
XL.25 wheels almost deserve a post in their own right. I initially started designing this engine with the more commonly available XL.5 wheels (right in between XL and XXL wheels). I quickly found that the driver wheelbase and proportions of the model were entirely wrong. So, I bit the bullet and opted to design a unique set of drivers at an intermediate size - essentially 1/2 a plate larger in diameter than an XL driver. This allows for the proper wheelbase dimension and better overall proportion, and the wheel is closer to scale as well. Overall, it's more effort, but worth the result.
I'm satisfied with performance, having operated the engine running light on my floor for a couple hours and getting a full hour in a convention setting with a mid-sized train behind it. Even still, my goal from the start of this project has been to operate 470 with a powered baggage/RPO car to enable more prototypically long passenger trains. While it would be nice to have 470 handle an entire train alone, it wasn't practical to go with any alternatives - no more room in the boiler for an extra motor and the tender is too short to use train motor bogies. Compromise was made, but I'm far from unhappy.
I've modeled 470 as it looked on its final revenue run on June 13, 1954. I think this is, bar none, the prettiest model I've made in recent memory. My favorite thing about this engine is the way it looks with the Maine Central logo, striping, and accents on the rods and wheels. An incredibly unique look for a star locomotive. All artwork was done by Cale Leiphart with some assistance and references from Richard Glueck. All artwork is decals printed by OKBrickWorks. Thank you all, particularly Mr. Glueck, for your assistance with this project.
As always, I'm pleased to bring this one over the goal line. Having been in progress for several years now, it feels great to have this one complete and published for the public. Guess I need to design some passenger cars now.
Video: youtu.be/kQwbIfLftjU?si=HOCQQ3svumVz1HXv
Thanks for reading.