Pencil Drawing Tutorials
View allAll Photos Tagged Tutorials
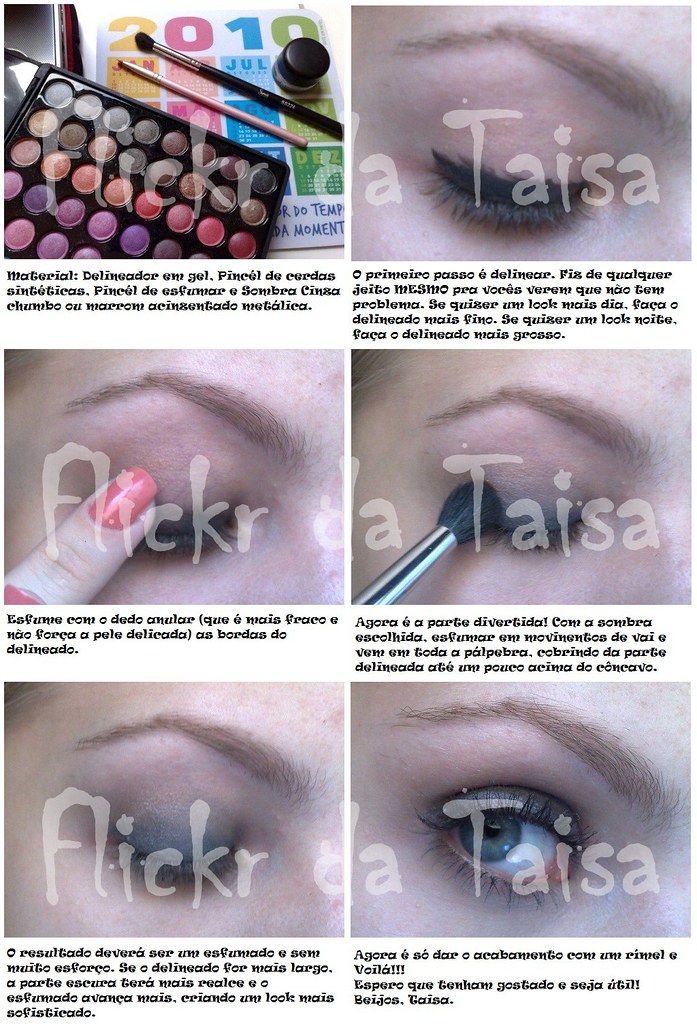
Que feliz!!! Hj o flickr colaborou comigooo.
Mel, esse é especial para vc! É o look do amigo oculto. Finalmente.. Rs...
Para ler, no tamanho grande fica melhor. Não tá gigante pq não tem muitos detalhes, então não precisa!
BEIJOS
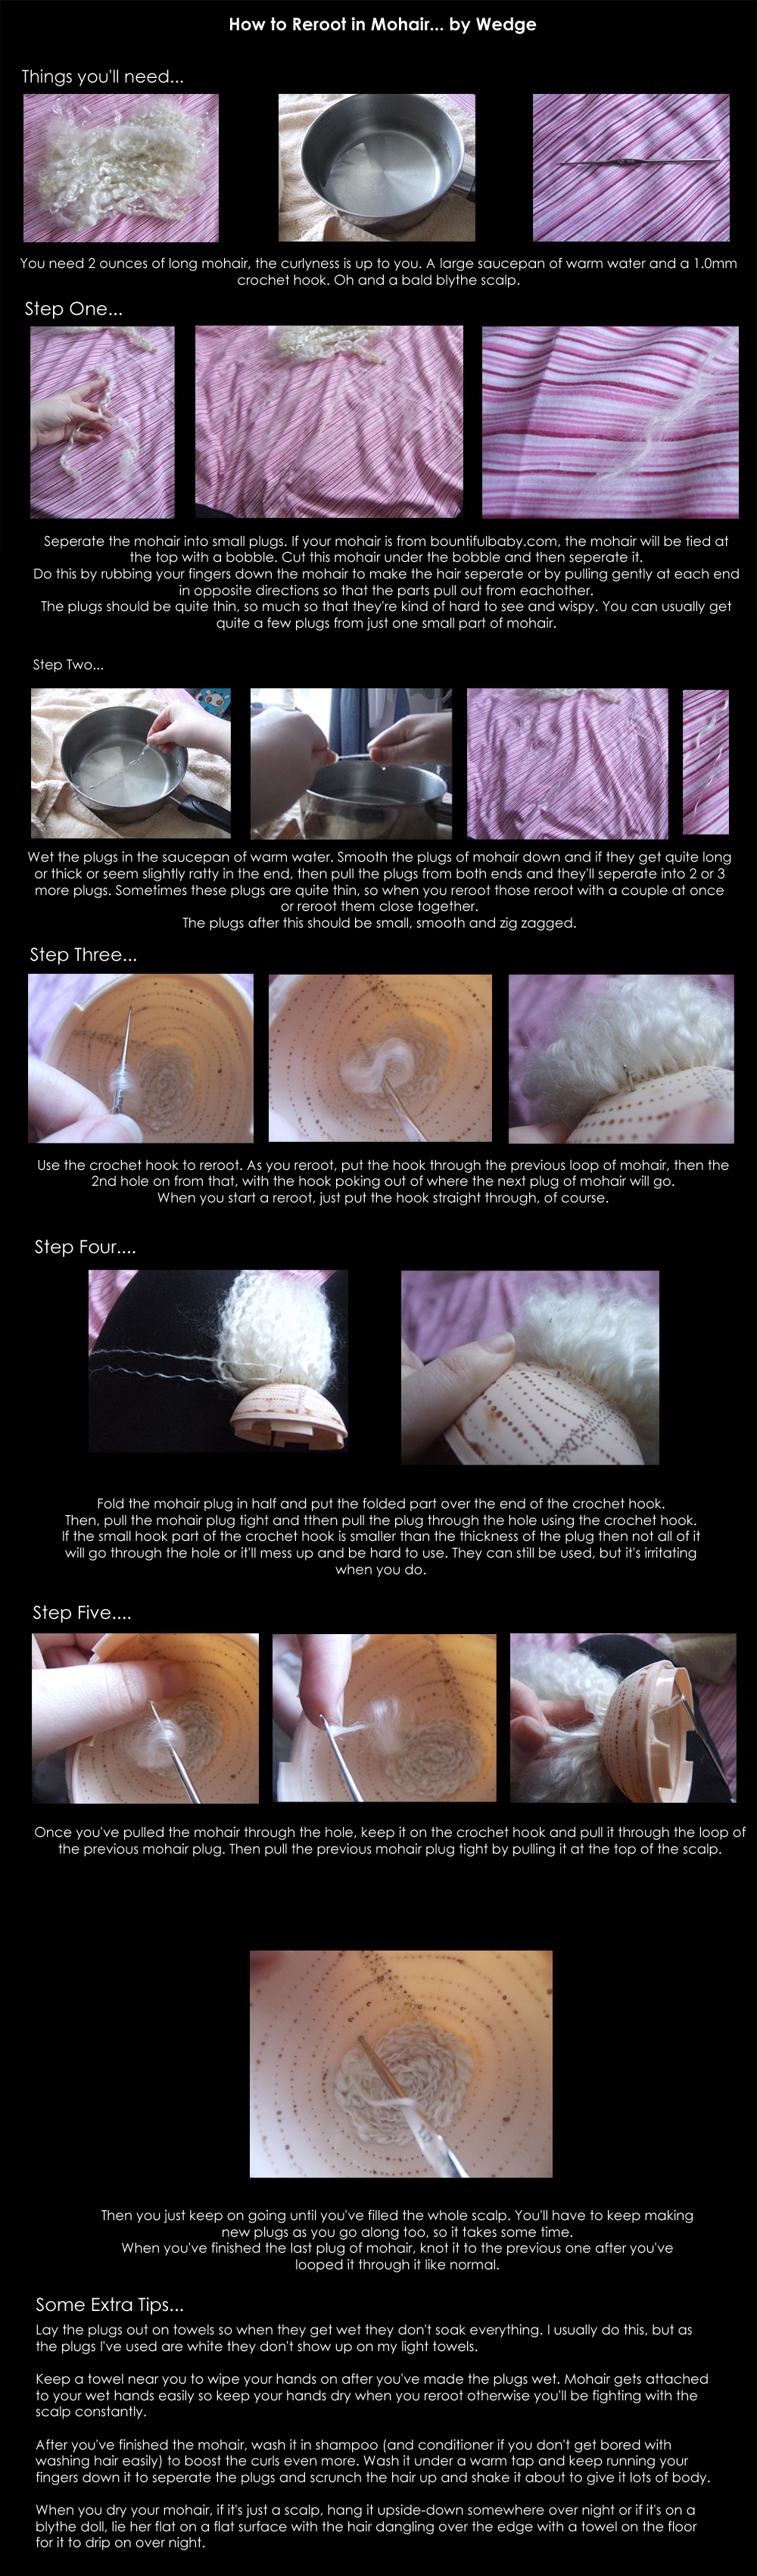
Someone was asking me lots of questions about mohair and asked for a tutorial on how to actually reroot it and everything.... the ones I recommended they didn't find helpful apparently, so I made one for them.
iamlily, this is your blythe's scalp, it's famous! :P
So Wedge, how can you do yourself and possibly others out of business?
I've posted a tutorial on how I photoshopped this image on my blog at cymagen.blogspot.com/2007/01/anatomy-of-psd-part-1.html
First winter photo session this season. I will record a video tutorial using this photo. I think it's interesting because it wasn't wintery at all. No snow at all. I will post in on my website and on my YT channel
I know my profile says I am not here to sell tutorials, and I am technically not changing that because it is not for sale, it is purely a community service - So here goes.
Jaap's cellphone photography course - Chapter one.
When photographing wildlife with a cellphone it is a little known but highly effective technique to point the phone in the general direction of the subject.
hehehehe
Consegui fazer graças ao tutorial da Jana!
A foto não ficou muito legal...
Dei de presente pra um amiguinho do T.
I made a picture tutorial for creating this image. It was done digitally in Paint Shop Pro X. I made the tutorial for my Smudgepainting group here on Flickr and for all my Digitalnuts friends.
Here is the final installment in my series of prizes for the Guild Evolution category of the 2024 Summer Joust
The settlement’s new dragon comrades gained them quite the reputation in the coming years. Intelligent and loyal, they were well suited to working together with the cartographers, hunters and trackers of the settlement. Together they could defeat even the most bloodthirsty of beasts that sometimes ventured out of Alnya’s deep forest, quickly deliver important messages, or find missing people. Their services were in high demand and earned them many generous rewards. And so an Adventurer’s Guild was formed where their many unique talents could be put to use solving problems others couldn’t. A large fortress was built with harbor, town, and farms springing up around it to house and supply the increasing number of recruits who came from afar to try and prove their mettle and gain admission.
More photos on more images on Brickbuilt.
This tutorial is done in Photoshop CS3, and you need some basic knowlegde to follow it. The numbers are the exact ones I used.
Step by step snapshots at www.soffia.net/tutorial.html
1. I duplicade the layer twise, on one layer I erase out carefully the mountain with soft eraser, opacity 100 flow around 60. (you can also use masks) One layer is just to have the photo as it is.
2. Name the layers ( image01) mountains, clouds and just_in_case_layer.
3. Go to creatae new fill or adjustment layer and choose Levels. (Image 02) I tweeked the 3 arrows untill I got 8 ~ 0,73 ~ 200
4. Go to creatae new fill or adjustment layer again but this time choose Brightness/Contrast. and put in -12 for brightness and contr. -28 (Image03)
5. Go to creatae new fill or adjustment layer again and choose Hue/Saturation. (Image 04)
take up saturation to 22
6. For now, I´m fairly happy with the mountains, so now I drag the Clouds layer on top of all the layers. (Image 05)
7. Then I merge the mountains with all the adjustment layers by selecting all the layers, and choose merge layers (Image 06)Name the Layer mountains again if it´s called hue/saturation.
8. Now we can work on the clouds, you can turn off the mountains layer by clicking on the eye on the left. Go to creatae new fill or adjustment layer and choose Levels. (Image 02) I tweeked the 3 arrows untill I got 18 ~ 0,84 ~ 215
9. I want a little more contrast in the big cloud so duplicade the clouds layer, name it cloud-contrast go to Image - Adjustment - Levels. Use 59~ 0,64~ 195. The reason why I choose levels from there is cause I only want it to affect the new cloud layer(Image 07)
10. with the cloud-contrast layer picked, go to Image - Adjustment - Brightness/Contrast and put brightness to +36 and contrast +17
11. I find the cloud too red, so go to Image - Adjustment - hue/saturation, in Edit: choose
Reds and take the saturation down to -42. After that I rease around it so the layer would look like this (Image 08)
12. Let´s go to the Clouds layer again, Go to creatae new fill or adjustment layer and choose Brightness/Contrast. put in +45 for brightness (Image03)
13. Go to create new fill or adjustment layer (Image 04) and choose Hue/Saturation. In Edit:
Blues hue: -13 sat: -67
Cyans hue: -10 sat: -57 (or tweek the numbers untill you´re happy with the colors......)
15. Merge the layers by selecting Cloud-contrast,clouds and the all the adjustment layers(image 06) (you can also select the layers and hit Ctrl + E )
16. Turn on the Mountains Layer. Flatten image. Then I did some more adjucstment with hue/sat, cyan -9 and -39 then blues -4 and -22 and Yelloes -35. And then I went to levels and did 8 ~ 1,16 ~ 255.
17. Then I put the lomo gradient fill with 40 % opacity on that layer
I did use the clone stamp to erase out a part of the sky, the dark bottom part... :P
And finally I ran it through Neat Image, a software I bought the other day. neatimage.com/
I could probably spend another hour tweeking and tuning. But let´s say this done for now.
This Bunny was based on this tutorial: tutsplus.
It took me a little while - and now I see that I have chosen the wrong export cmyk instead of rgb. UPDATED: its changed back to the right colors :-)
1 » foto original;
2 » Selecione o rosto sem selecionar olhos, boca e narinas;
3 » Após selecionar, copie (ctrl+c), cole (ctrl+v) e duplique a camada colada (ctrl+j). Na cama da meio, aplique um desfoque gaussiano (Menu Filtro/Desfoque/Desfoque gaussiano/5,0 OK). Na última camada (a de cima), você vai aplicar uma alta frequencia (Menu Filtro/Outros/Alta Frequencia - high pass/1,5 OK). A imagem ficará cinza, então mude para sobrepor (overlay) e una as camadas. Obs.: Caso precise arrumar alguma coisa que ficou "embaçada demais", vá na camada do desfoque gaussiano e passe uma borracha macia com uma opacidade baixa.
4 » Boca: Selecione a boca e vá em Menu Camada/Nova camada de preenchimento/Cor sólida. Escolha uma cor que fique boa pra boca e clique em OK. Caso fique borrado, é só usar a borracha macia (sempre usando a borracha macia =))
5 » Como fica a camada =)
6 » Olhos (oba!): Os olhos são que nem a boca. Você seleciona onde você quer a sombra e o lápis. Nesse passo, fiz o lápis e o delineador. Junto à foto tem as camadas. =)
7 » Mesma coisa. Selecione os olhos e pinte com o preenchimento de camada. Caso precise, dê um desfoque gaussiano pra ficar mais realista e tire um pouco da opacidade ou use a borracha, também. Mudei a cor dos olhos, também. Deixei mais viva a cor. É o mesmo passo. =)
8 » Como os olhos ficaram e o blush, que é a mesma coisa. Selecione as maçãs do rosto e vão em Menu Camada/Nova camada de preenchimento/Cor sólida/Escolha a cor OK e tire a opacidade. Será necessário dar uma desfocada (ctrl+f, caso tenha sido o último filtro que você usou =))
9 » Resultado.
Espero que tenham gostado e que eu tenha ajudado! hehe.
Qualquer dúvida, perguntem! =D
I've got a little good news under the stars here in New Zealand for you all on a rather dreary week! I don't know if you've seen my two recent videos on "Despair" and "Anxiety" - but in one of them I mentioned that a great way to escape from your own crazy-monkey mind is to help other people!
I'm not saying this is a self-congratulatory way, but just because it's kinda cool and maybe it will help others be outward-focused as well! First, if you're bored at home, why not learn photography, eh? I took my best Beginning Photography course, filmed here in New Zealand, and made it TOTALLY FREE - people seem to love it and Stu says we have over $50,000 worth of downloads already - that's awesome and I hope you all are enjoying it.
Link below...
Also, I want to send a shout out to my friends over at Monday.com for helping out with a new information-sharing initiative that's just about to get started here in NZ that should help with the COVID-19 sitch.
Besides all that stuff, I'm gonna make some more videos here in the next several days... people seem interested in these topics: 1) conspiracy theories and why you shouldn't believe them 2) my full death experiences and why I'm not afraid to die 3) what kind of evolved society will emerge after this 4) what the heck I get up to on a daily basis in solo isolation 5) ways to thrive and create in this new paradigm... and more!
I may even make some fun videos with good 'ol Gino. Hey man I have a lot of spare time and I can't play video games ALLLL day!!
store.stuckincustoms.com/collections/tutorials/products/b...
Ever wondered how to build good tudor style walls?
Check out our latest tutorial by Titus V. on brickbuilt.
In this advanced Photoshop tutorial I will show you how to create a nice floating woman in a forest. We will turn the forest from day to night effect in Photoshop and we will mask the sky using Calculations. We will create realistic depth of field using a Depth Map and we’ll paint realistic hair and light effects.
Tutorial here: www.psdbox.com/tutorials/fantasy-photoshop-tutorial-float...
Hey everyone.
Isaac and John asked me to write a small tutorial for my waterfall design to be featured on their awesome site www.brickbuilt.org/.
Check it out here!
I create this image in my new video tutorial. It's all about Giants ;)
I shot the background in Dubai and the models in the studio ;)
If you like to see more: tutorial.adriansommeling.com
TUTORIAL ♥♥
A lot of people asked me how special shaped bokehs are done. I decided to put together a tutorial and explain things in details.
This is a single shot out of the camera! Nothing was added in Photoshop.
Special thanks to Tony who helped me with the picture formatting!
#28
As promised, here is the tutorial for my littler R0-XI Droid. I'd love to see your versions of it, so feel free to tag me in your post, if you use the design.
This tutorial explains how I built the 45° roof of my Riften Watchtower, and also shows the method I used to make the plank siding underneath the roof-line.
Check it out on brickbuilt.
I'm writing a series of reroot tutorials, and just posted the first part on my blog: lovalizious.blogspot.nl/2013/12/blythe-reroot-tutorial-pa...
Let me know what you think!
Gostaria do tutorial destes box, para passar para uma amiga muito querida Lelê Ceschini, se alguém tiver, agradeço!
bjos
I was hoping to put this tutorial up a while ago, but never got the chance to complete it until now. I received a lot of requests from people who wanted to know the workflow on the Times Square image(below). It’s fairly similar to my previous tutorial (the first few stages relating to the camera setup and Photomatix processing are pretty much the same), although this one concentrates more on the post processing in Adobe Photoshop.
If anyone wants to practice with the original images, let me know and I’ll upload them. You can see my original HDR tutorial here.
* You can enlarge any of the screenshots below, by clicking on the image which will take you through to the larger image.
The tutorial can also be found over on my blog http://blog.sandmania.co.uk.
This is the second tutorial geared around the frame warping and a little more on shadowing using PS CS2. Also see below for the first tutorial on creating a OOB as well. Please let me know of any errors or if you have questions here.
Okay, so I made this tutorial a while back, and I shared it on my Facebook MOC page.
I've got the link to the rest of the tutorial below!It's relatively simple and decently sturdy. Plus, IMO it fits in pretty good with an Oriental setting. :)
Enjoy and God bless!
www.facebook.com/LEGObyNelson/photos/pcb.1083726751661965...
TUTORIAL - FIRESTORM
TURN OFF AO
1. www.flickr.com/photos/valenska/50866330231/in/pool-poseus...
2. www.flickr.com/photos/147240527@N03/51052457858/in/pool-p...
I've been tinkering with this idea for getting sort of a muted color effect that's sorta neat. It also looks pretty good on portraits. Here's what I did. LARGE
1. having the layers and channels pallet side by side (for ease of use) first command/ctrl + click on the RGB layers in the channels pallet.
2. Add a new blank layer. Hit "d" on the keyboard to get DEFAULT COLORS and then hit command/ctrl + delete/backspace (mac/windows).
3. Put that layer in "Screen" blending mode and on the keyboard do command/ctrl + d to deselect (Select > deselect).
4. Hide Layer 1 by clicking on the little eye in the layers pallet to the left of that layer's icon.
5. Click on the background layer and invert it...... command/ctrl + i
6. command/ctrl + click on the RGB layer in the Channels pallet.
7. Deselect.... command/ctrl + d
8. Invert the background layer back to positive (command/ctrl + i )
9. Click on Layer 1 and then CLICK ON THE ADD NEW LAYER BUTTON in the Layer's Pallet.
10. Reselect your last selection..... command/ctrl + shift + d
11. OK fill that layer with the foreground color, which should be black, ..... option/alt + delete/backspace
12. Put that layer in "Multiply" blending mode (using the Layers Pallet menu) and deselect (command/ctrl + d)
13. Add a hue/saturation adjustment layer and put saturation at +25 (to the right using saturation slider).
If you light this effect you can easily make and action of this by adding a new action before you do these steps and then clicking to close action in the actions pallet after you're done.
NEW VIDEO! iPhone Photography Tutorial: Lippen - Surreal Portrait #04 #video
Check link on my Instagram profile for my channel. OR here’s for direct link to video: youtu.be/Ok9e_PtsUGU
Enjoy!
#surreal #icolorama #superimpose #lensdistortions #mextures #iphoneart #mobileart #iphoneonly
•
•
•
•
•
•
•
•
•
•
•
•
#instagram #mobileartistry #shotaward #artsick #fineartphg #expofilm #enter_imagination #graphicroozane #thecreativers #manipulationteam #moodcommunity #launchdsigns #milliondollarvisuals #imaginativeuniverse
#iphoneography #iphone #photography
The latest tutorial on Brickbuilt shows how to build slanted rockwork, like I used in my Risky Endeavor creation.
Image created for a tutorial.... inspired by the amazing James White... signalnoise.com
Check the tutorial out at abduzeedo.com/really-cool-eclipse-effect-photoshop
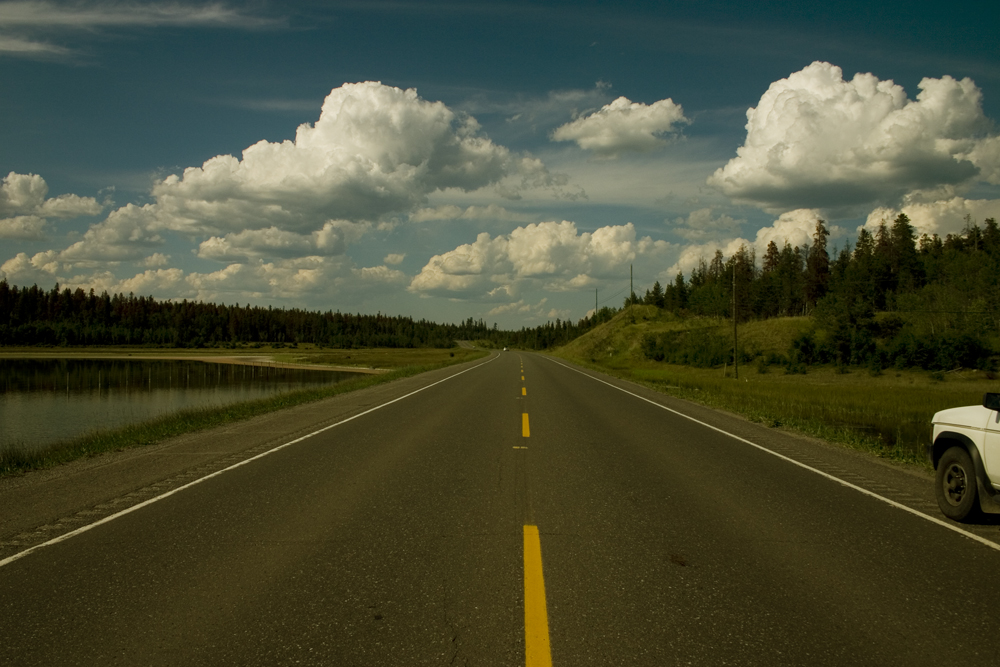
TUTORIAL on how I made this one. If you wanna try here is the orginal:
farm3.static.flickr.com/2040/1551982387_a2180917a9_o.jpg
1. I´ll work with the road and the sky on 2 images, since the settings will be
different. Go to Image - Duplicate. Name it road.jpg (you can minimize it, since we will start working on one)
2. Image - Adjustment - variations... pick more yellow, OK
3. We will first work on the sky: Create new ajustment layer, Image - Adjustment - Levels, put in the numbers 21, 1.08 , 255
4. Duplicate the layer (right click on the layer, choose duplicate)
Name it Sky01
5. With Sky01 , go to levels again, put in 41 , 0.96 , 255
6. Image - Adjustments - hue saturation. In master take hue down to +4 and cyan is -9. It doesn´t do much, just little.
7. Duplicate the layer named Background, name it sky02 and drag it on top of the other layers. Go to Image -adjustment - Levels. Put in 74 , 1.14 , 197
Then some parts of the clouds get over exposed, so choose the erase tool, have the opacity on the eraser around 70% and the brush very soft, and erase the whitest. Then the layer underneath shows. Then put the opacity on the layer down to ca 74%.
8. I want it to be smoother, so I open the program "Neat image2 ( I bought it, but I think there is a free trial at www.neatimage.com) Now save this image (you can save it as psd if you wanna keep the layers, and then another one, f.x save as tutorial_sky.jpg
9. Open the tutorial_sky.jpg and minimize it, you can close the psd file
10. Now we´ll work on the road. Maximize the road.jpg
11. Duplicate the background layer, name the new layer road
12. Go to Image -Adjustment - Levels. Put in 21 , 1.10 , 199
13. Go to Image - Adjustments - Brightness Contrast. Put in +53 in Brightness and +80 in Contrast.
14. I think the road itself is to yello, but I like the other colors. Duplicate this layer you named Road. Name it Road02
15. Go to Image - Adjustments - Hue Saturation. Choose, Yellows and take the saturation down to - 75
16. Go to Image -Adjustment - Levels. Put in 0 , 1.08 , 172
17. On layer Road02 erase everything but the road. I also erase the yellow lines, cause I like them to be strong.
18. Now I´m happy with the road so I merge the layers ( or save this one as psd and another one as jpg) And drag the road layer to the sky Image
19. I kind of like the color of the yellow lines on the sky layer, so I´m gonna duplicate the layer Sky and erase everything but the yellow lines, the I put around 50 % opacity.
20 Flatten Image
21. Then there are cars on the road, I use clone stamp to remove them.
22. At last, crop it as you like. By holding in Shift while dragging the retangular marquee you get the perfect square ( you can also put 1 in width and height in fixed ratio. I can´t deside on the scuare or just cutting out the car. I like the square more, but I don´t like to cut out the clouds and the lake.
Now we are done, I could tweek on, but let´s say this done for now : )
If you have ever struggled with making a round roof, you'll definitely want to check out this tutorial by Cozei on brickbuilt.
Full color photo tutorial over on Moda Bake Shop:: www.modabakeshop.com/2011/02/sunkissed-squares.html
Picture II
For those who did not see the first picture...
This is going to be my first visual tutorial about consciousness and awareness.
It is very easy because the pictures will speak for themselves.
Without words you will understand, what it all means.
Maybe you discover something very important for yourself... :-)))
If you like, ask yourself what you see and how you see.
Next picture tomorrow.
HKD